
Authentication is one of the most important features in modern web applications. Whether you're building an admin dashboard, an e-commerce platform, or a Software-as-a-Service (SaaS) application, you need a secure way to verify users and protect sensitive pages from unauthorized access.
One of the most popular authentication methods is JSON Web Token (JWT). A JWT-based authentication system allows the server to issue signed tokens after a successful login. The client then includes these tokens in subsequent requests, enabling the server to verify the user's identity without maintaining a server-side session.
Nuxt 4 provides an excellent foundation for implementing JWT authentication. With built-in support for server-side rendering (SSR), route middleware, composables, runtime configuration, and server APIs, Nuxt makes it straightforward to build a secure authentication flow that works for both client-side and server-side navigation.
In this tutorial, you'll build a complete JWT authentication system for a Nuxt 4 application. Instead of relying on third-party authentication libraries, you'll implement the authentication flow yourself to better understand how each component works.
By the end of this guide, you'll know how to:
- Create a login page that authenticates users with a backend API.
- Store JWT access and refresh tokens securely.
- Build reusable route middleware to protect authenticated pages.
- Redirect unauthenticated users to the login page.
- Prevent authenticated users from accessing guest-only pages such as Login or Register.
- Automatically refresh expired access tokens.
- Implement a secure logout process.
- Apply security best practices for production deployments.
To keep the tutorial focused on Nuxt 4, we'll assume you already have a backend API capable of issuing JWT access and refresh tokens. The backend can be built with any framework, such as Spring Boot, Express.js, NestJS, Laravel, ASP.NET Core, or another technology that follows a standard JWT authentication flow.
What You'll Build
Throughout this tutorial, you'll create a simple application consisting of:
- A login page for user authentication.
- A protected dashboard accessible only to authenticated users.
- Route middleware that guards private pages.
- Guest middleware that redirects logged-in users away from authentication pages.
- Automatic token validation and refresh.
- A logout mechanism that clears authentication data securely.
The finished project will follow authentication practices commonly used in production applications while taking advantage of Nuxt 4's modern architecture.
In the next section, we'll briefly review how JWT authentication works and see where route middleware fits into the authentication process before we start writing code.
How JWT Authentication Works
Before writing any code, it's important to understand how JWT authentication works and how Nuxt 4 route middleware helps protect your application.
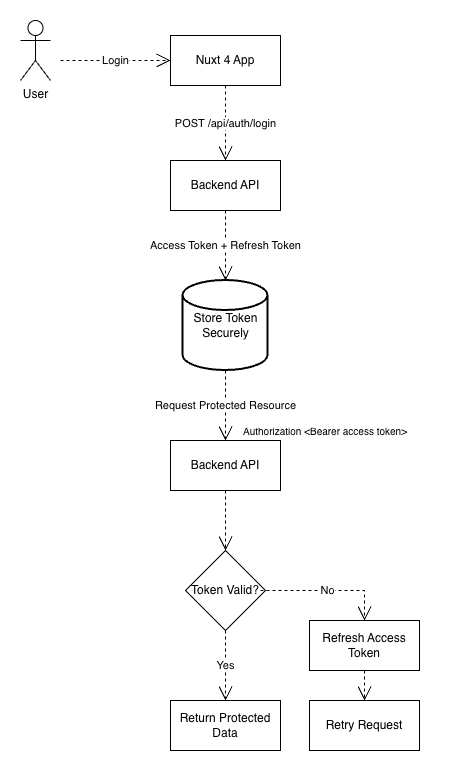
Unlike traditional session-based authentication, where the server stores user sessions, JWT authentication is stateless. After a successful login, the server generates signed tokens and sends them to the client. The client includes these tokens with future requests so the server can verify the user's identity.
A typical authentication flow looks like this:
- The user enters their email and password on the login page.
- The Nuxt application sends the credentials to the backend API.
- The backend validates the credentials.
- If the login is successful, the backend returns:
- An access token with a short expiration time.
- A refresh token with a longer expiration time.
- The Nuxt application stores the tokens securely.
- Every protected API request includes the access token in the
Authorizationheader. - The backend verifies the token before returning protected data.
- When the access token expires, the application uses the refresh token to request a new access token without requiring the user to log in again.
Access Token vs Refresh Token
Although both are JWTs, they serve different purposes.
| Access Token | Refresh Token |
|---|---|
| Short lifetime (typically 5–30 minutes) | Longer lifetime (days or weeks) |
| Sent with every protected API request | Used only to obtain a new access token |
| If compromised, the exposure window is limited | Must be protected carefully because it can generate new access tokens |
| Stored securely and replaced frequently | Usually stored as a secure, HttpOnly cookie |
Using both token types provides a balance between security and user experience. Even if an access token expires while the user is actively using the application, they can continue working without being interrupted by another login prompt.
Where Route Middleware Fits
Nuxt 4 route middleware acts as a gatekeeper before a page is rendered.
Whenever a user navigates to a route, middleware runs first and determines whether access should be allowed or denied.
For example:
- If the user visits
/dashboardwithout being authenticated, the middleware redirects them to/login. - If the user is already authenticated and visits
/login, middleware redirects them to/dashboard. - If the access token has expired but the refresh token is still valid, middleware can trigger a token refresh before allowing navigation.
This ensures users only access pages appropriate for their authentication status.
Authentication Flow
The overall authentication process can be summarized as follows:
Why Middleware Is Better Than Page-Level Checks
You could check authentication inside every page component, but that quickly becomes repetitive and difficult to maintain. Route middleware offers several advantages:
- Centralizes authentication logic in one place.
- Prevents unauthorized pages from rendering.
- Works consistently with both client-side navigation and server-side rendering.
- Makes your page components cleaner and easier to maintain.
- Simplifies adding role-based authorization later.
For these reasons, route middleware is the recommended way to protect pages in Nuxt 4.
Now that you understand the authentication flow and the role of middleware, it's time to create a new Nuxt 4 project and prepare it for implementing JWT authentication.
Prerequisites and Project Setup
In this section, you'll create a new Nuxt 4 project and install the dependencies required for implementing JWT authentication. We'll also configure the project structure that we'll build on throughout this tutorial.
Prerequisites
Before you begin, make sure you have the following installed on your development machine:
- Node.js 20.x or later (LTS recommended)
- npm, pnpm, yarn, or bun
- A code editor such as Visual Studio Code
- A backend API that supports JWT authentication (login, refresh token, logout, and protected endpoints)
For this tutorial, we'll assume the backend exposes the following REST API endpoints:
| Endpoint | Method | Description |
/api/auth/login |
POST | Authenticate a user and return JWT tokens |
/api/auth/refresh |
POST | Generate a new access token using a refresh token |
/api/auth/logout |
POST | Invalidate the refresh token and log the user out |
/api/user/profile |
GET | Return the authenticated user's profile |
The exact endpoint names may differ depending on your backend implementation. As long as your API follows a standard JWT authentication flow, you can easily adapt the code in this tutorial.
Create a New Nuxt 4 Project
Run the following command to create a new Nuxt project:
npx nuxi@latest init nuxt-jwt-authNavigate to the project directory:
cd nuxt-jwt-authInstall the project dependencies:
npm installStart the development server:
npm run devOpen your browser and navigate to:
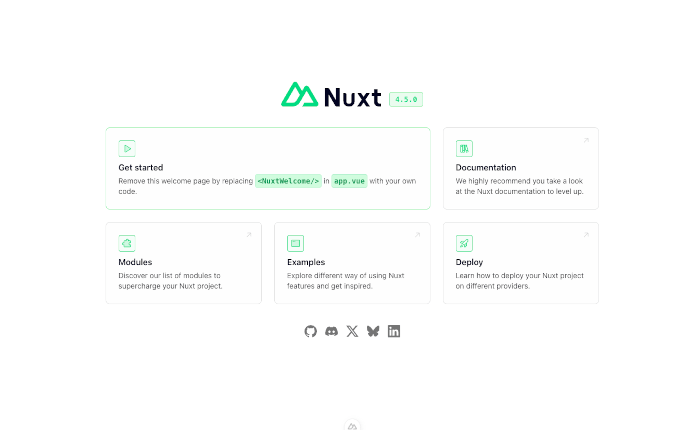
http://localhost:3000You should see the default Nuxt welcome page, confirming that the project has been created successfully.
Install Required Packages
Next, install Pinia, which we'll use for centralized authentication state management.
npm install @pinia/nuxtAlthough Nuxt provides powerful composables such as useState(), Pinia is a better fit for authentication because it offers:
- A centralized authentication store.
- Reactive state shared across components.
- Well-organized actions for login, logout, and token refresh.
- Excellent TypeScript support.
- Easy debugging with Vue DevTools.
Configure Pinia
Open nuxt.config.ts and register the Pinia module:
export default defineNuxtConfig({ modules: [ '@pinia/nuxt' ] })No additional configuration is required.
Create the Project Structure
To keep the application organized, create the following directories:
├── middleware/
│   ├── auth.ts
│   └── guest.ts
├── pages/
│   ├── login.vue
│   └── dashboard.vue
├── stores/
│   └── auth.ts
├── composables/
│   └── useApi.ts
├── plugins/
│   └── auth.client.ts
└── types/
    └── auth.ts
Each directory has a specific responsibility:
- middleware/ contains route guards for authenticated and guest-only pages.
- pages/ contains the application's public and protected pages.
- stores/ manages authentication state using Pinia.
- composables/ provides reusable API helper functions.
- plugins/ initializes authentication when the application starts.
- types/ contains TypeScript interfaces for API responses and user data.
Organizing the project this way keeps authentication logic separate from page components, making the application easier to maintain as it grows.
Configure Runtime Environment Variables
Create a .env file in the project root:
NUXT_PUBLIC_API_BASE=http://localhost:8080/apiNow expose this variable through nuxt.config.ts:
// https://nuxt.com/docs/api/configuration/nuxt-config
export default defineNuxtConfig({
  compatibilityDate: "2025-07-15",
  devtools: { enabled: true },
  modules: ["@pinia/nuxt"],
  runtimeConfig: { public: { apiBase: process.env.NUXT_PUBLIC_API_BASE } },
});
You can access this value anywhere in your application using:
const config = useRuntimeConfig()

const apiBase = config.public.apiBase
Using runtime configuration instead of hardcoding URLs makes it easy to switch between development, staging, and production environments.
At this point, the project is ready. In the next section, you'll define the authentication data models and create a reusable API composable that communicates with the backend authentication service.
Defining Authentication Types and Creating an API Composable
Before implementing login and route protection, let's create the TypeScript types and a reusable API composable. This approach keeps the code organized, improves type safety, and avoids duplicating API request logic throughout the application.
Define Authentication Types
Create a new file named types/auth.ts.
export interface LoginRequest {
    email: string
    password: string
}
export interface AuthTokens {
    accessToken: string
    refreshToken: string
    expiresIn: number
}
export interface User {
    id: number
    name: string
    email: string
}
export interface LoginResponse {
    user: User
    tokens: AuthTokens
}
These interfaces represent the request and response objects we'll exchange with the backend API.
LoginRequestcontains the user's login credentials.AuthTokensstores the JWT access and refresh tokens returned by the server.Userrepresents the authenticated user's profile.LoginResponsecombines the authenticated user and issued tokens into a single response.
If your backend returns additional fields, simply extend these interfaces accordingly.
Create a Reusable API Composable
Instead of repeating the API base URL and request configuration throughout the application, create a composable named composables/useApi.ts.
export const useApi = () => {
    const config = useRuntimeConfig()

    const api = $fetch.create({
        baseURL: config.public.apiBase,

        onRequest({ options }) {
            const accessToken = useCookie<string | null>('access_token')

            if (accessToken.value) {
                options.headers = {
                    ...options.headers,
                    Authorization: `Bearer ${accessToken.value}`
                }
            }
        }, onResponseError({ response }) {
            console.error(`API Error ${response.status}:`, response._data)
        }
    })

    return api
}
This composable creates a customized $fetch instance with two important features:
- It automatically prefixes every request with the configured API base URL.
- It adds the JWT access token to the
Authorizationheader whenever the user is authenticated.
With this setup, any component or store can simply call:
const api = useApi()and make authenticated requests without manually attaching headers.
Making API Requests
Here's a simple example of requesting the authenticated user's profile:
const api = useApi()

const profile = await api('/user/profile')
Because the access token is added automatically, the request remains clean and easy to read.
Why Use $fetch.create()?
Nuxt's built-in $fetch is already an excellent HTTP client. Using $fetch.create() allows you to define common behavior once and reuse it everywhere.
Some of the advantages include:
- Centralized API configuration.
- Automatic authorization headers.
- Shared error handling.
- Cleaner page and store code.
- Easier maintenance if your API changes.
As your application grows, you can enhance this composable to support features such as automatic token refresh, request retries, logging, or custom headers.
About Token Storage
In this example, the access token is read from a Nuxt cookie using useCookie().
const accessToken = useCookie<string | null>('access_token')Using cookies works well with both client-side navigation and server-side rendering because Nuxt automatically makes cookies available in either environment.
For production applications, consider the following recommendations:
- Store the refresh token in a Secure, HttpOnly cookie created by the backend. This prevents JavaScript from accessing it and helps mitigate XSS attacks.
- Keep the access token short-lived (typically 5–15 minutes).
- Always serve your application over HTTPS.
- Implement token rotation or refresh token invalidation when appropriate.
In this tutorial, we'll focus on the Nuxt implementation while assuming the backend follows these security best practices.
Now that the API layer is in place, we're ready to build the authentication store with Pinia, where we'll implement login, logout, user state management, and token refresh logic.
Building the Authentication Store with Pinia
Now that the API composable is ready, it's time to create the authentication store. This store will serve as the central place for managing the user's authentication state, including login, logout, token storage, and user information.
Using a dedicated Pinia store keeps authentication logic separate from page components, making it easier to maintain and reuse throughout the application.
Create the Authentication Store
Create a new file named stores/auth.ts.
import type {
    LoginRequest,
    LoginResponse,
    User
} from '~/types/auth'

export const useAuthStore = defineStore('auth', () => {
    const api = useApi()

    const user = ref<User | null>(null)

    const accessToken = useCookie<string | null>('access_token')
    const refreshToken = useCookie<string | null>('refresh_token')

    const isAuthenticated = computed(() => !!accessToken.value)

    async function login(credentials: LoginRequest) {
        const response = await api<LoginResponse>('/auth/login', {
            method: 'POST',
            body: credentials
        })

        user.value = response.user

        accessToken.value = response.tokens.accessToken
        refreshToken.value = response.tokens.refreshToken
    }

    function logout() {
        user.value = null

        accessToken.value = null
        refreshToken.value = null

        return navigateTo('/login')
    }

    return {
        user,
        accessToken,
        refreshToken,
        isAuthenticated,
        login,
        logout
    }
})
This store exposes everything needed by the rest of the application:
-
userstores the authenticated user's profile. -
accessTokenstores the JWT access token. -
refreshTokenstores the refresh token. -
isAuthenticatedindicates whether the user is currently logged in. -
login()authenticates the user and stores the returned tokens. -
logout()clears authentication data and redirects to the login page.
Understanding the Login Action
The login() action sends the user's credentials to the backend.
await api<LoginResponse>('/auth/login', {
  method: 'POST',
  body: credentials
})
If authentication succeeds, the backend returns:
-
User information
-
Access token
-
Refresh token
The store then updates its state and saves both tokens in cookies.
user.value = response.user

accessToken.value = response.tokens.accessToken
refreshToken.value = response.tokens.refreshToken
Because these values are reactive, every component using the store is automatically updated.
Authentication State
The store exposes a computed property:
const isAuthenticated = computed(() => !!accessToken.value)
Instead of checking whether the user object exists, the application checks whether a valid access token is present.
For example:
const auth = useAuthStore()

if (auth.isAuthenticated) {
  console.log('User is logged in.')
}
This property will also be used by route middleware in the next section.
Improving the Logout Action
Our current logout implementation simply clears local authentication data.
function logout() {
  user.value = null

  accessToken.value = null
  refreshToken.value = null

  return navigateTo('/login')
}
In a production application, you should also notify the backend so it can invalidate the refresh token.
For example:
async function logout() {
  try {
    await api('/auth/logout', {
      method: 'POST'
    })
  } catch (error) {
    console.error(error)
  }

  user.value = null

  accessToken.value = null
  refreshToken.value = null

  return navigateTo('/login')
}
Even if the API request fails, the local authentication state is still cleared to ensure the user is logged out from the client.
Restoring the User Session
If the user refreshes the browser, the Pinia store is recreated, so the user object is initially empty even though the authentication cookies still exist.
To restore the session, add a method that retrieves the authenticated user's profile from the backend.
async function fetchUser() {
  if (!accessToken.value) {
    return
  }

  try {
    user.value = await api<User>('/user/profile')
  } catch (error) {
    logout()
  }
}
Expose this method from the store:
return {
  user,
  accessToken,
  refreshToken,
  isAuthenticated,
  login,
  logout,
  fetchUser
}
We'll call fetchUser() automatically when the application starts in a later section so that users remain signed in after refreshing the page.
Store Responsibilities
At this point, the authentication store is responsible for:
-
Managing authentication state.
-
Storing the authenticated user's profile.
-
Saving access and refresh tokens.
-
Logging users in.
-
Logging users out.
-
Restoring the current user's session.
This separation of concerns makes page components much simpler—they only need to call the store's actions instead of handling authentication logic directly.
In the next section, you'll build the login page and connect it to the authentication store so users can sign in to the application.
Creating the Login Page
With the authentication store in place, you can now build the login page that allows users to authenticate with your backend API.
The page will:
-
Collect the user's email and password.
-
Validate the form before submitting.
-
Call the Pinia authentication store.
-
Display an error message if login fails.
-
Redirect authenticated users to the dashboard.
Create the Login Page
Create a new file named pages/login.vue.
<script setup lang="ts">
import { ref } from 'vue'
import { useAuthStore } from '~/stores/auth'

definePageMeta({
  middleware: 'guest'
})

const auth = useAuthStore()

const email = ref('')
const password = ref('')

const loading = ref(false)
const error = ref('')

const login = async () => {
  error.value = ''
  loading.value = true

  try {
    await auth.login({
      email: email.value,
      password: password.value
    })

    await navigateTo('/dashboard')
  } catch (err: any) {
    error.value =
      err?.data?.message ??
      'Invalid email or password.'

    console.error(err)
  } finally {
    loading.value = false
  }
}
</script>

<template>
  <div class="login-container">
    <h1>Sign In</h1>

    <form @submit.prevent="login">
      <div class="form-group">
        <label>Email</label>

        <input
          v-model="email"
          type="email"
          required
        >
      </div>

      <div class="form-group">
        <label>Password</label>

        <input
          v-model="password"
          type="password"
          required
        >
      </div>

      <p
        v-if="error"
        class="error"
      >
        {{ error }}
      </p>

      <button
        type="submit"
        :disabled="loading"
      >
        {{ loading ? 'Signing In...' : 'Sign In' }}
      </button>
    </form>
  </div>
</template>
This page uses the guest middleware, which means authenticated users will automatically be redirected away from the login page. You'll implement this middleware in the next section.
How the Login Process Works
When the user submits the form, the following code executes:
await auth.login({
  email: email.value,
  password: password.value
})
The login() action in the Pinia store:
-
Sends the credentials to the backend.
-
Receives the authenticated user's information.
-
Stores the access and refresh tokens.
-
Updates the authentication state.
If the login succeeds, the user is redirected to the dashboard.
await navigateTo('/dashboard')
Handling Login Errors
Authentication may fail for several reasons, such as:
-
Invalid email or password.
-
Disabled user account.
-
Expired account.
-
Backend server unavailable.
The login page catches these errors and displays a friendly message.
catch (err: any) {
  error.value =
    err?.data?.message ??
    'Invalid email or password.'
}
If your backend returns structured validation errors, you can display them directly to provide more specific feedback.
Basic Form Validation
HTML validation using the required attribute provides a good starting point, but you should also perform client-side validation before submitting the form.
For example:
if (!email.value.trim()) {
  error.value = 'Email is required.'
  return
}

if (!password.value) {
  error.value = 'Password is required.'
  return
}
For larger applications, consider using a validation library such as VeeValidate or Regle to handle more advanced validation rules and error messages.
Improving the User Experience
A few small enhancements can significantly improve usability:
-
Disable the submit button while the login request is in progress.
-
Display a loading indicator during authentication.
-
Automatically focus the email field when the page loads.
-
Clear previous error messages before each login attempt.
-
Submit the form when the user presses Enter.
These improvements make the authentication flow feel more responsive and polished.
Styling the Login Page
The example above focuses on functionality rather than appearance. You can style the page using your preferred CSS framework, including:
-
Tailwind CSS
-
UnoCSS
-
Bootstrap
-
Vuetify
-
PrimeVue
-
Plain CSS or SCSS
Regardless of the styling solution, the authentication logic remains the same.
Testing the Login Flow
Before moving on, verify that the login page behaves as expected:
-
Open
/login. -
Enter valid credentials.
-
Confirm that the backend returns the JWT tokens.
-
Verify that the authentication cookies are created.
-
Ensure you are redirected to
/dashboard. -
Test with invalid credentials and confirm that an error message is displayed.
At this stage, users can successfully sign in, but every page is still publicly accessible. In the next section, you'll create Nuxt route middleware to protect private pages and redirect users based on their authentication status.
Protecting Routes with Nuxt Middleware
The login page is now functional, but users can still access protected pages by typing their URLs directly into the browser. To prevent unauthorized access, you'll use Nuxt route middleware.
Route middleware runs before a page is rendered. It can allow navigation, redirect the user to another page, or cancel navigation entirely. This makes it the ideal place to enforce authentication rules.
In this section, you'll create two middleware files:
-
auth.tsto protect pages that require authentication. -
guest.tsto prevent authenticated users from accessing pages such as Login or Register.
Create the Authentication Middleware
Create a new file named middleware/auth.ts.
export default defineNuxtRouteMiddleware(() => {
  const auth = useAuthStore()

  if (!auth.isAuthenticated) {
    return navigateTo('/login')
  }
})
This middleware checks whether the user is authenticated. If not, they're redirected to the login page.
Apply the Middleware to a Protected Page
Create a simple dashboard page.
<script setup lang="ts">
const auth = useAuthStore()

definePageMeta({
  middleware: 'auth'
})
</script>

<template>
  <div>
    <h1>Dashboard</h1>

    <p>Welcome, {{ auth.user?.name }}</p>

    <button @click="auth.logout()">
      Logout
    </button>
  </div>
</template>
Because this page uses the auth middleware, unauthenticated users can no longer access it.
Create the Guest Middleware
Next, create middleware/guest.ts.
export default defineNuxtRouteMiddleware(() => {
  const auth = useAuthStore()

  if (auth.isAuthenticated) {
    return navigateTo('/dashboard')
  }
})
Pages such as:
-
Login
-
Register
-
Forgot Password
-
Reset Password
should generally be accessible only to guests. This middleware ensures authenticated users are redirected to the dashboard instead of seeing those pages.
Apply Guest Middleware
The login page already includes:
definePageMeta({
  middleware: 'guest'
})
This means:
-
Guests can access
/login. -
Authenticated users are automatically redirected to
/dashboard.
Preserving the Intended Destination
Suppose an unauthenticated user tries to visit:
/dashboard/settings
The current middleware redirects them to:
/login
After logging in, the user is always sent to /dashboard, even though they originally wanted to visit /dashboard/settings.
A better user experience is to remember the original destination.
Update middleware/auth.ts:
export default defineNuxtRouteMiddleware((to) => {
  const auth = useAuthStore()

  if (!auth.isAuthenticated) {
    return navigateTo({
      path: '/login',
      query: {
        redirect: to.fullPath
      }
    })
  }
})
Now the requested URL is included as a query parameter.
For example:
/login?redirect=/dashboard/settings
Redirect After Login
Modify the login page to honor the redirect parameter.
const route = useRoute()

await auth.login({
  email: email.value,
  password: password.value
})

const redirect =
  (route.query.redirect as string) ??
  '/dashboard'

await navigateTo(redirect)
This allows users to continue exactly where they intended to go after authenticating.
Middleware Execution in SSR
One of the advantages of Nuxt middleware is that it works in both server-side rendering (SSR) and client-side navigation.
When a user requests a protected page directly:
-
The middleware executes on the server.
-
Unauthorized users are redirected before the page is rendered.
-
Protected content is never sent to the browser.
When navigating between pages within the application:
-
The middleware executes in the browser.
-
Navigation occurs without a full page reload.
This consistent behavior makes middleware a reliable way to protect your application regardless of how users navigate.
Current Limitation
Our middleware currently checks only whether an access token exists.
if (!auth.isAuthenticated) {
  return navigateTo('/login')
}
This is sufficient for a basic implementation, but it doesn't account for expired access tokens. If the token has expired, the user would still appear authenticated until an API request fails.
A more robust solution is to automatically refresh the access token before redirecting the user to the login page.
In the next section, you'll implement automatic token refresh using the refresh token, allowing authenticated users to stay signed in seamlessly while maintaining strong security.
Implementing Automatic Token Refresh
At this point, the application can authenticate users and protect private routes. However, there's still one important issue to address.
Access tokens should have a short lifetime—typically between 5 and 15 minutes. Once an access token expires, every authenticated API request will fail with an HTTP 401 Unauthorized response.
Requiring users to log in again every few minutes would create a poor user experience. Instead, we'll use the refresh token to automatically obtain a new access token whenever the current one expires.
The flow looks like this:
-
The user logs in successfully.
-
The backend issues an access token and a refresh token.
-
The access token eventually expires.
-
The next API request receives a 401 Unauthorized response.
-
The application sends the refresh token to the backend.
-
The backend validates the refresh token and issues a new access token.
-
The original API request is retried automatically.
-
If the refresh token is invalid or expired, the user is logged out and redirected to the login page.
This process happens in the background, so users can continue working without interruption.
Add a Refresh Token Action
Open stores/auth.ts and add a new action.
async function refreshAccessToken() {
  if (!refreshToken.value) {
    throw new Error('Refresh token not found.')
  }

  const response = await api<{
    accessToken: string
  }>('/auth/refresh', {
    method: 'POST',
    body: {
      refreshToken: refreshToken.value
    }
  })

  accessToken.value = response.accessToken
}
Finally, expose the action from the store.
return {
  user,
  accessToken,
  refreshToken,
  isAuthenticated,
  login,
  logout,
  fetchUser,
  refreshAccessToken
}
Now the store knows how to request a new access token whenever it's needed.
Update the API Composable
Next, enhance the API composable so it automatically refreshes expired tokens.
Open composables/useApi.ts.
export const useApi = () => {
  const config = useRuntimeConfig()
  const auth = useAuthStore()

  const api = $fetch.create({
    baseURL: config.public.apiBase,

    onRequest({ options }) {
      const token = auth.accessToken

      if (token) {
        options.headers = {
          ...options.headers,
          Authorization: `Bearer ${token}`
        }
      }
    },

    async onResponseError(ctx) {
      const { response, request, options } = ctx

      if (
        response.status !== 401 ||
        request === '/auth/refresh'
      ) {
        throw response
      }

      try {
        await auth.refreshAccessToken()

        return await $fetch(request, {
          baseURL: config.public.apiBase,
          ...options,
          headers: {
            ...options.headers,
            Authorization:
              `Bearer ${auth.accessToken}`
          }
        })
      } catch (error) {
        auth.logout()
        throw error
      }
    }
  })

  return api
}
The updated composable now handles expired access tokens automatically.
Whenever an API request returns 401 Unauthorized, it:
-
Requests a new access token.
-
Stores the updated token.
-
Retries the original request.
-
Logs the user out if the refresh fails.
This means your page components don't need to worry about expired tokens.
Prevent Multiple Refresh Requests
One potential issue is that several API requests might fail simultaneously if the access token expires. Without additional logic, each request would attempt to refresh the token independently.
A simple solution is to share the same refresh request.
let refreshPromise: Promise<void> | null = null

async function refreshToken() {
  if (!refreshPromise) {
    refreshPromise = auth
      .refreshAccessToken()
      .finally(() => {
        refreshPromise = null
      })
  }

  return refreshPromise
}
Then replace:
await auth.refreshAccessToken()
with:
await refreshToken()
Now, regardless of how many requests receive a 401 response at the same time, only one refresh request is sent to the backend. The remaining requests simply wait for it to complete.
Refresh Tokens and HttpOnly Cookies
In this tutorial, the refresh token is stored using a Nuxt cookie for simplicity.
In a production environment, a more secure approach is for the backend to store the refresh token in a Secure, HttpOnly cookie.
With this approach:
-
JavaScript cannot read or modify the refresh token.
-
The browser automatically sends the cookie with refresh requests.
-
XSS attacks are less likely to expose long-lived credentials.
-
The client only needs to manage the short-lived access token.
Many modern authentication systems adopt this pattern because it offers a better balance between security and usability.
Token Refresh Flow
The complete refresh process can be summarized as follows:
Client Request
      |
      v
Access Token Valid?
      |
  +---+---+
  |       |
 Yes      No
  |       |
  |   POST /auth/refresh
  |       |
  |   Refresh Token Valid?
  |       |
  |   +---+---+
  |   |       |
  |  Yes      No
  |   |       |
  | New Access |
  |   Token    |
  |       |    |
  +-------+    |
      |         |
 Retry Request  |
      |         |
      +---------+
                |
          Logout User
With automatic token refresh implemented, your application now provides a much smoother authentication experience. Users remain signed in while actively using the application, and expired access tokens are handled transparently.
In the next section, you'll initialize authentication when the application starts so users remain logged in even after refreshing the browser or reopening an existing session.
Restoring Authentication on Application Startup
So far, users can log in, access protected pages, and automatically refresh expired access tokens. However, there's still one usability issue.
If the user refreshes the browser or opens the application in a new tab, the Pinia store is recreated. While the authentication cookies are still available, the user object in the store is reset to null.
This means the application doesn't know who the authenticated user is until it requests the user's profile from the backend.
To provide a seamless experience, we'll restore the user's session when the application starts.
Create an Authentication Plugin
Nuxt plugins are an ideal place to initialize application-wide functionality before pages are rendered.
Create a new file named plugins/auth.client.ts.
export default defineNuxtPlugin(async () => {
  const auth = useAuthStore()

  if (!auth.isAuthenticated) {
    return
  }

  try {
    await auth.fetchUser()
  } catch (error) {
    console.error(error)
  }
})
This plugin runs when the application starts in the browser.
If an access token is available, it retrieves the authenticated user's profile and updates the authentication store.
How Session Restoration Works
The startup process now follows this sequence:
-
Nuxt initializes the application.
-
The authentication plugin executes.
-
The plugin checks for an access token.
-
If a token exists, it requests the current user's profile.
-
The Pinia store is updated with the returned user information.
-
The application renders with the authenticated user's data available.
As a result, refreshing the page no longer logs the user out.
Improve the fetchUser() Action
Earlier, you added a simple fetchUser() method to the authentication store. Let's make it a little more robust.
Update the method in stores/auth.ts.
async function fetchUser() {
  if (!accessToken.value) {
    return
  }

  try {
    user.value = await api<User>('/user/profile')
  } catch (error) {
    user.value = null

    accessToken.value = null
    refreshToken.value = null

    throw error
  }
}
If retrieving the user's profile fails because the token is invalid or expired, the store clears the authentication state.
This prevents the application from remaining in an inconsistent state where an invalid token still exists.
Showing a Loading State
Fetching the user's profile takes a small amount of time. During this period, the application may briefly display guest content before the authenticated state is restored.
To avoid this visual flicker, add an initialization flag to the authentication store.
const initialized = ref(false)
Update fetchUser() to set this flag after initialization.
async function fetchUser() {
  try {
    if (accessToken.value) {
      user.value = await api<User>('/user/profile')
    }
  } finally {
    initialized.value = true
  }
}
Don't forget to expose it from the store.
return {
  user,
  accessToken,
  refreshToken,
  initialized,
  isAuthenticated,
  login,
  logout,
  fetchUser,
  refreshAccessToken
}
Now the application can determine whether authentication initialization has completed.
Wait for Initialization
You can use the initialized flag in your root layout or app.vue to display a loading indicator until authentication has been restored.
For example:
<script setup lang="ts">
const auth = useAuthStore()
</script>

<template>
  <div v-if="!auth.initialized">
    Loading...
  </div>

  <NuxtPage v-else />
</template>
This ensures that protected pages are rendered only after the authentication state has been determined.
Supporting Server-Side Rendering
The previous plugin uses the .client.ts suffix, so it runs only in the browser.
For applications that rely heavily on server-side rendering, you may also want to restore authentication during SSR. This allows protected pages to render with the authenticated user's information on the first request, improving both user experience and SEO for authenticated content.
A common approach is to:
-
Store the refresh token in a Secure, HttpOnly cookie.
-
Read the cookie during server-side rendering.
-
Validate or refresh the access token on the server.
-
Populate the authentication state before rendering the page.
This requires coordination between your Nuxt application and backend API but results in a smoother SSR experience.
Testing Session Restoration
Before continuing, verify that session restoration works correctly:
-
Log in to the application.
-
Navigate to the dashboard.
-
Refresh the browser.
-
Confirm that you remain authenticated.
-
Open the application in a new browser tab.
-
Verify that your profile is loaded automatically.
-
Remove the authentication cookies and refresh again.
-
Confirm that you're redirected to the login page.
At this stage, your authentication system is capable of restoring user sessions automatically while keeping the authentication state synchronized with the backend.
In the next section, you'll explore additional security best practices for deploying a JWT-based authentication system in production, including secure cookie settings, HTTPS, CSRF protection, and token lifecycle management.
Security Best Practices for Production
The authentication system you've built is fully functional, but before deploying it to production, there are several security practices you should follow. JWT authentication is only as secure as its implementation, so careful handling of tokens and API communication is essential.
This section covers the most important recommendations for protecting your Nuxt 4 application and its users.
Always Use HTTPS
Never transmit JWTs over an unencrypted HTTP connection.
HTTPS encrypts all communication between the browser and your backend, preventing attackers from intercepting credentials or authentication tokens.
In production:
-
Redirect all HTTP traffic to HTTPS.
-
Use a valid TLS certificate.
-
Enable HTTP Strict Transport Security (HSTS).
Most cloud providers and reverse proxies such as Nginx, Apache, and Caddy make HTTPS configuration straightforward.
Store Refresh Tokens in HttpOnly Cookies
Throughout this tutorial, the refresh token was stored using useCookie() to keep the implementation simple.
For production systems, a more secure approach is:
-
Store the access token in memory or a short-lived cookie.
-
Store the refresh token in a Secure, HttpOnly cookie created by the backend.
Benefits include:
-
JavaScript cannot access the refresh token.
-
XSS attacks are less likely to expose long-lived credentials.
-
The browser automatically sends the cookie with refresh requests.
A typical authentication flow becomes:
Browser
   |
   | Login
   |
   v
Backend
   |
   | Access Token
   | Refresh Token (HttpOnly Cookie)
   |
   v
Browser
When the access token expires, the browser automatically includes the HttpOnly refresh token cookie in the refresh request.
Keep Access Tokens Short-Lived
Access tokens should expire quickly.
Recommended expiration times:
| Token | Recommended Lifetime |
|---|---|
| Access Token | 5–15 minutes |
| Refresh Token | 7–30 days |
A short-lived access token minimizes the impact if it is compromised.
Rotate Refresh Tokens
Instead of issuing the same refresh token repeatedly, consider implementing refresh token rotation.
With rotation:
-
The client sends the current refresh token.
-
The backend validates it.
-
A new refresh token is generated.
-
The old refresh token is invalidated.
-
The new refresh token is returned to the client.
This significantly reduces the risk of replay attacks if a refresh token is stolen.
Validate JWTs Properly
Your backend should verify every JWT before accepting it.
Important validation checks include:
-
Signature verification
-
Expiration time (
exp) -
Issued-at time (
iat) -
Issuer (
iss) -
Audience (
aud) -
Token algorithm
-
User status (active, disabled, locked, etc.)
Never trust a JWT simply because it appears to contain valid user information.
Protect Against XSS
Cross-Site Scripting (XSS) remains one of the most common web application vulnerabilities.
Reduce your risk by:
-
Escaping user-generated content.
-
Avoiding
v-htmlunless absolutely necessary. -
Sanitizing HTML before rendering it.
-
Using a strong Content Security Policy (CSP).
-
Keeping third-party dependencies up to date.
If attackers can execute JavaScript in your application, they may be able to access tokens stored in browser-accessible storage.
Protect Against CSRF
When using HttpOnly cookies, your backend should also implement protection against Cross-Site Request Forgery (CSRF).
Common approaches include:
-
Synchronizing CSRF tokens.
-
Double-submit cookies.
-
Validating the
OriginorRefererheader for sensitive requests. -
Setting cookies with an appropriate
SameSiteattribute (LaxorStrictwhere possible).
These measures help ensure that authenticated requests originate from your own application.
Secure Cookie Configuration
Refresh token cookies should include appropriate security attributes.
Example:
Set-Cookie:
refresh_token=...
HttpOnly
Secure
SameSite=Lax
Path=/
Max-Age=2592000
These attributes provide additional protection:
-
HttpOnly prevents JavaScript access.
-
Secure ensures the cookie is sent only over HTTPS.
-
SameSite helps reduce CSRF attacks.
-
Max-Age controls the cookie's lifetime.
Implement Logout Correctly
Logging out should do more than clear local state.
Your backend should also:
-
Invalidate the refresh token.
-
Remove it from the database or token store.
-
Record the logout event if auditing is required.
The client should then:
-
Clear the access token.
-
Remove any cached user data.
-
Redirect the user to the login page.
Consider Role-Based Authorization
Authentication determines who a user is.
Authorization determines what they are allowed to do.
Instead of checking only whether a user is authenticated, you can extend your middleware to verify user roles or permissions.
For example:
definePageMeta({
  middleware: ['auth', 'admin']
})
An admin middleware could verify that the authenticated user has the required role before allowing access to administrative pages.
This approach scales well as your application grows and different user roles are introduced.
Security Checklist
Before deploying your application, verify that you have implemented the following:
-
✅ Enforce HTTPS for all requests.
-
✅ Use Secure, HttpOnly cookies for refresh tokens.
-
✅ Configure appropriate
SameSitecookie settings. -
✅ Keep access tokens short-lived.
-
✅ Rotate refresh tokens after use.
-
✅ Validate JWT signatures and claims on every request.
-
✅ Implement CSRF protection when using cookies.
-
✅ Prevent XSS through input sanitization and a Content Security Policy.
-
✅ Revoke refresh tokens during logout.
-
✅ Log authentication events for auditing and troubleshooting.
-
✅ Regularly update dependencies to receive security fixes.
By following these recommendations, you'll significantly strengthen the security of your Nuxt 4 authentication system while maintaining a smooth user experience.
Congratulations! You now have a production-ready JWT authentication architecture featuring login, protected routes, automatic token refresh, session restoration, and security best practices.
In the final section, we'll summarize what you've built and discuss possible enhancements, such as social login, two-factor authentication (2FA), and role-based access control (RBAC).
Conclusion
In this tutorial, you've built a complete JWT authentication system for a Nuxt 4 application without relying on third-party authentication libraries. By leveraging Nuxt 4's built-in features—such as route middleware, composables, plugins, runtime configuration, and Pinia—you created an authentication architecture that is both secure and maintainable.
Starting from a fresh Nuxt 4 project, you progressively implemented each part of the authentication workflow, including:
-
Creating a centralized authentication store with Pinia.
-
Building a reusable API composable using
$fetch.create(). -
Developing a login page that authenticates users with a backend API.
-
Protecting private pages using Nuxt route middleware.
-
Redirecting authenticated users away from guest-only pages.
-
Automatically refreshing expired access tokens.
-
Restoring user sessions when the application starts.
-
Applying security best practices for production deployments.
By separating authentication logic into dedicated stores, composables, middleware, and plugins, your page components remain clean and focused on presentation. This modular architecture also makes it easier to test, maintain, and extend your application as it grows.
What's Next?
The authentication system you've built provides a solid foundation for most modern web applications. From here, you can enhance it with additional features such as:
-
User registration and email verification.
-
Password reset and account recovery.
-
Role-Based Access Control (RBAC).
-
Permission-based authorization.
-
OAuth login with Google, GitHub, Microsoft, or Facebook.
-
Multi-factor authentication (MFA/2FA).
-
Remember Me functionality.
-
Session management across multiple devices.
-
Audit logging and login history.
-
Account lockout after repeated failed login attempts.
These features can be integrated without significantly changing the architecture you've established in this tutorial.
Complete Project Structure
By the end of this guide, your project should resemble the following structure:
nuxt-jwt-auth/
├── composables/
│   └── useApi.ts
├── middleware/
│   ├── auth.ts
│   └── guest.ts
├── pages/
│   ├── login.vue
│   └── dashboard.vue
├── plugins/
│   └── auth.client.ts
├── stores/
│   └── auth.ts
├── types/
│   └── auth.ts
├── nuxt.config.ts
└── .env
This organization keeps authentication concerns well separated and follows common best practices for Nuxt applications.
Source Code
The complete source code for this tutorial is available on GitHub. Feel free to clone the repository, experiment with the implementation, and adapt it to your own backend API.
Note: If your backend uses a different authentication flow or endpoint naming convention, you may need to adjust the API requests accordingly. The overall architecture presented in this tutorial remains applicable to most JWT-based authentication systems.
Final Thoughts
Authentication is a fundamental aspect of nearly every web application. While implementing it from scratch requires careful planning, Nuxt 4 provides the tools needed to build a secure, scalable, and developer-friendly solution.
By understanding how JWTs, route middleware, token refresh, and session restoration work together, you'll be better equipped to build authentication systems that deliver both strong security and an excellent user experience.
We hope this guide helps you implement JWT authentication confidently in your next Nuxt 4 project. Happy coding!
We know that building beautifully designed Mobile and Web Apps from scratch can be frustrating and very time-consuming. Check Envato unlimited downloads and save development and design time.
That's just the basics. If you need more deep learning about Nuxt.js, you can take the following cheap course:
- Nuxt 3 & Supabase Mastery: Build 2 Full-Stack Apps
- Build Web Apps with Nuxt.js 3: Master TypeScript & API [New]
- The Nuxt 3 Bootcamp - The Complete Developer Guide
- Complete Nuxt.js Course (EXTRA React)
- The Complete NUXT 3 Bootcamp: Full-Stack Guide
- Nuxt 3 Authentication with Laravel Sanctum:A Practical Guide
- Learn How to Make Your Nuxt 3 App SEO-Friendly
- Headless Prestashop with Nuxt JS