Microservices have become a popular architecture for building scalable and maintainable backend applications. Instead of developing an entire application as a single monolithic service, a microservice architecture divides the application into smaller, independent services. Each service focuses on a specific business capability and can be developed, deployed, and scaled independently.
In the Java ecosystem, Spring Boot provides a convenient foundation for building standalone, production-ready applications, while Spring Cloud adds tools and patterns that make it easier to build distributed systems.
In this tutorial, you will learn how to build a simple microservice-based application using Java, Spring Boot, and Spring Cloud. We will create multiple services and connect them through service discovery and an API gateway.
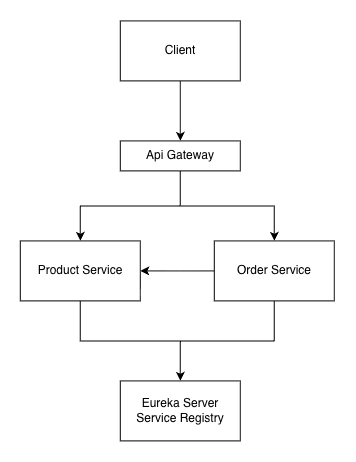
The example application will contain a Product Service and an Order Service. We will also create a service registry using Eureka and an API Gateway using Spring Cloud Gateway.
By the end of this tutorial, you will have a working architecture similar to the following:
This tutorial focuses on the core concepts needed to understand Spring Cloud microservices, including service discovery, API gateways, inter-service communication, centralized configuration, and resilience.
We will also look at how the individual services can be tested and eventually packaged for deployment.
What You Will Learn
Throughout this tutorial, you will learn how to:
-
Create independent microservices with Spring Boot.
-
Build REST APIs for individual services.
-
Register microservices with a Eureka service registry.
-
Discover services dynamically instead of using hard-coded hostnames.
-
Create an API Gateway with Spring Cloud Gateway.
-
Communicate between microservices.
-
Manage configuration in a distributed application.
-
Add resilience features such as timeouts, retries, and circuit breakers.
-
Test the microservices through the API Gateway.
-
Prepare the application for containerized deployment.
The goal is not just to create several Spring Boot applications, but to understand how those applications work together as a distributed system.
Why Spring Cloud?
Building a microservice architecture introduces problems that do not normally exist in a monolithic application. Services need to find each other, communicate over a network, handle failures, expose a consistent entry point, and manage configuration across different environments.
Spring Cloud provides a collection of projects that address many of these common distributed-system requirements.
For example, Spring Cloud can be used for:
-
Service discovery — allowing services to find other services dynamically.
-
API gateway — providing a single entry point for client applications.
-
Centralized configuration — managing configuration outside individual services.
-
Resilience — helping applications deal with network and service failures.
-
Distributed systems integration — providing common patterns for communication between services.
Combined with Spring Boot, these tools allow developers to build microservices without having to implement every distributed-system capability from scratch.
What We Are Building
For this tutorial, we will use a small e-commerce-style example.
The Product Service will manage product information, while the Order Service will manage orders. An order may need information about a product, so the Order Service will communicate with the Product Service.
The Eureka Server will act as the service registry. Instead of configuring the hostname and port of every service manually, each microservice will register itself with Eureka.
Finally, Spring Cloud Gateway will provide the external entry point to the system. Clients can send requests to the gateway rather than communicating directly with individual microservices.
This architecture is intentionally small so that the important Spring Cloud concepts remain easy to understand. However, the same patterns can be extended to larger systems containing dozens or hundreds of services.
In the next section, we will prepare the development environment and review the technologies and versions used throughout the tutorial.
Prerequisites
Before creating the microservices, make sure the required development tools are installed on your computer. Because this tutorial uses several Spring Cloud components, it is also important to use compatible versions of Java, Spring Boot, and Spring Cloud.
Java
We will use Java 21 for this tutorial. Java 21 is a Long-Term Support (LTS) release and provides a stable foundation for modern Spring applications.
Verify your Java installation with:
java -version
You should see output similar to:
openjdk version "21.x.x"
If Java is not installed, install a JDK 21 distribution such as Eclipse Temurin, OpenJDK, or another supported JDK distribution.
Maven
The examples in this tutorial use Maven for dependency management and application builds.
Check whether Maven is installed:
mvn -version
The command should display the installed Maven version together with the Java version being used.
You can also use the Maven Wrapper generated by Spring Initializr, which allows each project to use its own Maven configuration without requiring a system-wide Maven installation.
For example:
./mvnw spring-boot:run
On Windows, use:
mvnw.cmd spring-boot:run
Spring Boot
Each microservice in this tutorial will be created as a Spring Boot application.
Spring Boot provides the foundation for the individual services, including dependency management, auto-configuration, embedded servers, and application configuration.
We will generate the projects using Spring Initializr rather than manually creating the Maven configuration.
You can access Spring Initializr at:
For each project, we will select Maven as the build system and Java as the programming language.
Spring Cloud
Spring Cloud provides the components required to build the distributed architecture.
In this tutorial, we will use Spring Cloud components for:
-
Service discovery with Eureka.
-
API routing with Spring Cloud Gateway.
-
Inter-service communication.
-
Centralized configuration.
-
Resilience and failure handling.
Spring Cloud projects are released in coordinated release trains, so the Spring Cloud version must be compatible with the Spring Boot version used by the application.
Rather than mixing arbitrary Spring Boot and Spring Cloud versions, always check the official compatibility information before creating a new project.
Development Environment
You can use any Java-compatible IDE. Popular choices include:
-
IntelliJ IDEA
-
Visual Studio Code
-
Eclipse
-
Spring Tools for Eclipse
For this tutorial, the IDE does not significantly affect the code because the projects are standard Maven-based Spring Boot applications.
Command-Line Tools
You should also have a terminal available for running Maven commands and testing the REST APIs.
We will use commands such as:
./mvnw spring-boot:run
and:
curl http://localhost:8080
If you prefer, the REST APIs can also be tested with tools such as Postman or Insomnia.
Verify the Environment
Before continuing, verify that Java and Maven are available:
java -version
mvn -version
For this tutorial, the important requirements are:
| Tool | Version |
|---|---|
| Java | 21 |
| Spring Boot | 4.x |
| Spring Cloud | Compatible 2026.x release |
| Build Tool | Maven |
| Database | H2 for development |
| IDE | Any Java-compatible IDE |
We will use H2 initially to keep the example focused on microservice architecture rather than database configuration. A production application can later replace H2 with PostgreSQL, MySQL, or another database.
With the development environment ready, we can now design the application architecture and define the responsibilities of each microservice before creating the projects.
Design the Microservice Architecture
Before creating the Spring Boot projects, it is useful to define the architecture of the application and the responsibility of each component.
A microservice architecture works best when each service has a clearly defined responsibility. Instead of creating one large application that handles products, orders, authentication, and other business functions, we separate those responsibilities into independent services.
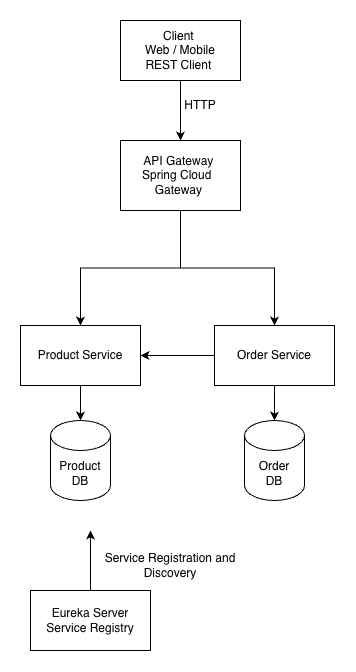
For this tutorial, we will build a small e-commerce system consisting of four main components:
-
Eureka Server — service registry.
-
Product Service — manages product information.
-
Order Service — manages customer orders.
-
API Gateway — provides a single entry point for clients.
The resulting architecture will look like this:
Eureka Server
The Eureka Server acts as the service registry.
In a traditional application, the Order Service might call the Product Service using a fixed URL such as:
http://localhost:8081/products/1
This approach becomes problematic when services are deployed to different machines, containers, or cloud environments. Service addresses can change, and multiple instances of the same service may exist.
With service discovery, the Product Service registers itself with Eureka. The Order Service can then discover the Product Service through its registered service name instead of depending on a fixed hostname and port.
Conceptually:
Product Service
       │
       │ register
       ▼
Eureka Server
       ▲
       │ discover
       │
Order Service
This makes the architecture more flexible as the number of services and instances increases.
Product Service
The Product Service is responsible for product-related operations.
For our example, it will provide REST endpoints for operations such as:
GET    /products
GET    /products/{id}
POST   /products
PUT    /products/{id}
DELETE /products/{id}
The service will have its own database.
This is an important microservice principle: each service should own the data required for its business responsibility rather than allowing multiple services to directly share the same database tables.
For development, we will initially use an H2 database.
Order Service
The Order Service is responsible for creating and managing orders.
A simplified order might contain information such as:
id
productId
quantity
price
status
When creating an order, the Order Service may need to retrieve product information from the Product Service.
The communication will therefore look like:
Client
   │
   ▼
Order Service
   │
   │ request product information
   ▼
Product Service
   │
   ▼
Product Database
The Order Service will also have its own database instead of directly accessing the Product Service's database.
API Gateway
The API Gateway provides a single entry point for external clients.
Without a gateway, a client would need to know the location of every microservice:
Client ──► Product Service
Client ──► Order Service
Client ──► Other Service
With an API Gateway, the client communicates with one endpoint:
Client
   │
   ▼
API Gateway
   ├──► Product Service
   │
   └──► Order Service
The gateway can perform several responsibilities, including:
-
Request routing.
-
Authentication and authorization.
-
Rate limiting.
-
Request filtering.
-
CORS handling.
-
Centralized logging.
-
Load balancing.
For this tutorial, we will primarily use it for request routing.
Service Names
Each microservice will have a logical application name.
We will use:
| Component | Service Name | Port |
|---|---|---|
| Eureka Server | eureka-server |
8761 |
| Product Service | product-service |
8081 |
| Order Service | order-service |
8082 |
| API Gateway | api-gateway |
8080 |
The ports are mainly for local development. Once service discovery is configured, other services will not need to depend on these ports when communicating with each other.
Request Flow
Consider a client requesting a list of products.
The request starts at the API Gateway:
GET http://localhost:8080/products
The gateway forwards the request to the Product Service:
API Gateway
     │
     ▼
Product Service
     │
     ▼
Product Database
The Product Service processes the request and returns the response through the gateway to the client.
For an order request, the flow becomes slightly more interesting:
Client
  │
  │ POST /orders
  ▼
API Gateway
  │
  ▼
Order Service
  │
  │ discover Product Service
  ▼
Eureka Server
  │
  ▼
Product Service
  │
  ▼
Product Database
The Order Service can use the service registry to locate the Product Service instead of depending on a hard-coded network address.
Why Separate the Databases?
Each service will own its own data.
The Product Service has:
Product Service
       │
       ▼
  Product DB
The Order Service has:
Order Service
       │
       ▼
   Order DB
This separation prevents one service from becoming tightly coupled to another service's database schema.
For example, if the Product Service changes how products are stored internally, the Order Service should not need to know about those database changes. It should communicate with the Product Service through its API.
This approach also makes it possible to choose different database technologies for different services when a real application requires it.
Project Structure
We will eventually have four independent Maven projects:
spring-cloud-microservices/
├── eureka-server/
├── product-service/
├── order-service/
└── api-gateway/
Each directory represents an independent Spring Boot application.
This is different from creating multiple modules inside a single Spring Boot application. Each service can be built, tested, packaged, and deployed independently.
Development Sequence
To make the implementation easier to follow, we will build the application in the following order:
-
Create the Eureka Server.
-
Create the Product Service.
-
Register the Product Service with Eureka.
-
Create the Order Service.
-
Register the Order Service with Eureka.
-
Implement communication between the Order and Product services.
-
Create the API Gateway.
-
Configure gateway routes.
-
Add centralized configuration.
-
Add resilience features.
-
Test the complete architecture.
Starting with Eureka gives the other services a service registry to connect to as they are created.
In the next section, we will create the Eureka Server using Spring Boot and configure it as the service registry for our microservices.
Create the Eureka Server
Generate the Project
Open Spring Initializr and create a new Maven project.
Use the following configuration:
| Setting | Value |
|---|---|
| Project | Maven |
| Language | Java |
| Spring Boot | Current stable 4.x |
| Group | com.djamware |
| Artifact | eureka-server |
| Name | eureka-server |
| Package name | com.djamware.eureka |
| Packaging | Jar |
| Java | 21 |
For dependencies, add:
-
Eureka Server
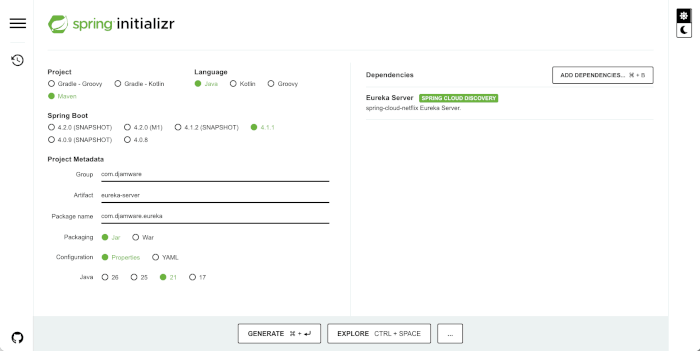
The generated project should have a structure similar to:
eureka-server/
├── src/
│   ├── main/
│   │   ├── java/
│   │   │   └── com/
│   │   │       └── djamware/
│   │   │           └── eureka/
│   │   │               └── EurekaServerApplication.java
│   │   └── resources/
│   │       └── application.properties
│   └── test/
├── pom.xml
└── mvnw
You can download the generated project, extract it, and open it in your IDE.
Add the Eureka Server Dependency
If you prefer to create the project manually or want to verify the generated dependencies, the important Spring Cloud dependency is:
<dependency>
    <groupId>org.springframework.cloud</groupId>
    <artifactId>spring-cloud-starter-netflix-eureka-server</artifactId>
</dependency>
Spring Cloud manages the compatible dependency versions through its release train, so you generally should not specify an individual version for this starter when using the Spring Cloud dependency management configuration.
Enable Eureka Server
Open the generated main application class.
It should initially look similar to:
package com.djamware.eureka;

import org.springframework.boot.SpringApplication;
import org.springframework.boot.autoconfigure.SpringBootApplication;

@SpringBootApplication
public class EurekaServerApplication {

    public static void main(String[] args) {
        SpringApplication.run(EurekaServerApplication.class, args);
    }
}
Add the @EnableEurekaServer annotation:
package com.djamware.eureka;

import org.springframework.boot.SpringApplication;
import org.springframework.boot.autoconfigure.SpringBootApplication;
import org.springframework.cloud.netflix.eureka.server.EnableEurekaServer;

@SpringBootApplication
@EnableEurekaServer
public class EurekaServerApplication {

    public static void main(String[] args) {
        SpringApplication.run(EurekaServerApplication.class, args);
    }
}
The @EnableEurekaServer annotation enables the Eureka server functionality in the Spring Boot application. The official Spring Cloud documentation uses the same basic approach for creating a Eureka Server.
Configure the Eureka Server
Open:
src/main/resources/application.properties
Replace its contents with:
spring.application.name=eureka-server
server.port=8761

eureka.client.register-with-eureka=false
eureka.client.fetch-registry=false
The important settings are explained below.
Application Name
spring.application.name=eureka-server
This gives the application its logical service name.
Server Port
server.port=8761
Eureka conventionally runs on port 8761. We will use this port throughout the tutorial.
Therefore, the Eureka dashboard will be available at:
http://localhost:8761
Disable Registration
eureka.client.register-with-eureka=false
A Eureka server is also capable of behaving as a Eureka client. However, our initial setup uses a single standalone Eureka Server, so it does not need to register itself with another Eureka server.
Disable Registry Fetching
eureka.client.fetch-registry=false
The Eureka server itself does not need to fetch a registry from another Eureka server in this standalone configuration.
These settings are particularly useful for a local standalone server because they prevent the application from continually trying to communicate with nonexistent Eureka peers.
Using YAML Instead
If you prefer YAML configuration, you can remove application.properties and create:
src/main/resources/application.yml
with:
spring:
  application:
    name: eureka-server

server:
  port: 8761

eureka:
  client:
    register-with-eureka: false
    fetch-registry: false
Use either application.properties or application.yml, not both for the same configuration.
For the rest of this tutorial, we will use YAML because it becomes easier to organize the configuration as the microservices become more complex.
Run the Eureka Server
From the project directory, run:
./mvnw spring-boot:run
On Windows:
mvnw.cmd spring-boot:run
You can also run the EurekaServerApplication class directly from your IDE.
If the application starts successfully, you should see a message indicating that the embedded server is running on port 8761.
You can then open the following URL in your browser:
http://localhost:8761
You should see the Eureka dashboard.
At this point, the Instances currently registered with Eureka section should be empty because we have not created any Eureka clients yet.
That is expected.
Later, when we start the Product Service and Order Service, those applications will register themselves with this server and appear in the dashboard.
Understanding the Eureka Dashboard
The dashboard provides a simple view of the service registry.
Once services are registered, you will be able to see information such as:
-
Application name.
-
Instance status.
-
Hostname.
-
Port.
-
Availability status.
-
Instance information.
For example, after we create the Product Service, the registry will eventually contain something similar to:
APPLICATION        STATUS
PRODUCT-SERVICE    UP
If we start two instances of the Product Service, Eureka can maintain information about both instances:
APPLICATION        STATUS
PRODUCT-SERVICE    UP
PRODUCT-SERVICE    UP
This is one of the important benefits of service discovery. Other services can discover available instances without having to maintain a manually configured list of servers.
Verify the Eureka Server
At this stage, the project should satisfy the following requirements:
-
The application starts successfully.
-
The application listens on port
8761. -
The Eureka dashboard is accessible.
-
No microservices are registered yet.
-
The Eureka Server does not attempt to register itself with another Eureka server.
The architecture now looks like this:
                    ┌──────────────────┐
                    │  Eureka Server   │
                    │   localhost:8761 │
                    └──────────────────┘
                              ▲
                              │
                       No clients yet
The Eureka Server is now ready to accept registrations.
In the next section, we will create the Product Service, configure it as a Eureka client, and register it with the Eureka Server.
Create the Product Microservice
With the Eureka Server running, we can now create our first actual business microservice: the Product Service.
The Product Service will be responsible for managing product data and exposing a REST API that other services and clients can use.
It will also register itself with the Eureka Server so that other microservices can discover it dynamically.
Generate the Product Service
Open Spring Initializr and create another Maven project.
Use the following configuration:
| Setting | Value |
|---|---|
| Project | Maven |
| Language | Java |
| Spring Boot | Current compatible 4.x release |
| Group | com.djamware |
| Artifact | product-service |
| Name | product-service |
| Package name | com.djamware.product |
| Packaging | Jar |
| Java | 21 |
Add these dependencies:
-
Spring Web
-
Spring Data JPA
-
H2 Database
-
Eureka Discovery Client
Download the generated project and place it alongside the Eureka Server project:
spring-cloud-microservices/
├── eureka-server/
└── product-service/
Configure the Eureka Client
Open the pom.xml file and make sure the Eureka client dependency is included:
<dependency>
    <groupId>org.springframework.cloud</groupId>
    <artifactId>spring-cloud-starter-netflix-eureka-client</artifactId>
</dependency>
The Eureka client allows the Product Service to register with the Eureka Server and discover other registered services.
Create the Main Application
The generated application class should look similar to:
package com.djamware.product;

import org.springframework.boot.SpringApplication;
import org.springframework.boot.autoconfigure.SpringBootApplication;

@SpringBootApplication
public class ProductServiceApplication {

    public static void main(String[] args) {
        SpringApplication.run(ProductServiceApplication.class, args);
    }
}
With current Spring Cloud versions, the Eureka client can be auto-configured when the appropriate starter is present. You therefore do not need to add @EnableEurekaClient to the application class.
This keeps the main application class simple:
@SpringBootApplication
public class ProductServiceApplication {

    public static void main(String[] args) {
        SpringApplication.run(ProductServiceApplication.class, args);
    }
}
Configure the Application
Open:
src/main/resources/application.yml
and add:
spring:
  application:
    name: product-service

  datasource:
    url: jdbc:h2:mem:productdb
    driver-class-name: org.h2.Driver
    username: sa
    password:

  jpa:
    hibernate:
      ddl-auto: update
    show-sql: true

server:
  port: 8081

eureka:
  client:
    service-url:
      defaultZone: http://localhost:8761/eureka
The most important settings are the application name, server port, database configuration, and Eureka server URL.
Application Name
spring:
  application:
    name: product-service
The application name becomes the service identifier Eureka uses.
When the Product Service registers itself, Eureka will identify it as:
PRODUCT-SERVICE
Another microservice will use this name to discover the Product Service.
Server Port
server:
  port: 8081
We will run the Product Service on port 8081 during local development.
The complete local setup will eventually use:
Eureka Server    → 8761
API Gateway      → 8080
Product Service  → 8081
Order Service    → 8082
H2 Database
For development, we use an in-memory H2 database:
spring:
  datasource:
    url: jdbc:h2:mem:productdb
    driver-class-name: org.h2.Driver
    username: sa
    password:
The database is intentionally simple because the main focus of this tutorial is microservice architecture.
Later, this configuration can be replaced with PostgreSQL, MySQL, or another production database.
JPA Configuration
We also configure Spring Data JPA:
spring:
  jpa:
    hibernate:
      ddl-auto: update
    show-sql: true
The ddl-auto setting allows Hibernate to create and update the database schema during development.
The show-sql option is useful while learning because it allows us to see the SQL statements generated by Hibernate in the application log.
Eureka Server
Finally, configure the Eureka server:
eureka:
  client:
    service-url:
      defaultZone: http://localhost:8761/eureka
This tells the Product Service where the Eureka Server is running.
The Product Service will use this endpoint to register itself.
Create the Product Entity
Create the following package:
src/main/java/com/djamware/product/entity
Then create Product.java:
package com.djamware.product.entity;

import jakarta.persistence.Entity;
import jakarta.persistence.GeneratedValue;
import jakarta.persistence.GenerationType;
import jakarta.persistence.Id;

@Entity
public class Product {

    @Id
    @GeneratedValue(strategy = GenerationType.IDENTITY)
    private Long id;

    private String name;

    private String description;

    private double price;

    public Product() {
    }

    public Product(String name, String description, double price) {
        this.name = name;
        this.description = description;
        this.price = price;
    }

    public Long getId() {
        return id;
    }

    public String getName() {
        return name;
    }

    public void setName(String name) {
        this.name = name;
    }

    public String getDescription() {
        return description;
    }

    public void setDescription(String description) {
        this.description = description;
    }

    public double getPrice() {
        return price;
    }

    public void setPrice(double price) {
        this.price = price;
    }
}
The entity contains three basic product properties:
-
name -
description -
price
The id field is automatically generated by the database.
Create the Product Repository
Create:
src/main/java/com/djamware/product/repository/ProductRepository.java
with:
package com.djamware.product.repository;

import com.djamware.product.entity.Product;
import org.springframework.data.jpa.repository.JpaRepository;

public interface ProductRepository extends JpaRepository<Product, Long> {
}
By extending JpaRepository, we automatically get common database operations such as:
-
Find all products.
-
Find a product by ID.
-
Save a product.
-
Update a product.
-
Delete a product.
We therefore do not need to write SQL for the basic CRUD operations.
Create the Product Service
Next, create:
src/main/java/com/djamware/product/service/ProductService.java
package com.djamware.product.service;

import com.djamware.product.entity.Product;
import com.djamware.product.repository.ProductRepository;
import org.springframework.stereotype.Service;

import java.util.List;
import java.util.Optional;

@Service
public class ProductService {

    private final ProductRepository productRepository;

    public ProductService(ProductRepository productRepository) {
        this.productRepository = productRepository;
    }

    public List<Product> findAll() {
        return productRepository.findAll();
    }

    public Optional<Product> findById(Long id) {
        return productRepository.findById(id);
    }

    public Product save(Product product) {
        return productRepository.save(product);
    }

    public void deleteById(Long id) {
        productRepository.deleteById(id);
    }
}
The service layer keeps business logic separate from the REST controller and database repository.
Create the Product Controller
Create:
src/main/java/com/djamware/product/controller/ProductController.java
with:
package com.djamware.product.controller;

import com.djamware.product.entity.Product;
import com.djamware.product.service.ProductService;
import org.springframework.http.ResponseEntity;
import org.springframework.web.bind.annotation.*;

import java.util.List;

@RestController
@RequestMapping("/products")
public class ProductController {

    private final ProductService productService;

    public ProductController(ProductService productService) {
        this.productService = productService;
    }

    @GetMapping
    public List<Product> findAll() {
        return productService.findAll();
    }

    @GetMapping("/{id}")
    public ResponseEntity<Product> findById(@PathVariable Long id) {
        return productService.findById(id)
                .map(ResponseEntity::ok)
                .orElse(ResponseEntity.notFound().build());
    }

    @PostMapping
    public Product create(@RequestBody Product product) {
        return productService.save(product);
    }

    @PutMapping("/{id}")
    public ResponseEntity<Product> update(
            @PathVariable Long id,
            @RequestBody Product product) {

        return productService.findById(id)
                .map(existing -> {
                    existing.setName(product.getName());
                    existing.setDescription(product.getDescription());
                    existing.setPrice(product.getPrice());

                    return ResponseEntity.ok(
                            productService.save(existing)
                    );
                })
                .orElse(ResponseEntity.notFound().build());
    }

    @DeleteMapping("/{id}")
    public ResponseEntity<Void> delete(@PathVariable Long id) {
        if (productService.findById(id).isEmpty()) {
            return ResponseEntity.notFound().build();
        }

        productService.deleteById(id);
        return ResponseEntity.noContent().build();
    }
}
The controller exposes the following REST endpoints:
| HTTP Method | Endpoint | Description |
|---|---|---|
| GET | /products |
Get all products |
| GET | /products/{id} |
Get a product |
| POST | /products |
Create a product |
| PUT | /products/{id} |
Update a product |
| DELETE | /products/{id} |
Delete a product |
Start the Product Service
Make sure the Eureka Server is already running.
From the Product Service directory, run:
./mvnw spring-boot:run
The Product Service should start on port 8081.
Open the Eureka dashboard:
http://localhost:8761
The Product Service should now appear in the registered applications.
You should see something similar to:
APPLICATION        STATUS
PRODUCT-SERVICE    UP
This confirms that the Product Service has successfully registered itself with Eureka.
Test the Product API
We can test the service directly before introducing the API Gateway.
Create a product with:
curl -X POST http://localhost:8081/products \
  -H "Content-Type: application/json" \
  -d '{
    "name": "Mechanical Keyboard",
    "description": "Wireless mechanical keyboard",
    "price": 89.99
  }'
The response should contain the newly created product:
{
  "id": 1,
  "name": "Mechanical Keyboard",
  "description": "Wireless mechanical keyboard",
  "price": 89.99
}
Now retrieve the products:
curl http://localhost:8081/products
The response should contain the product we just created.
You can also retrieve an individual product:
curl http://localhost:8081/products/1
At this point, we have two independently running applications:
                    ┌──────────────────┐
                    │  Eureka Server   │
                    │      :8761       │
                    └────────▲─────────┘
                             │
                       registers
                             │
                    ┌────────┴─────────┐
                    │ Product Service  │
                    │      :8081       │
                    └──────────────────┘
The Product Service is now a real microservice rather than simply another controller inside a monolithic application.
More importantly, it is registered with the service registry. This will become useful when we create the Order Service, because the Order Service will be able to discover the Product Service through Eureka rather than relying on a hard-coded URL.
In the next section, we will create the Order Service and use service discovery to allow it to communicate with the Product Service.
Create the Order Microservice
The Order Service will be responsible for creating and retrieving orders.
Unlike the Product Service, an order needs information about a product. For example, when creating an order, we need to know whether the referenced product exists and, eventually, retrieve its current price.
The important point is that the Order Service will not access the Product Service database directly. Instead, it will communicate with the Product Service through its REST API.
This separation keeps the two services independent.
Generate the Order Service
Open Spring Initializr and create another Maven project.
Use the following configuration:
| Setting | Value |
|---|---|
| Project | Maven |
| Language | Java |
| Spring Boot | Current compatible 4.x release |
| Group | com.djamware |
| Artifact | order-service |
| Name | order-service |
| Package name | com.djamware.order |
| Packaging | Jar |
| Java | 21 |
Add the following dependencies:
-
Spring Web
-
Spring Data JPA
-
H2 Database
-
Eureka Discovery Client
Download the project and place it alongside the other services:
spring-cloud-microservices/
├── eureka-server/
├── product-service/
└── order-service/
Configure the Eureka Client
The generated project should contain the Eureka Client dependency:
<dependency>
    <groupId>org.springframework.cloud</groupId>
    <artifactId>spring-cloud-starter-netflix-eureka-client</artifactId>
</dependency>
This allows the Order Service to register itself with Eureka.
As with the Product Service, we don't need to add @EnableEurekaClient to the application class when using current Spring Cloud versions.
Configure the Application
Open:
src/main/resources/application.yml
and configure the application as follows:
spring:
  application:
    name: order-service

  datasource:
    url: jdbc:h2:mem:orderdb
    driver-class-name: org.h2.Driver
    username: sa
    password:

  jpa:
    hibernate:
      ddl-auto: update
    show-sql: true

server:
  port: 8082

eureka:
  client:
    service-url:
      defaultZone: http://localhost:8761/eureka
The application name is particularly important:
spring:
  application:
    name: order-service
Eureka will use this name to identify the service.
The Order Service will run on port 8082 during local development.
Create the Order Entity
Create the following package:
src/main/java/com/djamware/order/entity
Then create Order.java:
package com.djamware.order.entity;

import jakarta.persistence.Entity;
import jakarta.persistence.GeneratedValue;
import jakarta.persistence.GenerationType;
import jakarta.persistence.Id;

@Entity
public class Order {

    @Id
    @GeneratedValue(strategy = GenerationType.IDENTITY)
    private Long id;

    private Long productId;

    private int quantity;

    private double price;

    private String status;

    public Order() {
    }

    public Order(Long productId, int quantity, double price, String status) {
        this.productId = productId;
        this.quantity = quantity;
        this.price = price;
        this.status = status;
    }

    public Long getId() {
        return id;
    }

    public Long getProductId() {
        return productId;
    }

    public void setProductId(Long productId) {
        this.productId = productId;
    }

    public int getQuantity() {
        return quantity;
    }

    public void setQuantity(int quantity) {
        this.quantity = quantity;
    }

    public double getPrice() {
        return price;
    }

    public void setPrice(double price) {
        this.price = price;
    }

    public String getStatus() {
        return status;
    }

    public void setStatus(String status) {
        this.status = status;
    }
}
The order contains:
-
id— unique order identifier. -
productId— identifier of the product being ordered. -
quantity— number of products ordered. -
price— price associated with the order. -
status— current order status.
For simplicity, this example contains only one product per order. A production application would typically have separate Order and OrderItem entities to support multiple products in a single order.
Create the Order Repository
Create:
src/main/java/com/djamware/order/repository/OrderRepository.java
with:
package com.djamware.order.repository;

import com.djamware.order.entity.Order;
import org.springframework.data.jpa.repository.JpaRepository;

public interface OrderRepository extends JpaRepository<Order, Long> {
}
This gives us the standard CRUD operations through Spring Data JPA.
Create the Order Service
Create:
src/main/java/com/djamware/order/service/OrderService.java
with:
package com.djamware.order.service;

import com.djamware.order.entity.Order;
import com.djamware.order.repository.OrderRepository;
import org.springframework.stereotype.Service;

import java.util.List;
import java.util.Optional;

@Service
public class OrderService {

    private final OrderRepository orderRepository;

    public OrderService(OrderRepository orderRepository) {
        this.orderRepository = orderRepository;
    }

    public List<Order> findAll() {
        return orderRepository.findAll();
    }

    public Optional<Order> findById(Long id) {
        return orderRepository.findById(id);
    }

    public Order save(Order order) {
        return orderRepository.save(order);
    }

    public void deleteById(Long id) {
        orderRepository.deleteById(id);
    }
}
For now, the service contains only basic database operations.
We'll extend it when we introduce communication with the Product Service.
Create the Order Controller
Create:
src/main/java/com/djamware/order/controller/OrderController.java
with:
package com.djamware.order.controller;

import com.djamware.order.entity.Order;
import com.djamware.order.service.OrderService;
import org.springframework.http.ResponseEntity;
import org.springframework.web.bind.annotation.*;

import java.util.List;

@RestController
@RequestMapping("/orders")
public class OrderController {

    private final OrderService orderService;

    public OrderController(OrderService orderService) {
        this.orderService = orderService;
    }

    @GetMapping
    public List<Order> findAll() {
        return orderService.findAll();
    }

    @GetMapping("/{id}")
    public ResponseEntity<Order> findById(@PathVariable Long id) {
        return orderService.findById(id)
                .map(ResponseEntity::ok)
                .orElse(ResponseEntity.notFound().build());
    }

    @PostMapping
    public Order create(@RequestBody Order order) {
        return orderService.save(order);
    }

    @DeleteMapping("/{id}")
    public ResponseEntity<Void> delete(@PathVariable Long id) {
        if (orderService.findById(id).isEmpty()) {
            return ResponseEntity.notFound().build();
        }

        orderService.deleteById(id);
        return ResponseEntity.noContent().build();
    }
}
The initial API provides:
| HTTP Method | Endpoint | Description |
|---|---|---|
| GET | /orders |
Get all orders |
| GET | /orders/{id} |
Get an order |
| POST | /orders |
Create an order |
| DELETE | /orders/{id} |
Delete an order |
We intentionally keep the initial API small. The next step is to make order creation validate the referenced product.
Start the Order Service
Before starting the Order Service, make sure the Eureka Server is running.
You should now have:
Eureka Server       :8761
Product Service     :8081
Order Service       :8082
From the Order Service directory, run:
./mvnw spring-boot:run
If the application starts successfully, open the Eureka dashboard again:
http://localhost:8761
You should now see both services registered:
APPLICATION        STATUS
ORDER-SERVICE      UP
PRODUCT-SERVICE    UP
The exact instance information displayed by Eureka may differ depending on your local environment.
The important part is that both services are registered and available.
Test the Order API
We can initially create an order directly through the Order Service.
For example:
curl -X POST http://localhost:8082/orders \
  -H "Content-Type: application/json" \
  -d '{
    "productId": 1,
    "quantity": 2,
    "price": 89.99,
    "status": "NEW"
  }'
A successful response should look similar to:
{
  "id": 1,
  "productId": 1,
  "quantity": 2,
  "price": 89.99,
  "status": "NEW"
}
You can retrieve the order with:
curl http://localhost:8082/orders/1
And retrieve all orders with:
curl http://localhost:8082/orders
At this point, the Order Service works independently, but there is a problem.
The client had to provide the product price manually:
{
  "productId": 1,
  "quantity": 2,
  "price": 89.99
}
This isn't ideal. The Product Service already owns the product information, so the Order Service should retrieve the product instead of trusting the client to provide its price.
That is where inter-service communication becomes important.
The Problem with Hard-Coded URLs
A simple solution would be to call the Product Service directly:
http://localhost:8081/products/1
We could put that URL in the Order Service configuration.
However, this creates a dependency on the Product Service's physical location.
For example:
Order Service
     │
     │ http://localhost:8081
     ▼
Product Service
If the Product Service moves to another host or its port changes, the Order Service configuration must also change.
The problem becomes more significant when multiple Product Service instances are running:
                   ┌──► Product Service :8081
                   │
Order Service ─────┼──► Product Service :8083
                   │
                   └──► Product Service :8084
The Order Service should not need to maintain this list manually.
Instead, it can ask Eureka where the product-service is currently available.
The architecture then becomes:
                  ┌─────────────────┐
                  │ Eureka Server   │
                  │     :8761       │
                  └────────▲────────┘
                           │
                  service discovery
                           │
             ┌─────────────┴─────────────┐
             │                           │
             │                           │
      ┌──────┴───────┐           ┌───────┴──────┐
      │ Order Service│──────────►│   Product    │
      │    :8082     │ discover  │   Service    │
      └──────────────┘           │    :8081     │
                                 └───────────────┘
The next step is therefore to configure the Order Service to communicate with the Product Service using its Eureka service name.
This is one of the key advantages of a service registry: the application can work with a logical service identifier rather than a hard-coded host and port.
In the next section, we will implement this communication and use Eureka-based service discovery to retrieve product information from the Order Service.
Implement Inter-Service Communication
In a microservice architecture, services commonly need to communicate with one another. The important principle is that one service should communicate with another through its API rather than accessing its database directly.
In our application, the Order Service needs product information.
The communication will look like this:
Order Service
     │
     │ discover "product-service"
     ▼
Eureka Server
     │
     │ return available instance
     ▼
Product Service
     │
     ▼
Product Database
The Order Service will therefore depend on the Product Service API, but it will not depend on the Product Service database.
Add Spring Cloud OpenFeign
Spring Cloud OpenFeign provides a declarative way to create HTTP clients.
Instead of manually constructing HTTP requests, we define an interface describing the remote API.
Add the OpenFeign dependency to the order-service project:
<dependency>
    <groupId>org.springframework.cloud</groupId>
    <artifactId>spring-cloud-starter-openfeign</artifactId>
</dependency>
The Spring Cloud dependency management configuration will provide the compatible version.
Enable Feign Clients
Open the main application class:
src/main/java/com/djamware/order/OrderServiceApplication.java
Add @EnableFeignClients:
package com.djamware.order;

import org.springframework.boot.SpringApplication;
import org.springframework.boot.autoconfigure.SpringBootApplication;
import org.springframework.cloud.openfeign.EnableFeignClients;

@SpringBootApplication
@EnableFeignClients
public class OrderServiceApplication {

    public static void main(String[] args) {
        SpringApplication.run(OrderServiceApplication.class, args);
    }
}
The @EnableFeignClients annotation tells Spring to scan the application for Feign client interfaces.
Create a Product DTO
The Order Service does not need the entire Product entity from the Product Service.
Instead, define a small DTO containing the information needed by the Order Service.
Create:
src/main/java/com/djamware/order/dto/Product.java
with:
package com.djamware.order.dto;

public class Product {

    private Long id;
    private String name;
    private String description;
    private double price;

    public Product() {
    }

    public Long getId() {
        return id;
    }

    public void setId(Long id) {
        this.id = id;
    }

    public String getName() {
        return name;
    }

    public void setName(String name) {
        this.name = name;
    }

    public String getDescription() {
        return description;
    }

    public void setDescription(String description) {
        this.description = description;
    }

    public double getPrice() {
        return price;
    }

    public void setPrice(double price) {
        this.price = price;
    }
}
Notice that this class is in the Order Service project.
It is deliberately not importing the Product entity from the Product Service. Each microservice should own its own domain model.
Create the Feign Client
Create:
src/main/java/com/djamware/order/client/ProductClient.java
with:
package com.djamware.order.client;

import com.djamware.order.dto.Product;
import org.springframework.cloud.openfeign.FeignClient;
import org.springframework.web.bind.annotation.GetMapping;
import org.springframework.web.bind.annotation.PathVariable;

@FeignClient(name = "product-service")
public interface ProductClient {

    @GetMapping("/products/{id}")
    Product findById(@PathVariable Long id);
}
The important part is:
@FeignClient(name = "product-service")
The name corresponds to the application name configured in the Product Service:
spring:
  application:
    name: product-service
Because the Product Service registered that name with Eureka, the Order Service can use it for service discovery.
There is no:
http://localhost:8081
in the client.
Feign and Spring Cloud will resolve the service name through the service discovery infrastructure.
Update the Order Service
Now we can inject ProductClient into our OrderService.
Update the class:
package com.djamware.order.service;

import com.djamware.order.client.ProductClient;
import com.djamware.order.dto.Product;
import com.djamware.order.entity.Order;
import com.djamware.order.repository.OrderRepository;
import org.springframework.stereotype.Service;

import java.util.List;
import java.util.Optional;

@Service
public class OrderService {

    private final OrderRepository orderRepository;
    private final ProductClient productClient;

    public OrderService(
            OrderRepository orderRepository,
            ProductClient productClient) {
        this.orderRepository = orderRepository;
        this.productClient = productClient;
    }

    public List<Order> findAll() {
        return orderRepository.findAll();
    }

    public Optional<Order> findById(Long id) {
        return orderRepository.findById(id);
    }

    public Order save(Order order) {
        Product product = productClient.findById(order.getProductId());

        order.setPrice(product.getPrice());
        order.setStatus("NEW");

        return orderRepository.save(order);
    }

    public void deleteById(Long id) {
        orderRepository.deleteById(id);
    }
}
There are two important changes here.
First, the ProductClient is injected into the service:
private final ProductClient productClient;
Second, the save() method retrieves the product:
Product product = productClient.findById(order.getProductId());
The Order Service then gets the price from the Product Service:
order.setPrice(product.getPrice());
This means the client no longer needs to provide the price.
Update the Order API
Because the Product Service is now responsible for product information, we can simplify the order request.
Previously, we sent:
{
  "productId": 1,
  "quantity": 2,
  "price": 89.99,
  "status": "NEW"
}
Now we only need:
{
  "productId": 1,
  "quantity": 2
}
The Order Service will retrieve the product and determine the price itself.
Send the request:
curl -X POST http://localhost:8082/orders \
  -H "Content-Type: application/json" \
  -d '{
    "productId": 1,
    "quantity": 2
  }'
If product 1 exists and its price is 89.99, the response should look similar to:
{
  "id": 1,
  "productId": 1,
  "quantity": 2,
  "price": 89.99,
  "status": "NEW"
}
The price was obtained from the Product Service rather than from the request body.
How Service Discovery Works
When this method executes:
productClient.findById(order.getProductId());
the Order Service needs to determine where product-service is running.
The overall process is conceptually:
1. Order Service
        │
        │ "Where is product-service?"
        ▼
2. Service Discovery
        │
        │ Product Service instance
        ▼
3. HTTP Request
        │
        ▼
4. Product Service
        │
        ▼
5. Product Response
The Order Service therefore doesn't need to know the physical location of the Product Service.
This becomes especially useful when multiple instances are available.
For example:
                    ┌── Product Service :8081
                    │
Eureka Registry ────┼── Product Service :8083
                    │
                    └── Product Service :8084
The client-side service discovery and load-balancing infrastructure can select an available instance.
Test the Communication
Make sure all three applications are running:
Eureka Server       http://localhost:8761
Product Service     http://localhost:8081
Order Service       http://localhost:8082
First, verify that the Product Service contains a product:
curl http://localhost:8081/products
You should have at least one product.
For example:
[
  {
    "id": 1,
    "name": "Mechanical Keyboard",
    "description": "Wireless mechanical keyboard",
    "price": 89.99
  }
]
Now create an order without specifying a price:
curl -X POST http://localhost:8082/orders \
  -H "Content-Type: application/json" \
  -d '{
    "productId": 1,
    "quantity": 2
  }'
The Order Service should contact the Product Service and obtain the product price.
You can also watch the application logs while making the request. Because JPA SQL logging is enabled, the Order Service will show the database operation after it has successfully retrieved the product.
What Happens if the Product Does Not Exist?
Try creating an order using a nonexistent product:
curl -X POST http://localhost:8082/orders \
  -H "Content-Type: application/json" \
  -d '{
    "productId": 999,
    "quantity": 2
  }'
The Product Service will return 404 Not Found.
The Feign client will propagate the remote failure back to the Order Service.
At this point, the application doesn't have sophisticated error handling. A production microservice should not simply allow an unhandled remote exception to propagate to the client.
This illustrates an important characteristic of distributed applications:
A remote service call can fail even when the calling application itself is running normally.
Network failures, timeouts, unavailable services, and temporary infrastructure problems must therefore be handled explicitly.
We will address this later when we add resilience features.
Why Not Share the Product Entity?
It may be tempting to create a shared Java library containing the Product entity and use it in both services.
For example:
shared-model.jar
      │
      ├── Product
      └── other models
Then both services could depend on that library.
Although shared libraries can sometimes be useful, sharing domain entities between microservices can create tight coupling.
If the Product Service changes its internal representation, the Order Service could be forced to update as well.
Instead, the Order Service has its own DTO:
Product Service
      │
      │ Product API
      ▼
Order Service
      │
      └── Product DTO
The API becomes the contract between the services.
This allows each service to evolve its internal implementation independently.
Current Architecture
We now have genuine communication between our microservices:
                         ┌─────────────────┐
                         │  Eureka Server  │
                         │     :8761       │
                         └────────▲────────┘
                                  │
                       Service Discovery
                                  │
              ┌───────────────────┴──────────────────┐
              │                                      │
              │                                      │
       ┌──────┴───────┐                       ┌──────┴───────┐
       │    Order     │──── product-service ─►│   Product    │
       │   Service    │                       │   Service    │
       │    :8082     │                       │    :8081     │
       └──────┬───────┘                       └──────┬───────┘
              │                                      │
              ▼                                      ▼
         Order DB                                Product DB
The Order Service now discovers the Product Service through its logical service name rather than using a fixed URL.
This is a major step toward a properly distributed application.
However, clients still need to know which microservice they should call. A frontend application would currently need to know that products are available on port 8081 while orders are available on port 8082.
That is not an ideal public API.
In the next section, we will introduce Spring Cloud Gateway and create a single entry point through which clients can access both services.
Create the API Gateway
An API Gateway sits between external clients and the internal microservices.
Instead of exposing every service directly to clients:
Client ─────► Product Service
Client ─────► Order Service
we expose a single endpoint:
                         ┌─────────────────┐
                         │     Client      │
                         └────────┬────────┘
                                  │
                                  ▼
                         ┌─────────────────┐
                         │   API Gateway   │
                         │      :8080      │
                         └────────┬────────┘
                                  │
                     ┌────────────┴────────────┐
                     │                         │
                     ▼                         ▼
             ┌───────────────┐         ┌───────────────┐
             │ Product       │         │ Order         │
             │ Service :8081 │         │ Service :8082 │
             └───────────────┘         └───────────────┘
The gateway is responsible for routing incoming requests to the appropriate service.
Spring Cloud Gateway is designed specifically for this type of edge-routing use case.
Generate the API Gateway Project
Open Spring Initializr and create another Maven project.
Use the following configuration:
| Setting | Value |
|---|---|
| Project | Maven |
| Language | Java |
| Spring Boot | Current compatible 4.x release |
| Group | com.djamware |
| Artifact | api-gateway |
| Name | api-gateway |
| Package name | com.djamware.gateway |
| Packaging | Jar |
| Java | 21 |
Add these dependencies:
-
Spring Cloud Gateway
-
Eureka Discovery Client
Download the project and place it alongside the other services:
spring-cloud-microservices/
├── eureka-server/
├── product-service/
├── order-service/
└── api-gateway/
Configure the Gateway
Open:
src/main/resources/application.yml
and configure:
spring:
  application:
    name: api-gateway

  cloud:
    gateway:
      routes:
        - id: product-service
          uri: lb://product-service
          predicates:
            - Path=/products/**

        - id: order-service
          uri: lb://order-service
          predicates:
            - Path=/orders/**

server:
  port: 8080

eureka:
  client:
    service-url:
      defaultZone: http://localhost:8761/eureka
There are several important parts of this configuration.
Configure the Application Name
spring:
  application:
    name: api-gateway
This gives the gateway its service name.
Although the gateway is primarily used by external clients, it can also register itself with Eureka. This is useful when the infrastructure grows, and other services need to discover the gateway.
Configure the Gateway Port
server:
  port: 8080
The gateway will be the public entry point for our local application:
http://localhost:8080
The internal services continue to use their own ports:
Product Service → 8081
Order Service   → 8082
Clients no longer need to know about those internal ports.
Configure the Product Route
The first route is:
- id: product-service
  uri: lb://product-service
  predicates:
    - Path=/products/**
This tells the gateway:
When a request matches
/products/**, route it to the service namedproduct-service.
For example:
GET /products
is routed to:
product-service
Likewise:
GET /products/1
is routed to the Product Service.
Understanding lb://
The URI is:
lb://product-service
The lb:// prefix means that the destination is a service name rather than a fixed HTTP URL.
The gateway can use service discovery and load balancing to locate an available instance of product-service.
Compare this with a hard-coded URL:
http://localhost:8081
The hard-coded URL identifies one specific location.
The service-based URI:
lb://product-service
identifies the logical service.
This is particularly useful when multiple instances of the service are running.
Configure the Order Route
The second route is:
- id: order-service
  uri: lb://order-service
  predicates:
    - Path=/orders/**
Requests matching:
/orders/**
are routed to the Order Service.
For example:
GET /orders
is routed to the Order Service.
Similarly:
GET /orders/1
is also routed to the Order Service.
Start the API Gateway
Make sure the following services are already running:
Eureka Server
Product Service
Order Service
Then start the gateway:
./mvnw spring-boot:run
The gateway should start on:
http://localhost:8080
If the gateway is configured as a Eureka client, open:
http://localhost:8761
and verify that it has registered as well.
The Eureka dashboard should now contain entries similar to:
APPLICATION
API-GATEWAY
ORDER-SERVICE
PRODUCT-SERVICE
All registered instances should have an UP status.
Test the Product Route
Previously, we accessed the Product Service directly:
curl http://localhost:8081/products
Now we can send the same request through the gateway:
curl http://localhost:8080/products
The request flow is:
curl
 │
 ▼
API Gateway :8080
 │
 │ /products
 ▼
Product Service :8081
 │
 ▼
Product Database
The response should be the same product data returned by the Product Service.
You can also retrieve a specific product:
curl http://localhost:8080/products/1
The gateway will forward the request to:
GET /products/1
on the Product Service.
Test the Order Route
We can also access the Order Service through the gateway.
Retrieve all orders:
curl http://localhost:8080/orders
Create an order:
curl -X POST http://localhost:8080/orders \
  -H "Content-Type: application/json" \
  -d '{
    "productId": 1,
    "quantity": 2
  }'
The complete request flow is now:
Client
  │
  │ POST /orders
  ▼
API Gateway
  │
  │ lb://order-service
  ▼
Order Service
  │
  │ lb://product-service
  ▼
Product Service
  │
  ▼
Product Database
The client only needs to know the gateway address.
Why Use an API Gateway?
At first, the gateway may seem unnecessary because the services are already accessible directly.
However, the gateway becomes increasingly valuable as the application grows.
Without a gateway, a client might need to know:
Product Service → http://product-service:8081
Order Service   → http://order-service:8082
Customer Service → http://customer-service:8083
Payment Service → http://payment-service:8084
This exposes internal architecture to the client.
With a gateway, the client needs only:
API Gateway → http://api.example.com
The gateway can then route requests internally.
                         ┌───────────────────┐
                         │      Client       │
                         └─────────┬─────────┘
                                   │
                                   ▼
                         ┌───────────────────┐
                         │    API Gateway    │
                         └─────────┬─────────┘
                                   │
               ┌───────────────────┼───────────────────┐
               │                   │                   │
               ▼                   ▼                   ▼
          Product Service      Order Service      Other Services
This also provides a natural place to introduce cross-cutting concerns later.
Gateway Responsibilities
An API Gateway can handle more than routing.
Common responsibilities include:
Authentication
The gateway can validate authentication tokens before forwarding requests.
Client
  │
  │ Token
  ▼
Gateway
  │
  │ authenticated request
  ▼
Microservice
Authorization
The gateway can apply access rules to routes.
For example:
GET /products       → public
POST /products      → authenticated users
DELETE /products/1  → administrators
Rate Limiting
The gateway can limit how frequently clients can call an API.
This helps protect backend services from excessive traffic.
CORS
Cross-origin request policies can be handled centrally rather than configured independently in every service.
Request Filtering
The gateway can inspect or modify requests before forwarding them.
Observability
A gateway provides a useful location for collecting request metrics, access logs, and tracing information.
We will keep the gateway simple for now and focus on routing.
Gateway and Service Discovery
There are now two places where service discovery is useful.
First, the Order Service uses the Product Service's logical name:
@FeignClient(name = "product-service")
Second, the API Gateway uses:
uri: lb://product-service
Both approaches avoid hard-coding the physical location of the Product Service.
The architecture is therefore:
                         ┌─────────────────┐
                         │  Eureka Server  │
                         │     :8761       │
                         └───────▲─────────┘
                                 │
                       service discovery
                                 │
          ┌──────────────────────┼──────────────────────┐
          │                      │                      │
          │                      │                      │
 ┌────────┴────────┐    ┌────────┴────────┐    ┌────────┴────────┐
 │   API Gateway   │    │ Order Service   │    │ Product Service │
 │      :8080      │    │      :8082      │    │      :8081      │
 └────────┬────────┘    └────────┬────────┘    └─────────────────┘
          │                      │
          │                      │
          └──────────►───────────┘
                 routing / calls
What We Have Built So Far
The application now contains four independent Spring Boot applications:
spring-cloud-microservices/
├── eureka-server/
├── product-service/
├── order-service/
└── api-gateway/
Their responsibilities are:
| Component | Responsibility |
|---|---|
| Eureka Server | Service registration and discovery |
| Product Service | Product management |
| Order Service | Order management |
| API Gateway | External request routing |
The client now has a single entry point:
http://localhost:8080
while the individual services remain independently deployable.
However, our configuration is currently duplicated across the individual applications. As the number of microservices increases, managing configuration separately becomes difficult.
For example, every service currently needs to know the Eureka Server address:
eureka:
  client:
    service-url:
      defaultZone: http://localhost:8761/eureka
In a larger environment, we may also need different configurations for development, testing, staging, and production.
In the next section, we will introduce centralized configuration with Spring Cloud Config so that configuration can be managed separately from the individual microservices.
Centralize Configuration with Spring Cloud Config
So far, each service has its own application.yml file.
For example, the Product Service contains:
eureka:
  client:
    service-url:
      defaultZone: http://localhost:8761/eureka
The Order Service has the same configuration, and the API Gateway has a similar configuration.
This works for a small application, but imagine having 20 or 50 microservices. Configuration would be distributed across many repositories and application files.
Spring Cloud Config addresses this problem by providing a dedicated Config Server.
The basic architecture becomes:
                         ┌────────────────────┐
                         │   Config Server    │
                         │      :8888         │
                         └─────────┬──────────┘
                                   │
                    configuration  │
                  ┌────────────────┼────────────────┐
                  │                │                │
                  ▼                ▼                ▼
          Product Service    Order Service    API Gateway
Instead of each application maintaining all of its configuration locally, applications can retrieve external configuration from the Config Server.
Create the Config Server
Create another Spring Boot project using Spring Initializr.
Use:
| Setting | Value |
|---|---|
| Project | Maven |
| Language | Java |
| Group | com.djamware |
| Artifact | config-server |
| Name | config-server |
| Package name | com.djamware.config |
| Packaging | Jar |
| Java | 21 |
Add the following dependency:
-
Spring Cloud Config Server
Download the project and add it to the existing directory:
spring-cloud-microservices/
├── config-server/
├── eureka-server/
├── product-service/
├── order-service/
└── api-gateway/
Enable the Config Server
Open the main application class:
ConfigServerApplication.java
and add @EnableConfigServer:
package com.djamware.config;

import org.springframework.boot.SpringApplication;
import org.springframework.boot.autoconfigure.SpringBootApplication;
import org.springframework.cloud.config.server.EnableConfigServer;

@SpringBootApplication
@EnableConfigServer
public class ConfigServerApplication {

    public static void main(String[] args) {
        SpringApplication.run(ConfigServerApplication.class, args);
    }
}
The @EnableConfigServer annotation enables the Spring Cloud Config Server functionality.
Configure the Config Server
Open:
src/main/resources/application.yml
and add:
spring:
  application:
    name: config-server

  cloud:
    config:
      server:
        native:
          search-locations: classpath:/config

server:
  port: 8888
For this tutorial, we'll use the native configuration backend. This keeps the example self-contained and avoids introducing a separate Git repository before we understand how Config Server works.
The configuration files will be stored inside:
src/main/resources/config/
The Config Server will read configuration from this directory.
Create Centralized Configuration Files
Create the following directory:
src/main/resources/config/
Inside it, create:
application.yml
product-service.yml
order-service.yml
api-gateway.yml
The application.yml file contains configuration shared by all applications.
For example:
eureka:
  client:
    service-url:
      defaultZone: http://localhost:8761/eureka
The Product Service configuration can contain:
server:
  port: 8081

spring:
  datasource:
    url: jdbc:h2:mem:productdb
    driver-class-name: org.h2.Driver
    username: sa
    password:

  jpa:
    hibernate:
      ddl-auto: update
    show-sql: true
The Order Service configuration can contain:
server:
  port: 8082

spring:
  datasource:
    url: jdbc:h2:mem:orderdb
    driver-class-name: org.h2.Driver
    username: sa
    password:

  jpa:
    hibernate:
      ddl-auto: update
    show-sql: true
And the gateway configuration can contain:
server:
  port: 8080

spring:
  cloud:
    gateway:
      routes:
        - id: product-service
          uri: lb://product-service
          predicates:
            - Path=/products/**

        - id: order-service
          uri: lb://order-service
          predicates:
            - Path=/orders/**
The resulting Config Server structure is:
config-server/
└── src/
    └── main/
        └── resources/
            └── config/
                ├── application.yml
                ├── product-service.yml
                ├── order-service.yml
                └── api-gateway.yml
How Configuration Is Selected
Spring Cloud Config uses the application's name when determining which configuration to return.
For example, the Product Service has:
spring:
  application:
    name: product-service
When it requests configuration from the Config Server, the server looks for:
product-service.yml
It also loads the shared:
application.yml
The effective configuration is therefore conceptually:
application.yml
       +
product-service.yml
       │
       ▼
Product Service
For the Order Service:
application.yml
       +
order-service.yml
       │
       ▼
Order Service
This allows common configuration to be defined once while service-specific settings remain separate.
Test the Config Server
Start the Config Server:
./mvnw spring-boot:run
It should run on:
http://localhost:8888
The Config Server exposes configuration through HTTP endpoints.
For example, open:
http://localhost:8888/product-service/default
You should receive a response containing the configuration for product-service.
The response is normally represented as JSON and contains information about the configuration sources and properties.
You can also request:
http://localhost:8888/order-service/default
for the Order Service configuration.
Connect the Product Service
Now that the Config Server exists, the Product Service needs to know where to find it.
Modern Spring Boot applications can use spring.config.import to import external configuration.
In the Product Service, create or update:
src/main/resources/application.yml
so that it contains:
spring:
  application:
    name: product-service

  config:
    import: optional:configserver:http://localhost:8888
The optional: prefix means that the application does not necessarily have to fail immediately if the Config Server is unavailable during startup.
For a production environment where centralized configuration is mandatory, you may choose to remove optional:.
The local application.yml can now be much smaller:
spring:
  application:
    name: product-service

  config:
    import: optional:configserver:http://localhost:8888
The remaining configuration is retrieved from Config Server.
Connect the Order Service
Apply the same approach to the Order Service:
spring:
  application:
    name: order-service

  config:
    import: optional:configserver:http://localhost:8888
The application name is important because it tells Config Server which service-specific configuration to retrieve.
The Config Server will combine:
application.yml
with:
order-service.yml
Connect the API Gateway
The API Gateway can use the same configuration mechanism:
spring:
  application:
    name: api-gateway

  config:
    import: optional:configserver:http://localhost:8888
Its gateway routes can then live in:
api-gateway.yml
instead of the gateway application's local configuration.
Startup Order
Centralized configuration introduces another dependency into our application.
The recommended local startup sequence is now:
1. Config Server
       │
       ▼
2. Eureka Server
       │
       ├──► Product Service
       ├──► Order Service
       └──► API Gateway
Start the Config Server first:
cd config-server
./mvnw spring-boot:run
Then start Eureka:
cd ../eureka-server
./mvnw spring-boot:run
Then start the Product Service:
cd ../product-service
./mvnw spring-boot:run
Start the Order Service:
cd ../order-service
./mvnw spring-boot:run
Finally, start the API Gateway:
cd ../api-gateway
./mvnw spring-boot:run
Why Centralized Configuration Helps
Without Config Server, we might have:
product-service/
└── application.yml

order-service/
└── application.yml

api-gateway/
└── application.yml
Each application has its own copy of shared configuration.
With Config Server:
                 ┌──────────────────┐
                 │  Config Server   │
                 │                  │
                 │ application.yml  │
                 │ product-service  │
                 │ order-service    │
                 │ api-gateway      │
                 └────────┬─────────┘
                          │
             ┌────────────┼────────────┐
             ▼            ▼            ▼
          Product       Order       Gateway
          Service      Service       Service
Common settings can be maintained centrally.
This becomes particularly useful when the same application needs different configuration for different environments.
For example:
config/
├── application.yml
├── product-service.yml
├── product-service-dev.yml
├── product-service-prod.yml
├── order-service.yml
├── order-service-dev.yml
└── order-service-prod.yml
The exact organization depends on the deployment strategy and configuration backend.
Native Configuration vs Git
The native backend is useful for learning because everything is contained in the Config Server project.
For a production system, configuration is commonly stored in an external repository or configuration system.
A typical architecture might look like:
Git Repository
      │
      ▼
Config Server
      │
      ├──► Product Service
      ├──► Order Service
      └──► API Gateway
This provides additional benefits such as:
-
Version-controlled configuration.
-
Configuration history.
-
Pull-request-based changes.
-
Environment-specific configuration.
-
Separation between application code and operational configuration.
For this tutorial, we'll keep using the native backend so that the focus remains on Spring Cloud concepts.
Verify the Configuration
After starting all services, check their logs.
The Product Service should obtain its configuration from the Config Server.
The Order Service should do the same.
The API Gateway should retrieve its gateway routes from the centralized configuration.
You can then test the application through the gateway:
curl http://localhost:8080/products
and:
curl http://localhost:8080/orders
The request flow remains unchanged:
Client
  │
  ▼
API Gateway
  │
  ├──► Product Service
  │
  └──► Order Service
          │
          └──► Product Service
The difference is that configuration is now managed centrally:
                    ┌─────────────────┐
                    │  Config Server  │
                    │      :8888      │
                    └────────┬────────┘
                             │
                             ▼
                    ┌─────────────────┐
                    │  Microservices  │
                    └─────────────────┘
We have now added another important building block for distributed applications.
However, there is still a significant problem. Our Order Service makes a synchronous network call to the Product Service. If the Product Service becomes unavailable or takes too long to respond, the Order Service can also become slow or fail.
In a distributed system, failure is expected rather than exceptional.
In the next section, we will improve the application by adding resilience with Spring Cloud Circuit Breaker and Resilience4j, including timeouts, fallbacks, and circuit breakers.
Add Resilience with Circuit Breaker
In a distributed application, network calls can fail for many reasons.
For example:
-
A service may be temporarily unavailable.
-
A network connection may fail.
-
A service may become overloaded.
-
A request may take too long.
-
A database used by the remote service may be unavailable.
-
A deployment may temporarily remove all service instances.
Consider our current architecture:
Order Service
      │
      │ HTTP request
      ▼
Product Service
If the Product Service is unavailable, the Order Service can also be affected.
A circuit breaker helps prevent repeated calls to a failing service and provides an opportunity to return a controlled fallback response.
What Is a Circuit Breaker?
A circuit breaker works similarly to an electrical circuit breaker.
Under normal conditions, requests are allowed through:
Order Service
      │
      ▼
Product Service
If repeated failures occur, the circuit opens:
Order Service
      │
      X
   Circuit Open
Requests can then fail quickly instead of repeatedly waiting for the unavailable service.
After a configured period, the circuit breaker can enter a half-open state and allow a limited request through to determine whether the remote service has recovered.
The three common states are:
CLOSED
   │
   │ failures exceed threshold
   ▼
OPEN
   │
   │ wait
   ▼
HALF_OPEN
   │
   ├── success ──► CLOSED
   │
   └── failure ──► OPEN
Add Resilience4j
We will add the Spring Cloud Circuit Breaker Resilience4j starter to the Order Service.
Add this dependency to order-service/pom.xml:
<dependency>
    <groupId>org.springframework.cloud</groupId>
    <artifactId>spring-cloud-starter-circuitbreaker-resilience4j</artifactId>
</dependency>
The Spring Cloud dependency management configuration will provide the appropriate compatible version.
Configure the Circuit Breaker
Add the following configuration to the Order Service:
resilience4j:
  circuitbreaker:
    instances:
      productService:
        sliding-window-type: COUNT_BASED
        sliding-window-size: 5
        minimum-number-of-calls: 5
        failure-rate-threshold: 50
        wait-duration-in-open-state: 10s

  timelimiter:
    instances:
      productService:
        timeout-duration: 3s
This configuration creates a circuit breaker named productService.
Let's examine the important properties.
Sliding Window
sliding-window-type: COUNT_BASED
sliding-window-size: 5
The circuit breaker examines the most recent five calls when calculating the failure rate.
Minimum Number of Calls
minimum-number-of-calls: 5
The circuit breaker needs at least five calls before it evaluates the failure rate.
Failure Threshold
failure-rate-threshold: 50
If at least 50 percent of the recorded calls fail, the circuit can transition to the open state.
Open-State Duration
wait-duration-in-open-state: 10s
Once the circuit opens, it remains open for at least 10 seconds before attempting to transition to half-open.
Timeout
timeout-duration: 3s
A remote operation is allowed up to three seconds before the TimeLimiter considers it timed out.
The exact values used in a production application should be based on the expected traffic, latency, and failure characteristics of the system.
Create a Product Service Client with Circuit Breaker
Our current Feign client looks like this:
@FeignClient(name = "product-service")
public interface ProductClient {

    @GetMapping("/products/{id}")
    Product findById(@PathVariable Long id);
}
We can use Spring Cloud Circuit Breaker around the call from the Order Service.
Instead of placing the circuit-breaker logic directly inside the Feign interface, create a dedicated service component that controls the remote operation.
Update OrderService.java:
package com.djamware.order.service;

import com.djamware.order.client.ProductClient;
import com.djamware.order.dto.Product;
import com.djamware.order.entity.Order;
import com.djamware.order.repository.OrderRepository;
import org.springframework.cloud.client.circuitbreaker.CircuitBreaker;
import org.springframework.cloud.client.circuitbreaker.CircuitBreakerFactory;
import org.springframework.stereotype.Service;

import java.util.List;
import java.util.Optional;

@Service
public class OrderService {

    private final OrderRepository orderRepository;
    private final ProductClient productClient;
    private final CircuitBreakerFactory<?, ?> circuitBreakerFactory;

    public OrderService(
            OrderRepository orderRepository,
            ProductClient productClient,
            CircuitBreakerFactory<?, ?> circuitBreakerFactory) {
        this.orderRepository = orderRepository;
        this.productClient = productClient;
        this.circuitBreakerFactory = circuitBreakerFactory;
    }

    public List<Order> findAll() {
        return orderRepository.findAll();
    }

    public Optional<Order> findById(Long id) {
        return orderRepository.findById(id);
    }

    public Order save(Order order) {
        CircuitBreaker circuitBreaker =
                circuitBreakerFactory.create("productService");

        Product product = circuitBreaker.run(
                () -> productClient.findById(order.getProductId()),
                throwable -> null
        );

        if (product == null) {
            throw new IllegalStateException(
                    "Product service is currently unavailable"
            );
        }

        order.setPrice(product.getPrice());
        order.setStatus("NEW");

        return orderRepository.save(order);
    }

    public void deleteById(Long id) {
        orderRepository.deleteById(id);
    }
}
The important part is:
circuitBreaker.run(
    () -> productClient.findById(order.getProductId()),
    throwable -> null
);
The first function contains the normal operation:
() -> productClient.findById(order.getProductId())
The second function is the fallback:
throwable -> null
If the remote call fails or the circuit is open, the fallback is executed.
For a real application, returning null is generally not the best user experience. It is used here to keep the example simple. A better implementation would return a meaningful domain-specific response or throw an application exception that can be converted into an appropriate HTTP response.
Create a Dedicated Fallback
A cleaner implementation is to separate the fallback behavior.
For example:
private Product getProduct(Long productId) {
    CircuitBreaker circuitBreaker =
            circuitBreakerFactory.create("productService");

    return circuitBreaker.run(
            () -> productClient.findById(productId),
            throwable -> getProductFallback(productId)
    );
}

private Product getProductFallback(Long productId) {
    throw new IllegalStateException(
            "Unable to retrieve product " + productId
    );
}
The save() method can then become:
public Order save(Order order) {
    Product product = getProduct(order.getProductId());

    order.setPrice(product.getPrice());
    order.setStatus("NEW");

    return orderRepository.save(order);
}
This keeps the business operation easier to read.
Handle the Failure in the Controller
We don't want an internal IllegalStateException to produce an unclear response.
Create an exception handler in the Order Service:
package com.djamware.order.controller;

import org.springframework.http.HttpStatus;
import org.springframework.http.ResponseEntity;
import org.springframework.web.bind.annotation.ExceptionHandler;
import org.springframework.web.bind.annotation.RestControllerAdvice;

import java.util.Map;

@RestControllerAdvice
public class GlobalExceptionHandler {

    @ExceptionHandler(IllegalStateException.class)
    public ResponseEntity<Map<String, String>> handleServiceUnavailable(
            IllegalStateException exception) {

        return ResponseEntity
                .status(HttpStatus.SERVICE_UNAVAILABLE)
                .body(Map.of(
                        "error", exception.getMessage()
                ));
    }
}
Now, if the Product Service is unavailable, the Order Service can return HTTP 503 Service Unavailable.
For example:
{
  "error": "Unable to retrieve product 1"
}
This is much more useful to an API client than an unhandled server exception.
Simulate a Product Service Failure
To see the circuit breaker in action, stop the Product Service while keeping these applications running:
Config Server
Eureka Server
Order Service
API Gateway
Then try creating an order:
curl -X POST http://localhost:8080/orders \
  -H "Content-Type: application/json" \
  -d '{
    "productId": 1,
    "quantity": 2
  }'
Because the Product Service is unavailable, the Order Service cannot retrieve the product.
The request should eventually return a 503 Service Unavailable response rather than successfully creating an order with incomplete product information.
After enough failures, the circuit breaker opens.
Subsequent requests can then fail quickly instead of repeatedly waiting for the Product Service.
Why Timeouts Matter
A circuit breaker alone isn't enough.
Imagine the Product Service is technically running but takes 30 seconds to respond.
Without a timeout:
Order Service
     │
     │─────────────── wait ───────────────►
     │                                     Product Service
Each request can consume resources while waiting.
With a timeout:
Order Service
     │
     │────── request ──────►
     │
     │     3 seconds
     X
   timeout
The Order Service can stop waiting and execute its failure-handling logic.
This is why timeout configuration is an important part of resilient distributed systems.
Circuit Breaker vs Retry
A retry and a circuit breaker solve different problems.
A retry says:
The failure might be temporary, so try the request again.
A circuit breaker says:
This dependency appears unhealthy, so stop sending requests for a while.
They can be combined carefully.
For example:
Request
   │
   ▼
Retry
   │
   ├── success ──► response
   │
   └── repeated failure
             │
             ▼
       Circuit Breaker
             │
             ▼
          Fallback
Retries should be used carefully. Retrying every failed request multiple times can actually make an overloaded service worse.
Circuit Breaker States in Practice
During normal operation, the circuit is closed:
CLOSED
  │
  ├── successful calls
  └── occasional failures
If the failure rate exceeds the configured threshold:
CLOSED
  │
  │ too many failures
  ▼
OPEN
While open, requests are rejected without calling the Product Service.
After the configured wait period:
OPEN
  │
  │ wait 10 seconds
  ▼
HALF_OPEN
A limited request can then test the Product Service.
If the service has recovered:
HALF_OPEN
     │
     │ success
     ▼
  CLOSED
If the service is still failing:
HALF_OPEN
     │
     │ failure
     ▼
   OPEN
This prevents a failing dependency from continuously affecting the rest of the application.
Current Architecture
Our architecture now includes resilience around the Order Service's dependency on the Product Service:
                         ┌─────────────────┐
                         │  Config Server  │
                         │     :8888       │
                         └────────┬────────┘
                                  │
                                  ▼
                         ┌─────────────────┐
                         │  Eureka Server  │
                         │     :8761       │
                         └────────┬────────┘
                                  │
                                  ▼
                         ┌─────────────────┐
                         │   API Gateway   │
                         │      :8080      │
                         └────────┬────────┘
                                  │
                                  ▼
                         ┌─────────────────┐
                         │ Order Service   │
                         │      :8082      │
                         └────────┬────────┘
                                  │
                            Circuit Breaker
                                  │
                                  ▼
                         ┌─────────────────┐
                         │ Product Service │
                         │      :8081      │
                         └─────────────────┘
The application can now respond more gracefully when a remote service becomes unavailable.
However, our services still don't provide much operational visibility. In a distributed application, logs from several services can make troubleshooting difficult, and we need a way to understand application health and metrics.
In the next section, we'll add monitoring and observability with Spring Boot Actuator, including health endpoints that can be used to determine whether our microservices are running correctly.
Add Monitoring and Observability
As the application grows, simply knowing that a microservice is running is no longer enough.
We now have several applications:
Config Server
Eureka Server
API Gateway
Product Service
Order Service
Each application can have its own logs, errors, database operations, and remote service calls.
When something goes wrong, we need a way to answer questions such as:
-
Is the service running?
-
Is its database available?
-
Is the application accepting requests?
-
What is the current application status?
-
How many requests are being processed?
-
Are there errors or performance problems?
Spring Boot Actuator provides production-oriented features for monitoring and managing Spring Boot applications, including health and metrics endpoints.
Add Spring Boot Actuator
Add the Actuator dependency to the Product Service:
<dependency>
    <groupId>org.springframework.boot</groupId>
    <artifactId>spring-boot-starter-actuator</artifactId>
</dependency>
Do the same for the Order Service and API Gateway.
You can also add it to the Eureka and Config Server applications if you want to monitor those infrastructure components.
The project structure does not change. Actuator simply adds management endpoints to each Spring Boot application.
Configure Actuator
For the Product Service, add the following to its centralized configuration:
management:
  endpoints:
    web:
      exposure:
        include:
          - health
          - info
          - metrics
You can place the same configuration in the shared application.yml used by Config Server if you want these endpoints enabled consistently across the services.
The configuration exposes three useful endpoints:
/actuator/health
/actuator/info
/actuator/metrics
We don't need to expose every available Actuator endpoint. Limiting the exposed endpoints is a better approach, particularly when applications are deployed to a public or untrusted network.
Check the Health Endpoint
Start the Product Service and open:
http://localhost:8081/actuator/health
You should receive a response similar to:
{
  "status": "UP"
}
The UP status indicates that the application is currently healthy according to the health indicators available to it.
You can perform the same check against the Order Service:
http://localhost:8082/actuator/health
and the API Gateway:
http://localhost:8080/actuator/health
Health Checks
Health information becomes particularly useful when applications run inside containers or an orchestration platform.
A platform can use a health endpoint to determine whether an application is responding correctly.
For example:
                  ┌─────────────────┐
                  │   Load Balancer │
                  └────────┬────────┘
                           │
                  health check
                           │
                           ▼
                  ┌─────────────────┐
                  │ Product Service │
                  │ /actuator/health│
                  └─────────────────┘
If the application reports that it is unhealthy, the infrastructure can take appropriate action, such as removing an unhealthy instance from service.
Health checks are therefore different from simply checking whether a TCP port is open.
Health and Database Connectivity
Spring Boot can automatically configure health indicators for supported infrastructure.
For example, because the Product Service uses Spring Data JPA and H2, its health information can include database connectivity.
This means that:
Application running
doesn't necessarily mean:
Application healthy
An application may be running while its database is unavailable.
Health indicators help expose this distinction.
Add Application Information
The Actuator info endpoint can expose application-specific information.
For example, add:
info:
  app:
    name: Product Service
    description: Product management microservice
    version: 1.0.0
Then open:
http://localhost:8081/actuator/info
The response can contain information about the application.
This can be useful when multiple versions of a service are deployed.
For example:
Product Service
Version: 1.0.0
can help identify which application version is currently running.
Application Metrics
The metrics endpoint provides access to application and JVM metrics.
Open:
http://localhost:8081/actuator/metrics
You will receive a list of available metric names.
Individual metrics can then be queried.
For example:
http://localhost:8081/actuator/metrics/jvm.memory.used
The exact set of available metrics depends on the application and its dependencies.
Metrics can provide information about:
-
JVM memory.
-
CPU-related measurements.
-
HTTP requests.
-
Database connection pools.
-
Thread pools.
-
Application startup.
-
Other runtime characteristics.
This becomes much more useful when metrics are collected by a dedicated monitoring system.
Logging Across Microservices
Actuator does not replace application logging.
Each service should still produce useful logs.
For example, the Order Service might log:
Creating order for product 1
and:
Calling Product Service for product 1
If the Product Service becomes unavailable, the Order Service should produce an appropriate error message.
A distributed application may therefore produce logs similar to:
API Gateway
    │
    └── POST /orders

Order Service
    │
    └── Creating order

Order Service
    │
    └── Calling product-service

Product Service
    │
    └── GET /products/1
This is useful when troubleshooting a request that travels through multiple services.
Correlation IDs
A common observability technique is to associate related requests with a unique identifier.
For example:
Correlation ID: 7f83b165
The same identifier can appear in logs from:
API Gateway
     │
     ▼
Order Service
     │
     ▼
Product Service
Then, when troubleshooting a particular request, we can search for the correlation ID and reconstruct the request flow.
In a production application, this is commonly combined with distributed tracing.
Distributed Tracing
Consider an order request:
Client
  │
  ▼
API Gateway
  │
  ▼
Order Service
  │
  ▼
Product Service
  │
  ▼
Product Database
If the request takes five seconds, looking at individual application logs may not immediately tell us where the delay occurred.
Distributed tracing allows a single request to be represented as a trace containing multiple spans:
Trace
├── API Gateway       100 ms
├── Order Service     150 ms
├── Product Service  3,500 ms
└── Database          3,200 ms
This makes it much easier to identify the slow component.
Spring applications can integrate with modern observability and tracing systems through Micrometer Observation and related instrumentation.
For this tutorial, we will keep the initial setup simple and focus on Actuator. Distributed tracing can be added as the application moves toward production deployment.
Secure Actuator Endpoints
Actuator endpoints can expose useful operational information, so they should not automatically be exposed publicly.
For example, exposing:
/actuator/metrics
to an unauthenticated public client may reveal information that should remain internal.
A production architecture should generally separate management traffic from normal application traffic.
For example:
                    Public Network
                          │
                          ▼
                    API Gateway
                          │
                    Application APIs
                          │
                          ▼
                    Microservices

                    Internal Network
                          │
                          ▼
                    Actuator Endpoints
Authentication and network-level access controls should be applied according to the deployment environment.
Create a Management Port
For some deployments, management endpoints can be placed on a separate port.
For example:
management:
  server:
    port: 9091
The application could then continue serving normal requests on:
8081
while management endpoints are available on:
9091
The architecture becomes:
Product Service
     │
     ├── Application API → :8081
     │
     └── Management API  → :9091
This can make it easier to control access to operational endpoints.
Whether a separate management port is appropriate depends on the deployment environment.
Monitoring the Complete Application
We now have several services that can expose health information:
Config Server
    └── /actuator/health

Eureka Server
    └── /actuator/health

Product Service
    └── /actuator/health

Order Service
    └── /actuator/health

API Gateway
    └── /actuator/health
An operational monitoring system can periodically check these endpoints.
Conceptually:
                   Monitoring System
                          │
            ┌─────────────┼─────────────┐
            │             │             │
            ▼             ▼             ▼
       Product         Order        API Gateway
       /health         /health        /health
This allows operators to detect unhealthy services before users experience prolonged failures.
Current Architecture
Our application now contains most of the fundamental components of a small Spring Cloud microservice system:
                         ┌─────────────────┐
                         │  Config Server  │
                         │     :8888       │
                         └────────┬────────┘
                                  │
                                  ▼
                         ┌─────────────────┐
                         │  Eureka Server  │
                         │     :8761       │
                         └────────┬────────┘
                                  │
                                  ▼
                         ┌─────────────────┐
                         │   API Gateway   │
                         │      :8080      │
                         └────────┬────────┘
                                  │
                     ┌────────────┴────────────┐
                     │                         │
                     ▼                         ▼
             ┌───────────────┐         ┌───────────────┐
             │ Product       │         │ Order         │
             │ Service       │◄────────│ Service       │
             │ :8081         │         │ :8082         │
             └───────┬───────┘         └───────┬───────┘
                     │                         │
                     ▼                         ▼
                Product DB                 Order DB
The services now have:
-
Service discovery through Eureka.
-
Centralized configuration through Spring Cloud Config.
-
Inter-service communication through OpenFeign.
-
Request routing through Spring Cloud Gateway.
-
Failure protection through a circuit breaker.
-
Health and metrics through Spring Boot Actuator.
There is one more major step before we can call this a complete deployable example: containerization.
Running five separate applications manually works during development, but it is inconvenient to distribute and deploy. Docker allows us to package each service consistently and run the complete system using containers.
In the next section, we will containerize the microservices with Docker and Docker Compose so that the complete Spring Cloud application can be started as a single environment.
Containerize the Microservices with Docker
At this point, our application consists of several independently running Spring Boot applications.
During development, we can start each one manually:
Config Server
Eureka Server
Product Service
Order Service
API Gateway
This becomes inconvenient as the system grows.
Docker allows us to package each application together with its runtime requirements into an image. Docker Compose can then start the entire local environment with a single command.
The architecture will look like this:
                         ┌─────────────────┐
                         │   API Gateway   │
                         │      :8080      │
                         └────────┬────────┘
                                  │
                    ┌─────────────┴─────────────┐
                    │                           │
                    ▼                           ▼
             Product Service              Order Service
                  :8081                       :8082
                    │                           │
                    ▼                           ▼
              Product DB                  Order DB

                    ▲
                    │
             Service Discovery
                    │
             ┌──────┴──────┐
             │   Eureka    │
             │    :8761    │
             └──────┬──────┘
                    ▲
                    │
             Config Server
                :8888
Create a Dockerfile
Each Spring Boot service needs a Docker image.
We'll start with the Product Service.
Create:
product-service/Dockerfile
with:
FROM eclipse-temurin:21-jre

WORKDIR /app

COPY target/product-service-*.jar app.jar

EXPOSE 8081

ENTRYPOINT ["java", "-jar", "app.jar"]
This Dockerfile uses the Java 21 runtime provided by Eclipse Temurin.
The important instructions are:
WORKDIR /app
which establishes the working directory inside the container,
COPY target/product-service-*.jar app.jar
which copies the built Spring Boot application into the image,
and:
ENTRYPOINT ["java", "-jar", "app.jar"]
which starts the application when the container launches.
Build the Product Service
Before building the Docker image, package the application:
cd product-service
./mvnw clean package
This produces a JAR file under:
target/
Then build the Docker image:
docker build -t microservices/product-service:1.0 .
The resulting image can be used to start the Product Service without installing Java directly on the host.
Create Dockerfiles for the Other Services
The same basic approach can be used for the remaining Spring Boot applications.
For the Order Service:
FROM eclipse-temurin:21-jre

WORKDIR /app

COPY target/order-service-*.jar app.jar

EXPOSE 8082

ENTRYPOINT ["java", "-jar", "app.jar"]
For the API Gateway:
FROM eclipse-temurin:21-jre

WORKDIR /app

COPY target/api-gateway-*.jar app.jar

EXPOSE 8080

ENTRYPOINT ["java", "-jar", "app.jar"]
For the Eureka Server:
FROM eclipse-temurin:21-jre

WORKDIR /app

COPY target/eureka-server-*.jar app.jar

EXPOSE 8761

ENTRYPOINT ["java", "-jar", "app.jar"]
And for the Config Server:
FROM eclipse-temurin:21-jre

WORKDIR /app

COPY target/config-server-*.jar app.jar

EXPOSE 8888

ENTRYPOINT ["java", "-jar", "app.jar"]
Each service is now independently containerizable.
A Better Multi-Stage Dockerfile
The previous Dockerfiles assume that Maven has already built the application.
For a more convenient build process, Docker can also build the application itself using a multi-stage build.
For example, the Product Service can use:
FROM maven:3.9-eclipse-temurin-21 AS builder

WORKDIR /app

COPY pom.xml .
COPY src ./src

RUN mvn clean package -DskipTests

FROM eclipse-temurin:21-jre

WORKDIR /app

COPY --from=builder /app/target/product-service-*.jar app.jar

EXPOSE 8081

ENTRYPOINT ["java", "-jar", "app.jar"]
The first stage builds the application:
Maven + Java 21
       │
       ▼
Spring Boot JAR
The second stage contains only the runtime environment and JAR:
Java 21 JRE
    +
application JAR
This results in a smaller runtime image than keeping Maven and the build tools in the final image.
For this tutorial, either approach is acceptable. Multi-stage builds are generally preferable for production images.
Important Docker Networking Change
There is an important difference between running our applications directly on the host and running them inside Docker.
Previously, we used:
localhost
For example:
defaultZone: http://localhost:8761/eureka
Inside a container, localhost means the current container, not another container.
For example:
Product Service container
      │
      └── localhost
             │
             └── Product Service itself
It does not mean the Eureka Server container.
Docker Compose provides an internal network where services can communicate using their service names.
Therefore, we'll change our configuration to use names such as:
eureka-server
config-server
product-service
order-service
api-gateway
instead of localhost.
Update Eureka Configuration
For example, services should use:
eureka:
  client:
    service-url:
      defaultZone: http://eureka-server:8761/eureka
The hostname:
eureka-server
will resolve to the Eureka Server container through Docker's internal network.
Update Config Server URLs
The services should similarly use:
spring:
  config:
    import: optional:configserver:http://config-server:8888
rather than:
spring:
  config:
    import: optional:configserver:http://localhost:8888
This distinction is critical when moving from local execution to Docker.
Configure Docker Compose
Create a file at the root of the project:
docker-compose.yml
A basic configuration can look like this:
services:

  config-server:
    build: ./config-server
    container_name: config-server
    ports:
      - "8888:8888"

  eureka-server:
    build: ./eureka-server
    container_name: eureka-server
    ports:
      - "8761:8761"
    depends_on:
      - config-server

  product-service:
    build: ./product-service
    container_name: product-service
    ports:
      - "8081:8081"
    depends_on:
      - config-server
      - eureka-server

  order-service:
    build: ./order-service
    container_name: order-service
    ports:
      - "8082:8082"
    depends_on:
      - config-server
      - eureka-server
      - product-service

  api-gateway:
    build: ./api-gateway
    container_name: api-gateway
    ports:
      - "8080:8080"
    depends_on:
      - config-server
      - eureka-server
      - product-service
      - order-service
Docker Compose automatically creates a network for these services.
Consequently:
config-server
eureka-server
product-service
order-service
api-gateway
can be used as hostnames between containers.
Understanding depends_on
For example:
depends_on:
  - config-server
  - eureka-server
tells Docker Compose to start those containers before starting the current service.
However, there is an important limitation.
depends_on controls startup order, not application readiness.
For example:
Config Server container starts
        │
        ▼
Eureka container starts
does not necessarily mean that Config Server is already ready to accept requests when Eureka starts.
A production-ready Compose configuration should therefore use health checks and appropriate startup/retry behavior.
We'll keep the initial configuration simple and improve it shortly.
Build and Start the Entire System
From the root directory:
docker compose up --build
Docker will build the images and start the containers.
You should see logs from the different services.
The containers can be listed with:
docker compose ps
You should see something similar to:
NAME              STATUS
config-server     Up
eureka-server     Up
product-service   Up
order-service     Up
api-gateway       Up
Verify Eureka
Open:
http://localhost:8761
The Eureka dashboard should show the registered services.
Remember that localhost is used by your browser, because the ports are mapped from Docker to the host.
Inside Docker, however, the applications communicate using service names.
For example:
Browser
   │
   │ localhost:8761
   ▼
Docker
   │
   ▼
eureka-server:8761
Test the Gateway
The API Gateway is mapped to port 8080.
Test it:
curl http://localhost:8080/products
The gateway receives the request and routes it internally:
localhost:8080
      │
      ▼
api-gateway
      │
      │ lb://product-service
      ▼
product-service:8081
The client doesn't need to know the internal Docker hostname.
Test the Order Service
Create an order through the gateway:
curl -X POST http://localhost:8080/orders \
  -H "Content-Type: application/json" \
  -d '{
    "productId": 1,
    "quantity": 2
  }'
The request travels through several containers:
Client
  │
  ▼
API Gateway
  │
  ▼
Order Service
  │
  ▼
Circuit Breaker
  │
  ▼
Product Service
  │
  ▼
Product Database
This demonstrates the complete microservice communication flow.
View Container Logs
Docker Compose makes it easy to inspect logs.
For example:
docker compose logs product-service
Follow the logs in real time:
docker compose logs -f product-service
You can also inspect the Order Service:
docker compose logs -f order-service
This is especially useful when debugging service-discovery or configuration problems.
Stop the Application
To stop all containers:
docker compose down
The containers will be stopped and removed.
To start them again:
docker compose up
If you changed the application code and need to rebuild the images:
docker compose up --build
Add Health Checks
As mentioned earlier, depends_on does not guarantee that a service is ready.
Docker Compose supports health checks.
For example, the Product Service can be configured with:
product-service:
  build: ./product-service
  container_name: product-service
  ports:
    - "8081:8081"
  healthcheck:
    test:
      [
        "CMD",
        "wget",
        "--no-verbose",
        "--tries=1",
        "--spider",
        "http://localhost:8081/actuator/health"
      ]
    interval: 10s
    timeout: 5s
    retries: 5
    start_period: 30s
The health check uses the Actuator endpoint we configured in the previous section:
/actuator/health
Docker can then determine whether the container is merely running or actually responding to health checks.
Similar health checks can be added to the other services.
Production Considerations
The Docker Compose configuration used here is intended for local development and demonstration.
A production deployment requires additional considerations, including:
-
External databases instead of in-memory H2.
-
Secrets management.
-
Persistent storage.
-
Container resource limits.
-
Health and readiness probes.
-
Secure communication.
-
Centralized logging.
-
Metrics collection.
-
Distributed tracing.
-
Image vulnerability scanning.
-
Automated image builds.
-
Proper service discovery.
-
Horizontal scaling.
-
Container orchestration.
For larger deployments, an orchestration platform such as Kubernetes can provide many of these capabilities.
The Complete Local Environment
Our project now looks like:
spring-cloud-microservices/
│
├── config-server/
│   ├── Dockerfile
│   └── ...
│
├── eureka-server/
│   ├── Dockerfile
│   └── ...
│
├── product-service/
│   ├── Dockerfile
│   └── ...
│
├── order-service/
│   ├── Dockerfile
│   └── ...
│
├── api-gateway/
│   ├── Dockerfile
│   └── ...
│
└── docker-compose.yml
The entire application can now be started with:
docker compose up --build
This is a major improvement over starting every Spring Boot application manually.
Final Architecture
We have reached a complete small-scale Spring Cloud microservice architecture:
                              Client
                                │
                                ▼
                       ┌─────────────────┐
                       │   API Gateway   │
                       │      :8080      │
                       └────────┬────────┘
                                │
                 ┌──────────────┴──────────────┐
                 │                             │
                 ▼                             ▼
        ┌─────────────────┐           ┌─────────────────┐
        │ Product Service │◄──────────│  Order Service  │
        │      :8081      │           │      :8082      │
        └────────┬────────┘           └────────┬────────┘
                 │                             │
                 ▼                             ▼
            Product DB                     Order DB

                         Service Discovery
                                ▲
                                │
                       ┌────────┴────────┐
                       │  Eureka Server  │
                       │      :8761      │
                       └────────┬────────┘
                                ▲
                                │
                       ┌────────┴────────┐
                       │  Config Server  │
                       │      :8888      │
                       └─────────────────┘
The application now demonstrates the major concepts introduced throughout this tutorial:
-
Independent Spring Boot services
-
Service registration and discovery
-
Inter-service communication with OpenFeign
-
API Gateway routing
-
Centralized configuration
-
Circuit-breaker-based resilience
-
Application health and metrics
-
Docker containerization
-
Docker Compose orchestration
There is still one important topic worth covering before wrapping up the tutorial: production considerations and best practices. The example is intentionally simple, but several decisions would need to change before deploying this architecture to a real production environment.
In the next section, we'll review those considerations and discuss how this sample architecture can evolve into a production-ready microservice platform.
Production Considerations and Best Practices
The application we've built is intentionally small so that the core Spring Cloud concepts are easy to understand.
A production system, however, requires considerably more attention to security, reliability, observability, deployment, data management, and operational processes.
The following areas are especially important.
1. Don't Use In-Memory Databases in Production
Our example uses H2 because it makes local development simple:
spring:
  datasource:
    url: jdbc:h2:mem:productdb
An in-memory database is recreated when the application restarts.
For production, use a persistent database such as PostgreSQL or MySQL.
A typical architecture might look like:
Product Service
      │
      ▼
PostgreSQL

Order Service
      │
      ▼
PostgreSQL
Each service should generally own its data.
Avoid having multiple microservices directly manipulate the same database tables. Doing so creates tight coupling between services and undermines one of the main benefits of a microservice architecture.
2. Keep Service Data Ownership Clear
The Product Service owns product data:
Product Service
│
└── Product Database
The Order Service owns order data:
Order Service
│
└── Order Database
If the Order Service needs product information, it should use the Product Service API:
Order Service
│
│ API call
▼
Product Service
rather than querying the Product database directly.
This keeps the boundaries between services clear.
3. Secure the API Gateway
Our gateway currently forwards requests without authentication.
A production system should normally protect APIs using an authentication and authorization mechanism.
A common architecture is:
Client
│
│ Access Token
▼
API Gateway
│
│ validate token
▼
Microservice
OAuth 2.0 and OpenID Connect are commonly used for modern API authentication.
The gateway can validate the incoming token and then forward an authenticated request to the appropriate service.
Authorization should still be considered at the service level when the service owns the business rule.
For example:
POST /products
might require a particular role, while:
GET /products
could be available to ordinary authenticated users.
4. Never Store Secrets in Git
Configuration such as:
spring:
datasource:
username: admin
password: my-secret-password
should not be committed to source control.
Production secrets can instead be managed using dedicated secret-management systems or environment-specific deployment mechanisms.
Examples include:
-
Database credentials.
-
API keys.
-
OAuth client secrets.
-
Encryption keys.
-
Cloud credentials.
The general principle is:
Source Code
│
├── application logic
└── non-sensitive configuration
Secret Management
│
└── passwords / keys / tokens
Secrets should be rotated periodically and access should be restricted according to the principle of least privilege.
5. Use Environment-Specific Configuration
Development and production rarely use identical settings.
For example:
Development
Product DB → local PostgreSQL
Gateway → localhost
while:
Production
Product DB → managed database
Gateway → public domain
Spring Cloud Config can help organize environment-specific configuration.
A configuration structure might look like:
config/
├── application.yml
├── application-dev.yml
├── application-prod.yml
├── product-service.yml
├── product-service-dev.yml
├── product-service-prod.yml
├── order-service.yml
├── order-service-dev.yml
└── order-service-prod.yml
This separates shared settings from environment-specific settings.
6. Don't Depend on a Single Service Instance
One of the major advantages of microservices is independent scaling.
Instead of running:
Product Service
│
└── one instance
we can run:
┌── Product Service
│
Load Balancer ───┼── Product Service
│
└── Product Service
Multiple instances provide greater availability and allow the system to handle more traffic.
Service discovery and load balancing become particularly valuable in this situation.
7. Design for Failure
Distributed systems fail.
A production application should assume that:
-
Networks can fail.
-
Services can restart.
-
Databases can become unavailable.
-
Requests can time out.
-
Instances can disappear.
-
External APIs can return errors.
Our circuit breaker helps with one part of this problem.
A production system may also use:
Timeouts
+
Retries
+
Circuit Breakers
+
Fallbacks
+
Bulkheads
These mechanisms should be configured carefully.
For example, retrying an overloaded service five times for every request can increase the load rather than reduce it.
Resilience should therefore be designed around actual traffic and failure patterns.
8. Make Operations Idempotent Where Appropriate
Consider an order creation request:
POST /orders
What happens if the client sends the request, but the network connection fails before receiving the response?
The client might retry the request.
The server could then receive the same logical operation twice.
For operations involving payments, orders, or other important state changes, idempotency becomes especially important.
A common approach is to accept an idempotency key:
Idempotency-Key: abc123
The server can recognize that the operation has already been processed and avoid creating a duplicate.
9. Use Distributed Tracing
Our application has several network hops:
Client
│
▼
Gateway
│
▼
Order Service
│
▼
Product Service
When a request becomes slow, we need to know where the time was spent.
Distributed tracing allows a request to be followed across services.
For example:
Trace: abc123
Gateway 80 ms
Order Service 120 ms
Product Service 950 ms
Database 900 ms
This immediately indicates that most of the latency originated in the Product Service and its database operation.
Tracing becomes increasingly valuable as the number of services increases.
10. Centralize Logs
With five services, manually checking individual container logs is manageable.
With dozens of services, it quickly becomes impractical.
A production environment should generally collect logs centrally:
Service A ─┐
Service B ─┤
Service C ─┼──► Central Log Platform
Service D ─┤
Service E ─┘
Structured JSON logging is often preferable to unstructured text because log-management systems can parse fields such as:
timestamp
service
level
traceId
requestId
message
This also makes searching and correlation easier.
11. Monitor Metrics
Actuator provides metrics, but production systems generally need a monitoring platform that collects and visualizes them.
A typical architecture is:
Microservices
│
│ metrics
▼
Metrics Collector
│
▼
Monitoring Dashboard
Useful metrics include:
-
Request rate.
-
Error rate.
-
Request latency.
-
JVM memory.
-
CPU usage.
-
Database connection usage.
-
Circuit-breaker state.
-
Container resource consumption.
One useful operational principle is to monitor the three broad categories of:
Traffic
Errors
Latency
These give a quick indication of whether the system is behaving normally.
12. Separate Liveness and Readiness
A service can be alive but not ready to receive traffic.
For example:
Application process → running
Database connection → unavailable
The process is alive, but the service may not be ready to handle normal requests.
This distinction is important in container orchestration.
Conceptually:
Liveness
│
└── Is the process functioning?
Readiness
│
└── Can the application handle traffic?
Using appropriate health checks helps deployment platforms make better decisions about routing traffic and restarting unhealthy containers.
13. Use HTTPS
Production APIs should not normally expose sensitive information over unencrypted HTTP.
The public architecture should use HTTPS:
Client
│
│ HTTPS
▼
API Gateway
│
▼
Internal Services
Depending on the environment, TLS may also be used between internal services.
This protects credentials, tokens, and application data while traveling across networks.
14. Don't Expose Internal Services Unnecessarily
The API Gateway is intended to provide the public entry point.
Therefore, services such as:
Product Service
Order Service
do not necessarily need to be publicly accessible from the Internet.
A better architecture is:
Internet
│
▼
API Gateway
│
├──► Product Service
│
└──► Order Service
while the internal services remain on a private network.
This reduces the externally exposed attack surface.
15. Consider Whether You Actually Need Every Spring Cloud Component
Spring Cloud provides many useful capabilities, but adding infrastructure also increases operational complexity.
Our example contains:
Config Server
Eureka Server
API Gateway
Product Service
Order Service
That is useful for demonstrating Spring Cloud concepts.
However, modern cloud platforms may already provide some of these capabilities.
For example, a container platform may provide:
-
Service discovery.
-
Load balancing.
-
Health checks.
-
Configuration management.
-
Secrets management.
-
Deployment orchestration.
In such an environment, introducing a separate Eureka Server may not always be necessary.
The right architecture depends on the infrastructure you're deploying to.
16. Consider Kubernetes for Larger Deployments
Docker Compose is excellent for local development and small environments.
For larger production deployments, Kubernetes is a common choice.
The architecture can evolve from:
Docker Compose
│
├── Product Service
├── Order Service
└── API Gateway
to:
Kubernetes Cluster
│
├── Product Service
├── Order Service
├── API Gateway
├── Config
├── Secrets
└── Monitoring
Kubernetes can provide capabilities such as:
-
Service discovery.
-
Load balancing.
-
Rolling deployments.
-
Horizontal scaling.
-
Health probes.
-
Container scheduling.
-
Self-healing.
Again, this does not mean Kubernetes is required for every microservice application.
Use the simplest infrastructure that satisfies the application's operational requirements.
17. Automate Testing
Microservices increase the number of interactions that need to be tested.
At minimum, consider:
Unit Tests
│
▼
Service Tests
│
▼
Integration Tests
│
▼
API Tests
│
▼
End-to-End Tests
For example, the Order Service should have tests for:
-
Creating an order.
-
Retrieving an order.
-
Handling an invalid product.
-
Product Service timeouts.
-
Product Service failures.
-
Circuit-breaker behavior.
Testing remote interactions is particularly important because distributed failures are different from ordinary application exceptions.
18. Use Contract Testing
Because services communicate through APIs, changes to one service can affect consumers.
For example:
Product Service API
│
▼
Order Service
If the Product Service changes its response format unexpectedly, the Order Service may stop working.
Contract testing can verify that the API contract expected by the consumer is still supported by the provider.
This is especially useful when multiple teams independently develop and deploy services.
19. Version APIs Carefully
APIs become contracts between services and clients.
Avoid making breaking changes casually.
For example, instead of immediately changing:
GET /products/1
in a way that breaks existing consumers, consider versioning strategies when appropriate:
/api/v1/products/1
/api/v2/products/1
API versioning should be introduced when there is a genuine compatibility requirement rather than simply because every endpoint should have a version number.
20. Keep Microservices Focused
One of the biggest architectural mistakes is creating services that are too large or too small.
A good service boundary should usually represent a meaningful business capability.
For example:
Product Service
Order Service
Payment Service
Customer Service
is generally more meaningful than splitting every database table into its own service.
The goal is not to maximize the number of services.
The goal is to create independently understandable, deployable, and scalable business capabilities.
21. Don't Create a Distributed Monolith
A system can have multiple services and still behave like a monolith.
For example:
Order Service
│
▼
Product Service
│
▼
Customer Service
│
▼
Payment Service
│
▼
Shipping Service
If every request requires a long chain of synchronous calls, the system becomes tightly coupled.
One service going down can cause failures throughout the entire application.
A healthy architecture should minimize unnecessary synchronous dependencies.
For operations that don't require an immediate response, asynchronous messaging can sometimes be a better approach.
For example:
Order Service
│
│ OrderCreated event
▼
Message Broker
│
├──► Payment Service
├──► Inventory Service
└──► Notification Service
This reduces direct coupling between services.
22. Know When Microservices Are Appropriate
Microservices are not automatically better than a monolith.
A small application with a small team may be easier to build and operate as a modular monolith.
Microservices introduce additional complexity:
More services
+
More deployments
+
Network communication
+
Distributed failures
+
Observability requirements
+
Infrastructure
The architecture should therefore be driven by actual business and organizational requirements.
For a small application, starting with a well-structured monolith and extracting services later can be a perfectly reasonable strategy.
Final Production Checklist
Before deploying this example to production, consider the following checklist:
[ ] Use persistent production databases
[ ] Define clear data ownership
[ ] Secure the API Gateway
[ ] Protect internal services
[ ] Move secrets out of source control
[ ] Configure environment-specific settings
[ ] Add health and readiness checks
[ ] Configure appropriate timeouts
[ ] Configure circuit breakers
[ ] Add centralized logging
[ ] Add metrics monitoring
[ ] Add distributed tracing
[ ] Use HTTPS
[ ] Implement automated tests
[ ] Consider contract testing
[ ] Design idempotent operations where necessary
[ ] Plan API compatibility and versioning
[ ] Automate builds and deployments
[ ] Plan backups and disaster recovery
[ ] Evaluate container orchestration needs
The important lesson is that building microservices is not just about splitting an application into several Spring Boot projects.
A production microservice architecture also requires an operational strategy for:
Security
Reliability
Observability
Deployment
Data
Testing
Scaling
With those considerations in place, the Spring Cloud components demonstrated in this tutorial can form a solid foundation for a distributed Java application.
The next and final section will summarize the architecture we've built and the key Spring Cloud concepts covered throughout the tutorial.
Conclusion
In this tutorial, we built a small but complete microservice architecture using Java, Spring Boot, and Spring Cloud.
Rather than creating one large application, we divided the system into independently deployable services:
┌─────────────────┐
│ API Gateway │
│ :8080 │
└────────┬────────┘
│
┌────────────┴────────────┐
│ │
▼ ▼
┌───────────────┐ ┌───────────────┐
│ Product │◄────────│ Order │
│ Service │ │ Service │
│ :8081 │ │ :8082 │
└───────────────┘ └───────────────┘
▲ ▲
│ │
└──────────┬──────────────┘
│
┌──────┴──────┐
│ Eureka │
│ :8761 │
└──────┬──────┘
▲
│
┌──────┴──────┐
│ Config │
│ Server │
│ :8888 │
└─────────────┘
Each component has a specific responsibility.
What We Built
The Product Service manages product-related functionality.
The Order Service manages orders and communicates with the Product Service when it needs product information.
The Eureka Server provides service discovery, allowing services to locate one another without relying on hard-coded hostnames and ports.
The API Gateway provides a single entry point for clients and routes requests to the appropriate backend service.
The Config Server centralizes application configuration so that configuration does not have to be duplicated across every service.
We also added Resilience4j through Spring Cloud Circuit Breaker to protect the Order Service from failures in the Product Service.
Finally, Spring Boot Actuator provides health and metrics endpoints that can be used for monitoring, while Docker and Docker Compose allow the complete application to be packaged and run as a containerized environment.
Spring Cloud Concepts
Throughout the tutorial, we covered several important Spring Cloud concepts:
| Component | Purpose |
|---|---|
| Spring Boot | Build the individual microservices |
| Spring Cloud Eureka | Service discovery |
| Spring Cloud OpenFeign | Service-to-service HTTP communication |
| Spring Cloud Gateway | API routing and gateway functionality |
| Spring Cloud Config | Centralized configuration |
| Spring Cloud Circuit Breaker | Resilience and failure handling |
| Resilience4j | Circuit breaker implementation |
| Spring Boot Actuator | Health and application metrics |
| Docker | Application containerization |
| Docker Compose | Local multi-container orchestration |
The important thing is not simply knowing how to configure each component, but understanding why each component exists.
Think in Responsibilities
A useful way to understand the architecture is to look at the responsibility of each layer.
The client doesn't need to know where individual services are running:
Client
│
▼
API Gateway
The services don't need to hard-code the locations of other services:
Order Service
│
▼
Service Discovery
│
▼
Product Service
Configuration doesn't need to be duplicated throughout every application:
Config Server
│
├── Product Service
├── Order Service
└── API Gateway
And a temporary failure in one service doesn't necessarily have to cascade through the entire application:
Order Service
│
▼
Circuit Breaker
│
X
Product Service
These patterns address some of the fundamental challenges introduced by distributed systems.
Microservices Are About More Than Code
One of the most important lessons from this tutorial is that microservices aren't simply a way of organizing Java packages.
Once an application is distributed across multiple processes, new operational problems appear.
You need to think about:
Service Discovery
+
Configuration
+
Networking
+
Security
+
Resilience
+
Observability
+
Deployment
+
Data Ownership
This is why a microservice architecture can be more complex than a traditional monolithic application.
The additional complexity is worthwhile when independent deployment, scaling, team ownership, or business boundaries justify it.
Start Small
You don't need dozens of services to start learning microservice architecture.
The two-service example in this tutorial is enough to demonstrate the most important concepts:
Product Service
▲
│
│ HTTP
│
Order Service
From there, infrastructure can be introduced incrementally:
Services
│
├── Service Discovery
│
├── API Gateway
│
├── Centralized Configuration
│
├── Resilience
│
└── Observability
This is usually easier to understand than attempting to build a large distributed system from the beginning.
Where to Go Next
Once you are comfortable with this architecture, there are several directions you can explore.
You can replace the H2 databases with PostgreSQL or MySQL and introduce persistent data.
You can add authentication and authorization using OAuth 2.0 and OpenID Connect.
You can introduce asynchronous communication using a message broker such as Kafka or RabbitMQ.
You can add distributed tracing and centralized logging.
You can deploy the services to a cloud environment or Kubernetes.
You can also introduce CI/CD pipelines so that each service can be built, tested, containerized, and deployed automatically.
The architecture can gradually evolve from:
Local Spring Boot Applications
to:
Docker Compose
and eventually to:
Cloud / Kubernetes
without changing the fundamental business-service boundaries.
Final Thoughts
Spring Boot makes it relatively easy to build individual Java services, while Spring Cloud provides tools for solving many of the problems that appear when those services communicate over a network.
The most important concepts to take away are:
-
Keep services focused on clear business responsibilities.
-
Use service discovery instead of hard-coding service locations.
-
Use an API Gateway to provide a controlled client entry point.
-
Centralize configuration when the number of services makes it useful.
-
Design for failure with timeouts and circuit breakers.
-
Make health, metrics, logs, and traces part of the architecture.
-
Containerize services to make deployment consistent.
-
Don't introduce microservices simply for the sake of using microservices.
A successful microservice architecture is ultimately less about how many services you create and more about how well those services can evolve, deploy, scale, and fail independently.
With Java, Spring Boot, and Spring Cloud, you now have a solid foundation for building and experimenting with these distributed-system patterns.
You can get the full source code on our GitHub.
You can find my first Ebook about Angular 21 + Spring Book 4 JWT Authentication here
We know that building beautifully designed Mobile and Web Apps from scratch can be frustrating and very time-consuming. Check Envato unlimited downloads and save development and design time.
That's just the basics. If you need more deep learning about Spring Boot, you can take the following cheap course:
- [NEW] Spring Boot 3, Spring 6 & Hibernate for Beginners
- Java Spring Framework 6, Spring Boot 3, Spring AI Telusko
- [NEW] Master Microservices with SpringBoot,Docker,Kubernetes
- Spring Boot Microservices Professional eCommerce Masterclass
- Java Spring Boot: Professional eCommerce Project Masterclass
- Master Backend Development using Java & Spring Boot
- Spring Boot REST APIs: Building Modern APIs with Spring Boot
- [NEW] Spring Boot 3, Spring Framework 6: Beginner to Guru
- Spring 6 & Spring Boot 3: AI, Security, Docker, Cloud
- From Java Dev to AI Engineer: Spring AI Fast Track
Thanks!