URL shorteners are everywhere. Services like TinyURL and Bitly turn long, hard-to-share links into short, clean URLs that are easier to manage and track.
In this tutorial, you will learn how to build your own URL shortener REST API using Java, Spring Boot, and MongoDB. By the end of this guide, you will have a working backend application that can:
- Shorten long URLs into compact codes
- Store URL mappings in MongoDB
- Redirect users from short URLs to the original links
- Track click counts
- Prevent duplicate entries
This project is excellent for learning Spring Boot REST APIs, MongoDB integration, and real-world backend system design concepts.
What You Will Build
Here is the flow of the application:
POST /api/url/shorten
Long URL → Short Code → Store in MongoDB

GET /{shortCode}
Short Code → Lookup → Redirect to Original URL
Example:
https://www.djamware.com/post/spring-boot-rest-api-with-mongodb
↓
http://localhost:8080/Ab3XyZ
Prerequisites
Before starting, make sure you have installed:
- Java 21 or later
- Maven 3.9+
- MongoDB
- Postman or curl
You can verify Java installation:
java -version
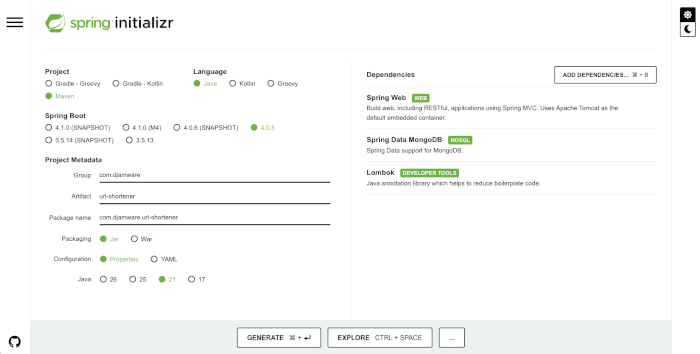
Step 1: Create a New Spring Boot Project
Go to Spring Initializr and generate a new project with these settings:
- Project: Maven
- Language: Java
- Spring Boot: 4.0.x
- Java: 21
Add dependencies:
- Spring Web
- Spring Data MongoDB
- Lombok
After generating the project, unzip then move it to your project folder, then open it in your favorite IDE.
Step 2: Add Maven Dependencies
If needed, update your pom.xml dependencies section:
<dependencies>
    <dependency>
        <groupId>org.springframework.boot</groupId>
        <artifactId>spring-boot-starter-web</artifactId>
    </dependency>

    <dependency>
        <groupId>org.springframework.boot</groupId>
        <artifactId>spring-boot-starter-data-mongodb</artifactId>
    </dependency>

    <dependency>
        <groupId>org.projectlombok</groupId>
        <artifactId>lombok</artifactId>
        <optional>true</optional>
    </dependency>
</dependencies>
Then refresh Maven.
Step 3: Configure MongoDB Connection
Open src/main/resources/application.properties and add:
spring.data.mongodb.uri=mongodb://localhost:27017/urlshortenerdb
server.port=8080
Make sure MongoDB is running locally:
mongodWant the Full Source Code + Bonus Chapters?
Get my complete Angular 21 eBook with:
- full project source code
- CRUD examples
- JWT auth
- deployment guide
👉 Buy now on Gumroad
Step 4: Create the MongoDB Document Model
Create a package named model, then create UrlMapping.java.
package com.djamware.url_shortener.model;

import java.time.LocalDateTime;

import org.springframework.data.annotation.Id;
import org.springframework.data.mongodb.core.mapping.Document;

import lombok.AllArgsConstructor;
import lombok.Builder;
import lombok.Data;
import lombok.NoArgsConstructor;

@Document(collection = "urls")
@Data
@NoArgsConstructor
@AllArgsConstructor
@Builder
public class UrlMapping {

    @Id
    private String id;

    private String originalUrl;

    private String shortCode;

    private Long clicks;

    private LocalDateTime createdAt;
}
This model stores the original URL, short code, click count, and creation timestamp.
Step 5: Create Repository Layer
Create a package named repository, then add UrlRepository.java.
package com.djamware.url_shortener.repository;

import java.util.Optional;

import org.springframework.data.mongodb.repository.MongoRepository;

import com.djamware.url_shortener.model.UrlMapping;

public interface UrlRepository extends MongoRepository<UrlMapping, String> {

    Optional<UrlMapping> findByShortCode(String shortCode);

    Optional<UrlMapping> findByOriginalUrl(String originalUrl);
}
This repository provides database access methods.
Step 6: Create Request DTO
Create a dto package and add UrlRequest.java.
package com.djamware.url_shortener.dto;

import lombok.Data;

@Data
public class UrlRequest {
    private String url;
}
This DTO will be used for API requests.
Step 7: Create Service Layer
Create a service package and add UrlService.java.
package com.djamware.url_shortener.service;

import java.util.Random;

import org.springframework.stereotype.Service;

import com.djamware.url_shortener.model.UrlMapping;
import com.djamware.url_shortener.repository.UrlRepository;

import lombok.RequiredArgsConstructor;

@Service
@RequiredArgsConstructor
public class UrlService {

    private final UrlRepository repository;

    private static final String BASE62 = "abcdefghijklmnopqrstuvwxyzABCDEFGHIJKLMNOPQRSTUVWXYZ0123456789";

    public String generateShortCode(int length) {
        Random random = new Random();
        StringBuilder code = new StringBuilder();

        for (int i = 0; i < length; i++) {
            code.append(BASE62.charAt(random.nextInt(BASE62.length())));
        }

        return code.toString();
    }

    public String shortenUrl(String originalUrl) {
        return repository.findByOriginalUrl(originalUrl)
                .map(UrlMapping::getShortCode)
                .orElseGet(() -> {
                    String code = generateShortCode(6);

                    UrlMapping mapping = UrlMapping.builder()
                            .originalUrl(originalUrl)
                            .shortCode(code)
                            .clicks(0L)
                            .createdAt(java.time.LocalDateTime.now())
                            .build();

                    repository.save(mapping);
                    return code;
                });
    }

    public String getOriginalUrl(String shortCode) {
        UrlMapping mapping = repository.findByShortCode(shortCode)
                .orElseThrow(() -> new RuntimeException("Short URL not found"));

        mapping.setClicks(mapping.getClicks() + 1);
        repository.save(mapping);

        return mapping.getOriginalUrl();
    }
}
This service generates the short code, saves it to MongoDB, and handles click tracking.
Step 8: Create REST Controller
Create a controller package and add UrlController.java.
package com.djamware.url_shortener.controller;

import java.net.URI;

import org.springframework.http.HttpStatus;
import org.springframework.http.ResponseEntity;
import org.springframework.web.bind.annotation.GetMapping;
import org.springframework.web.bind.annotation.PathVariable;
import org.springframework.web.bind.annotation.PostMapping;
import org.springframework.web.bind.annotation.RequestBody;
import org.springframework.web.bind.annotation.RestController;

import com.djamware.url_shortener.dto.UrlRequest;
import com.djamware.url_shortener.service.UrlService;

import lombok.RequiredArgsConstructor;

@RestController
@RequiredArgsConstructor
public class UrlController {

    private final UrlService service;

    @PostMapping("/api/url/shorten")
    public ResponseEntity<String> shortenUrl(@RequestBody UrlRequest request) {
        String shortCode = service.shortenUrl(request.getUrl());
        return ResponseEntity.ok("http://localhost:8080/" + shortCode);
    }

    @GetMapping("/{shortCode}")
    public ResponseEntity<Void> redirect(@PathVariable String shortCode) {
        String originalUrl = service.getOriginalUrl(shortCode);

        return ResponseEntity.status(HttpStatus.FOUND)
                .location(URI.create(originalUrl))
                .build();
    }
}
Step 9: Run the Application
Start the Spring Boot application:
mvn spring-boot:runYou should see:
Started UrlShortenerApplication
Step 10: Test the API
Shorten a URL
Use curl:
curl -X POST http://localhost:8080/api/url/shorten \
-H "Content-Type: application/json" \
-d '{"url":"https://www.djamware.com"}'
Example response:
http://localhost:8080/aB3xYzRedirect Using the Short URL
Open in browser:
http://localhost:8080/aB3xYzIt should redirect to:
https://www.djamware.com
Step 11: Verify Data in MongoDB
Open Mongo shell:
mongoshThen:
use urlshortenerdb
db.urls.find().pretty()
Example output:
{
  "originalUrl": "https://www.djamware.com",
  "shortCode": "aB3xYz",
  "clicks": 1
}
Conclusion
In this tutorial, you learned how to build a simple URL shortener application using Java, Spring Boot, and MongoDB.
You implemented:
- REST API endpoints
- URL shortening logic
- MongoDB document storage
- Redirect handling
- Click analytics
This project is an excellent foundation for more advanced features such as:
- custom aliases
- expiration dates
- QR code generation
- user authentication
- analytics dashboard
- Redis caching
You can find the full source code on our GitHub.
You can find my first Ebook about Angular 21 + Spring Book 4 JWT Authentication here.
We know that building beautifully designed Mobile and Web Apps from scratch can be frustrating and very time-consuming. Check Envato unlimited downloads and save development and design time.
That's just the basics. If you need more in-depth learning about Spring Boot, you can take the following cheap course:
- [NEW] Spring Boot 3, Spring 6 & Hibernate for Beginners
- Java Spring Framework 6, Spring Boot 3, Spring AI Telusko
- [NEW] Master Microservices with SpringBoot,Docker,Kubernetes
- Spring Boot Microservices Professional eCommerce Masterclass
- Java Spring Boot: Professional eCommerce Project Masterclass
- Master Backend Development using Java & Spring Boot
- Spring Boot REST APIs: Building Modern APIs with Spring Boot
- [NEW] Spring Boot 3, Spring Framework 6: Beginner to Guru
- Spring 6 & Spring Boot 3: AI, Security, Docker, Cloud
- From Java Dev to AI Engineer: Spring AI Fast Track
Thanks!