Modern cloud applications are increasingly built using microservices architectures, where small, independent services communicate over lightweight protocols. This approach improves scalability, resilience, and development velocity—but it also introduces new challenges in deployment, orchestration, and operations.
Go (Golang) has emerged as a top choice for cloud-native microservices due to its:
-
Compiled performance and low memory footprint
-
Excellent concurrency model with goroutines
-
Fast startup times (ideal for containers)
-
Simple, readable syntax for backend services
When combined with Docker for containerization and Kubernetes for orchestration, Go becomes a powerful foundation for building production-grade cloud systems.
What You’ll Learn in This Tutorial
In this guide, you’ll learn how to:
-
Design a simple Go-based microservices architecture
-
Containerize Go services using Docker best practices
-
Deploy and manage services using Kubernetes
-
Configure networking, scaling, and health checks
-
Understand real-world deployment patterns used in cloud environments
By the end of this tutorial, you’ll have a fully working Go microservices setup running on Kubernetes—ready to be deployed locally or in the cloud.
Who This Tutorial Is For
This tutorial is ideal for:
-
Backend developers moving into cloud-native development
-
Go developers who want to learn Docker & Kubernetes
-
Engineers building scalable microservices architectures
-
Anyone curious about real-world Go deployment workflows
Prerequisites
To follow along smoothly, you should have:
-
Basic knowledge of Go
-
Familiarity with REST APIs
-
Docker and Kubernetes installed (we’ll cover setup briefly)
💡 Don’t worry if you’re new to Kubernetes—each concept will be explained step by step with practical examples.
Microservices Architecture with Go

Before diving into Docker and Kubernetes, it’s important to understand how microservices are structured and why Go is particularly well-suited for this architectural style.
What Is a Microservices Architecture?
A microservices architecture breaks an application into small, independent services, each responsible for a single business capability. These services:
-
Run as separate processes
-
Communicate over the network (usually HTTP/REST or gRPC)
-
Can be deployed and scaled independently
-
Are loosely coupled but highly cohesive
Instead of one large monolithic application, microservices allow teams to evolve, deploy, and scale services without impacting the entire system.
Why Go Is Ideal for Microservices
Go was designed with networked services and concurrency in mind, making it a natural fit for microservices.
Key advantages include:
1. Fast and Lightweight
-
Compiles to a single static binary
-
Minimal runtime dependencies
-
Small Docker images (often under 20 MB)
2. Excellent Concurrency Model
-
Goroutines handle thousands of concurrent requests efficiently
-
Channels provide safe communication between processes
-
Perfect for high-throughput APIs
3. Simple Standard Library
-
Built-in
net/httppackage for REST APIs -
Native JSON encoding/decoding
-
Strong tooling (
go build,go test,go mod)
4. Cloud-Native Friendly
-
Fast startup times (great for Kubernetes pods)
-
Easy health checks and metrics
-
Works seamlessly with containers and orchestration platforms
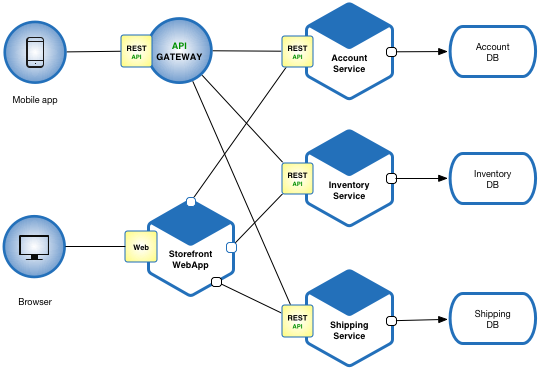
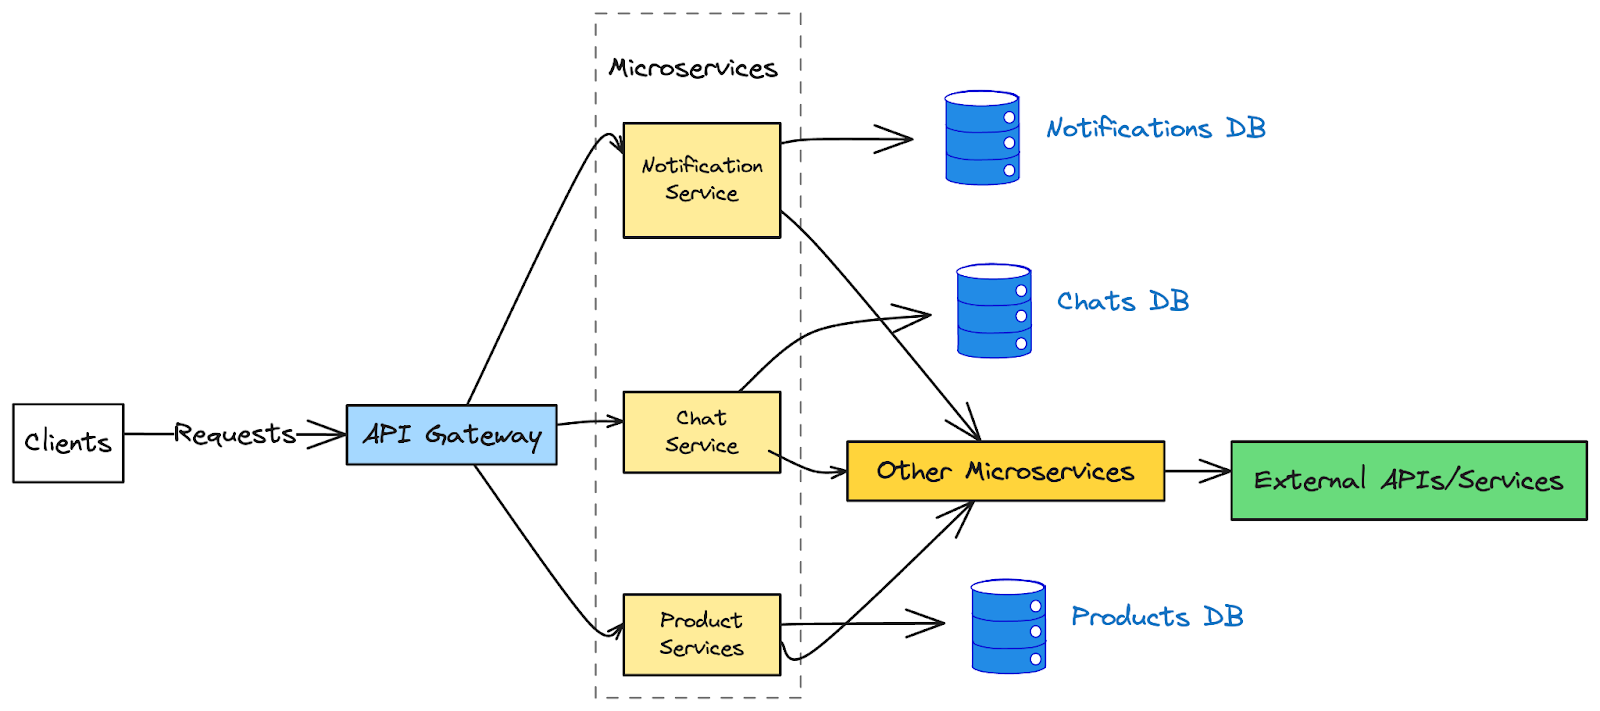
Typical Go Microservices Architecture
A common Go-based microservices setup looks like this:
-
API Gateway
Routes client requests to internal services -
Backend Services
Independent Go services (e.g., users, orders, payments) -
Service Communication
REST (HTTP/JSON) or gRPC -
Infrastructure Layer
Docker for packaging, Kubernetes for orchestration
Each service is developed, tested, and deployed independently.
Example Microservices Layout
Here’s a simple conceptual structure:
go-microservices/
├── user-service/
│   ├── main.go
│   ├── handlers/
│   └── Dockerfile
├── order-service/
│   ├── main.go
│   ├── handlers/
│   └── Dockerfile
└── k8s/
    ├── user-deployment.yaml
    ├── order-deployment.yaml
    └── services.yaml
Each folder represents a standalone Go application, containerized and deployed separately.
Communication Between Go Microservices
In this tutorial, we’ll use HTTP-based REST APIs for simplicity:
-
Easy to debug
-
Language-agnostic
-
Well-supported in Go’s standard library
Later, you can extend this approach using:
-
gRPC for high-performance communication
-
Message brokers (Kafka, NATS, RabbitMQ) for async workflows
Key Design Principles
When building Go microservices, keep these principles in mind:
-
Single Responsibility – one service, one job
-
Stateless Services – store state in databases or caches
-
Resilience – handle timeouts and failures gracefully
-
Observability – logs, metrics, and health endpoints
These principles align perfectly with Docker containers and Kubernetes pods.
Building a Simple Go Microservice
In this section, we’ll build a minimal but production-ready Go microservice. This service will expose REST endpoints, include a health check, and follow patterns that work well with Docker and Kubernetes.
Step 1: Project Structure
Start by creating a new folder for our service:
mkdir hello-service
cd hello-service
go mod init hello-service
Project structure:
hello-service/
├── go.mod
├── main.go
└── handlers/
    └── hello.go
This structure keeps the application simple while still separating concerns.
Step 2: Creating the HTTP Server
Open main.go and add the following code:
package main

import (
	"log"
	"net/http"

	"hello-service/handlers"
)

func main() {
	mux := http.NewServeMux()

	mux.HandleFunc("/hello", handlers.HelloHandler)
	mux.HandleFunc("/health", handlers.HealthHandler)

	log.Println("Hello Service running on :8080")
	log.Fatal(http.ListenAndServe(":8080", mux))
}
What’s happening here:
-
We use Go’s built-in
net/httpserver -
Routes are registered using
ServeMux -
The service listens on port 8080 (standard for containers)
Step 3: Implementing Request Handlers
Create handlers/hello.go:
package handlers

import (
	"encoding/json"
	"net/http"
)

type HelloResponse struct {
	Message string `json:"message"`
}

func HelloHandler(w http.ResponseWriter, r *http.Request) {
	response := HelloResponse{
		Message: "Hello from Go Microservice 🚀",
	}

	w.Header().Set("Content-Type", "application/json")
	json.NewEncoder(w).Encode(response)
}

func HealthHandler(w http.ResponseWriter, r *http.Request) {
	w.WriteHeader(http.StatusOK)
	w.Write([]byte("OK"))
}
Why this matters:
-
JSON responses are standard for microservices
-
/healthendpoint will be used by Kubernetes health probes -
No external dependencies required
Step 4: Running the Service Locally
Start the service:
go run main.goTest the endpoints:
curl http://localhost:8080/hello
curl http://localhost:8080/health
Expected response:
{
  "message": "Hello from Go Microservice 🚀"
}
Step 5: Cloud-Native Best Practices (Early)
Even at this early stage, we follow cloud-native principles:
-
Stateless design – no in-memory state
-
Fast startup – ideal for containers
-
Health endpoint – required by Kubernetes
-
Minimal dependencies – smaller Docker images
These decisions will pay off when we containerize the service.
Optional Enhancement: Configurable Port
For Kubernetes compatibility, update main.go to read the port from an environment variable:
port := os.Getenv("PORT")
if port == "" {
	port = "8080"
}

log.Fatal(http.ListenAndServe(":"+port, mux))
This allows flexible configuration across environments.
Containerizing the Go Microservice with Docker
To run Go microservices consistently across environments, we package them into Docker containers. In this section, you’ll learn how to create a small, secure, and production-ready Docker image for our Go service using a multi-stage build.
Why Docker for Go Microservices?
Docker solves several common deployment problems:
-
Ensures consistent runtime across environments
-
Simplifies dependency management
-
Enables fast scaling and portability
-
Works seamlessly with Kubernetes
Thanks to Go’s static binaries, Docker images for Go services can be extremely small and fast.
Step 1: Create a Dockerfile
Inside the hello-service directory, create a file named Dockerfile:
# ---- Build Stage ----
FROM golang:1.22-alpine AS builder

WORKDIR /app

# Install CA certificates
RUN apk add --no-cache ca-certificates

# Copy go mod files and download dependencies
COPY go.mod ./
RUN go mod download

# Copy source code
COPY . .

# Build the binary
RUN CGO_ENABLED=0 GOOS=linux GOARCH=amd64 \
    go build -o hello-service

# ---- Runtime Stage ----
FROM gcr.io/distroless/base-debian12

WORKDIR /app

COPY --from=builder /app/hello-service .

EXPOSE 8080

USER nonroot:nonroot

CMD ["./hello-service"]
Step 2: Understanding the Multi-Stage Build
This Dockerfile uses two stages:
Build Stage
-
Uses the official Go image
-
Compiles the application into a static binary
-
Keeps build tools out of the final image
Runtime Stage
-
Uses a minimal distroless base image
-
Contains only the compiled binary
-
Runs as a non-root user for security
✅ Result: tiny image, faster startup, better security
Step 3: Build the Docker Image
Run the following command from the hello-service directory:
docker build -t hello-service:1.0 .
Check the image size:
docker images hello-service
You’ll notice it’s significantly smaller than traditional images.
Step 4: Run the Container Locally
Start the container:
docker run -p 8080:8080 hello-service:1.0
Test the endpoints again:
curl http://localhost:8080/hello
curl http://localhost:8080/health
The service behaves the same—now inside a container.
Step 5: Docker Best Practices for Go Services
Follow these best practices when containerizing Go microservices:
-
Use multi-stage builds
-
Prefer distroless or
scratchimages -
Disable CGO for static binaries
-
Run containers as non-root
-
Expose only required ports
-
Avoid copying unnecessary files
These practices are essential for secure Kubernetes deployments.
Common Docker Issues (and Fixes)
| Issue | Cause | Fix |
|---|---|---|
| Container exits immediately | Wrong CMD | Use exec-form CMD |
| Cannot connect to the service | Port mismatch | Match EXPOSE and server port |
| Image too large | Single-stage build | Use multi-stage builds |
Deploying Go Microservices to Kubernetes
Now that our Go microservice is containerized, the next step is deploying it to Kubernetes, the de facto standard for orchestrating containerized applications in the cloud.
In this section, we’ll:
-
Create Kubernetes Deployment and Service resources
-
Configure health checks
-
Expose the microservice inside the cluster
-
Verify everything is running correctly
Step 1: Kubernetes Prerequisites
Make sure you have:
-
A running Kubernetes cluster (Docker Desktop, Minikube, or cloud-based)
-
kubectlinstalled and configured
Verify access:
kubectl get nodes
If you see your node(s), you’re ready.
Step 2: Create a Deployment Manifest
Create a new folder for Kubernetes manifests:
mkdir k8s
Create k8s/hello-deployment.yaml:
apiVersion: apps/v1
kind: Deployment
metadata:
  name: hello-service
spec:
  replicas: 2
  selector:
    matchLabels:
      app: hello-service
  template:
    metadata:
      labels:
        app: hello-service
    spec:
      containers:
        - name: hello-service
          image: hello-service:1.0
          imagePullPolicy: IfNotPresent
          ports:
            - containerPort: 8080
          livenessProbe:
            httpGet:
              path: /health
              port: 8080
            initialDelaySeconds: 5
            periodSeconds: 10
          readinessProbe:
            httpGet:
              path: /health
              port: 8080
            initialDelaySeconds: 5
            periodSeconds: 5
What this does:
-
Runs 2 replicas of the Go service
-
Restarts pods automatically if health checks fail
-
Uses
/healthfor liveness and readiness probes
Step 3: Create a Service Manifest
Create k8s/hello-service.yaml:
apiVersion: v1
kind: Service
metadata:
  name: hello-service
spec:
  selector:
    app: hello-service
  ports:
    - protocol: TCP
      port: 80
      targetPort: 8080
  type: ClusterIP
This service:
-
Exposes the microservice internally within the cluster
-
Provides stable networking for pod replicas
-
Enables service discovery via DNS (
hello-service)
Step 4: Deploy to Kubernetes
Apply both manifests:
kubectl apply -f k8s/hello-deployment.yaml
kubectl apply -f k8s/hello-service.yaml
Check deployment status:
kubectl get deployments
kubectl get pods
kubectl get services
You should see:
-
2 running pods
-
A ClusterIP service is assigned
Step 5: Access the Microservice
For local clusters, use port-forwarding:
kubectl port-forward service/hello-service 8080:80
Now test:
curl http://localhost:8080/hello
Expected output:
{
  "message": "Hello from Go Microservice 🚀"
}
🎉 Your Go microservice is now running on Kubernetes!
Step 6: Why This Works Well for Go
This setup highlights why Go shines in Kubernetes:
-
Fast pod startup
-
Minimal resource usage
-
Built-in HTTP server
-
Simple health endpoints
-
Easy horizontal scaling
These traits make Go services highly efficient in cloud-native environments.
Kubernetes Best Practices (Early)
Keep these in mind as your system grows:
-
Use labels consistently
-
Add resource limits (CPU & memory)
-
Keep services stateless
-
Version container images
-
Use readiness probes before exposing traffic
Scaling, Load Balancing & Configuration in Kubernetes

Once your Go microservices are running in Kubernetes, the real power of the platform comes from automatic scaling, built-in load balancing, and externalized configuration. In this section, we’ll enhance our deployment to make it scalable, resilient, and production-ready.
1. Scaling Go Microservices in Kubernetes
Kubernetes supports two main scaling approaches:
-
Manual scaling (adjust replicas)
-
Automatic scaling using the Horizontal Pod Autoscaler (HPA)
Manual Scaling
You can instantly scale your service by updating the number of replicas:
kubectl scale deployment hello-service --replicas=5
Verify:
kubectl get pods
Traffic will be distributed automatically across all running pods.
2. Horizontal Pod Autoscaler (HPA)
The HPA automatically scales pods based on CPU or memory usage.
Enable Metrics Server (if needed)
On local clusters:
kubectl top pods
If metrics are unavailable, install the metrics server for your environment.
Create an HPA Resource
Create k8s/hello-hpa.yaml:
apiVersion: autoscaling/v2
kind: HorizontalPodAutoscaler
metadata:
  name: hello-service-hpa
spec:
  scaleTargetRef:
    apiVersion: apps/v1
    kind: Deployment
    name: hello-service
  minReplicas: 2
  maxReplicas: 10
  metrics:
    - type: Resource
      resource:
        name: cpu
        target:
          type: Utilization
          averageUtilization: 60
Apply it:
kubectl apply -f k8s/hello-hpa.yamlKubernetes will now automatically scale your Go service based on CPU load.
3. Load Balancing in Kubernetes
Load balancing in Kubernetes is built in and requires no extra setup.
How It Works
-
A Service acts as a virtual IP
-
Incoming requests are distributed across pods
-
If a pod fails, traffic is rerouted automatically
Your existing ClusterIP service already provides:
-
Round-robin load balancing
-
Automatic failover
-
Stable DNS name
This makes scaling transparent to clients.
4. Resource Requests and Limits (Highly Recommended)
To enable effective autoscaling, define resource requests and limits.
Update hello-deployment.yaml:
resources:
  requests:
    cpu: "100m"
    memory: "64Mi"
  limits:
    cpu: "500m"
    memory: "128Mi"
Why this matters:
-
Kubernetes schedules pods efficiently
-
HPA uses requests to calculate scaling
-
Prevents noisy-neighbor issues
5. External Configuration with ConfigMaps
Hardcoding configuration is a bad idea in cloud environments.
Create a ConfigMap:
kubectl create configmap hello-config \
  --from-literal=APP_NAME=HelloService \
  --from-literal=GREETING="Hello from Kubernetes"
Update your Deployment:
env:
  - name: APP_NAME
    valueFrom:
      configMapKeyRef:
        name: hello-config
        key: APP_NAME
  - name: GREETING
    valueFrom:
      configMapKeyRef:
        name: hello-config
        key: GREETING
Your Go service can now read config from environment variables.
6. Managing Secrets Securely
For sensitive data (API keys, passwords), use Secrets:
kubectl create secret generic hello-secrets \
  --from-literal=API_KEY=my-secret-key
Reference it in your Deployment:
env:
  - name: API_KEY
    valueFrom:
      secretKeyRef:
        name: hello-secrets
        key: API_KEY
Secrets are:
-
Base64-encoded
-
Mounted securely
-
Easily rotated
7. Why This Matters for Production
These features together provide:
-
🚀 Automatic scaling under load
-
⚖️ Built-in load balancing
-
🔐 Secure configuration management
-
🔄 Zero-downtime updates
This is the foundation of cloud-native Go microservices.
Observability, Logging & Health Checks for Go Microservices
In production, running microservices isn’t enough—you need visibility into what they’re doing and how they’re behaving. Observability ensures you can detect issues, debug failures, and maintain reliability at scale.
In this section, we’ll add logging, health checks, and metrics to our Go microservice, making it fully production-ready in Kubernetes.
1. The Three Pillars of Observability
Modern observability is built on three core signals:
-
Logs – what happened?
-
Metrics – how is the system performing?
-
Health Checks – is the service alive and ready?
Kubernetes and Go integrate naturally with all three.
2. Structured Logging in Go
Avoid plain fmt.Println. Instead, use structured logs that work well with Kubernetes and log aggregators.
Simple Structured Logging (Standard Library)
Update your handler:
log.Printf(
  "method=%s path=%s remote=%s",
  r.Method,
  r.URL.Path,
  r.RemoteAddr,
)
These logs are:
-
Written to
stdout -
Automatically collected by Kubernetes
-
Easy to parse by tools like ELK or Loki
Best Practices
-
Log in JSON format for production
-
Include request IDs
-
Avoid logging sensitive data
3. Viewing Logs in Kubernetes
View logs for a pod:
kubectl logs pod/hello-service-xxxxx
Follow logs in real time:
kubectl logs -f deployment/hello-service
Kubernetes handles log collection automatically—no agent required at first.
4. Health Checks: Liveness & Readiness
We already created a /health endpoint. Now let’s refine its purpose.
Liveness Probe
-
Checks if the app is alive
-
Kubernetes restarts the pod if it fails
Readiness Probe
-
Checks if the app is ready to receive traffic
-
Kubernetes removes the pod from the service if it fails
Example implementation:
func HealthHandler(w http.ResponseWriter, r *http.Request) {
	w.WriteHeader(http.StatusOK)
	w.Write([]byte("OK"))
}
Mapped in Kubernetes:
livenessProbe:
  httpGet:
    path: /health
    port: 8080

readinessProbe:
  httpGet:
    path: /health
    port: 8080
5. Metrics with Prometheus (Go-Friendly)
Metrics help you answer:
-
How many requests?
-
How fast?
-
How many errors?
Add Prometheus Client
go get github.com/prometheus/client_golang/prometheus
Expose Metrics Endpoint
import "github.com/prometheus/client_golang/prometheus/promhttp"

mux.Handle("/metrics", promhttp.Handler())
Kubernetes and Prometheus can now scrape metrics automatically.
6. Key Metrics to Track
For Go microservices, focus on:
-
Request count
-
Request duration
-
Error rates
-
CPU & memory usage
-
Pod restarts
These metrics enable:
-
Alerting
-
Autoscaling
-
Capacity planning
7. Why Go Works So Well for Observability
Go’s advantages:
-
Minimal overhead logging
-
Native HTTP instrumentation
-
Excellent Prometheus ecosystem
-
Fast startup for probes & restarts
This makes Go services easy to observe and operate at scale.
8. Production Tips
-
Use JSON logs in production
-
Add request IDs via middleware
-
Separate
/healthand/readyendpoints for advanced setups -
Secure
/metricsif exposed externally -
Combine logs + metrics + alerts
CI/CD & Production Deployment Strategies for Go Microservices
To run Go microservices reliably in production, you need automation. Continuous Integration and Continuous Deployment (CI/CD) ensures every change is tested, packaged, and deployed safely and consistently.
In this final section, we’ll cover:
-
A practical CI/CD pipeline for Go microservices
-
Container image versioning strategies
-
Safe Kubernetes deployment patterns
-
Production-ready best practices
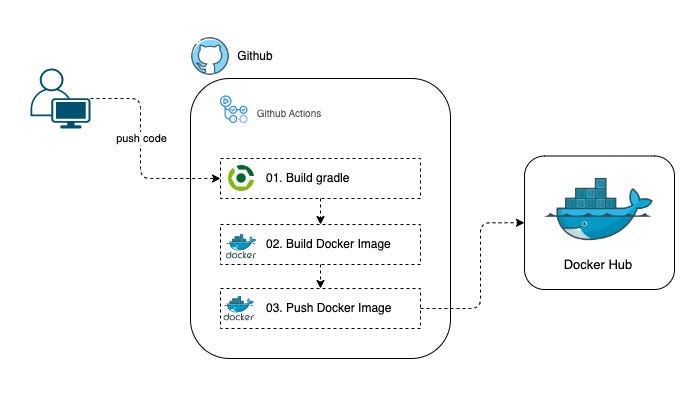
1. CI/CD Pipeline Overview
A typical cloud-native pipeline looks like this:
-
Code pushed to Git repository
-
Automated tests executed
-
Docker image built
-
Image pushed to a container registry
-
Kubernetes manifests applied
-
Service updated with zero downtime
This workflow eliminates manual deployments and reduces human error.
2. Continuous Integration for Go
At a minimum, your CI pipeline should:
-
Run
go test -
Enforce formatting (
go fmt) -
Build the binary
Example CI steps:
go fmt ./...
go test ./...
go build ./...
Fast build times make Go especially CI-friendly.
3. Building & Pushing Docker Images
Use a container registry such as:
-
Docker Hub
-
GitHub Container Registry (GHCR)
-
Cloud provider registries
Image Tagging Strategy
Avoid latest in production. Use:
-
Semantic versions:
1.0.0 -
Git commit SHA:
hello-service:abc123 -
Environment tags:
staging,prod
This makes rollbacks easy and traceable.
4. Example GitHub Actions Workflow
Create .github/workflows/deploy.yaml:
name: Build & Deploy Go Microservice

on:
  push:
    branches: [ "main" ]

jobs:
  build:
    runs-on: ubuntu-latest

    steps:
      - uses: actions/checkout@v4

      - name: Set up Go
        uses: actions/setup-go@v5
        with:
          go-version: "1.22"

      - name: Run tests
        run: go test ./...

      - name: Build Docker image
        run: docker build -t hello-service:${{ github.sha }} .

      - name: Push image
        run: |
          docker tag hello-service:${{ github.sha }} myrepo/hello-service:${{ github.sha }}
          docker push myrepo/hello-service:${{ github.sha }}
This pipeline:
-
Runs tests
-
Builds a Docker image
-
Pushes it to a registry
5. Updating Kubernetes Deployments
Update your Deployment image:
kubectl set image deployment/hello-service \
  hello-service=myrepo/hello-service:abc123
Kubernetes performs a rolling update:
-
New pods start first
-
Old pods terminate gradually
-
No downtime for users
6. Production Deployment Strategies
Rolling Updates (Default)
-
Safe and simple
-
Works for most services
Blue-Green Deployment
-
Two environments (blue & green)
-
Instant rollback
-
More infrastructure costs
Canary Deployment
-
Gradually release to a small % of users
-
Monitor metrics before full rollout
-
Ideal for high-risk changes
Kubernetes supports all three strategies.
7. Rollbacks & Failure Handling
Rollback instantly if needed:
kubectl rollout undo deployment/hello-service
Check rollout status:
kubectl rollout status deployment/hello-service
This is critical for production stability.
8. Production Best Practices for Go Microservices
✔ Use versioned container images
✔ Enforce CI checks before merge
✔ Enable health checks & metrics
✔ Monitor resource usage
✔ Automate rollbacks
✔ Keep services stateless
These practices ensure safe, repeatable deployments.
Final Thoughts
You’ve now built, containerized, scaled, observed, and deployed a production-ready Go microservice using Docker and Kubernetes.
This workflow reflects how modern cloud systems are built—and Go fits perfectly into this ecosystem.
Conclusion & Next Steps
In this tutorial, Go in the Cloud: Deploying Microservices with Docker, Kubernetes & Go, you’ve gone through the complete lifecycle of a cloud-native Go microservice—from writing the service itself to running it reliably in production.
You started by understanding microservices architecture and why Go is such a strong fit for cloud environments. From there, you:
-
Built a simple, clean Go REST microservice
-
Packaged it using Docker with production-grade best practices
-
Deployed and managed it using Kubernetes
-
Implemented scaling, load balancing, and external configuration
-
Added observability with logging, health checks, and metrics
-
Automated deployments using CI/CD pipelines
This workflow mirrors how real-world production systems are built and operated today.
Key Takeaways
-
Go is an excellent language for microservices due to performance, simplicity, and fast startup times
-
Docker enables consistent, portable deployments
-
Kubernetes provides scaling, resilience, and service discovery out of the box
-
Observability is not optional—logs, metrics, and health checks are essential
-
CI/CD turns deployments into a safe, repeatable process
When combined, these tools form a powerful cloud-native platform for modern backend systems.
Final Thoughts
Cloud-native development is not about tools alone—it’s about building systems that are scalable, observable, and resilient by design. Go, Docker, and Kubernetes work exceptionally well together to help you achieve exactly that.
With the foundation you’ve built in this tutorial, you’re well-equipped to design and deploy production-grade Go microservices in any cloud environment.
You can find the full source code on our GitHub.
We know that building beautifully designed Mobile and Web Apps from scratch can be frustrating and very time-consuming. Check Envato unlimited downloads and save development and design time.
That's just the basics. If you need more deep learning about Go/Golang, you can take the following cheap course:
- Go - The Complete Guide
- NEW-Comprehensive Go Bootcamp with gRPC and Protocol Buffers
- Backend Master Class [Golang + Postgres + Kubernetes + gRPC]
- Complete Microservices with Go
- Backend Engineering with Go
- Introduction to AI and Machine Learning with Go (Golang)
- Working with Concurrency in Go (Golang)
- Introduction to Testing in Go (Golang)
- Design Patterns in Go
- Go Bootcamp: Master Golang with 1000+ Exercises and Projects
🚀 Happy building—and welcome to Go in the Cloud!