
Building forms is one of the most common tasks in web development. From login screens to registration pages, feedback surveys to complex admin dashboards, forms are everywhere. However, creating forms manually for every use case can be repetitive, error-prone, and hard to maintain—especially when form structures need to change frequently.
That’s where a dynamic form generator comes in. Instead of hardcoding input fields, you can define your form in a JSON schema (or similar data structure), and the application will render the form automatically based on that schema. This makes your forms more flexible, reusable, and easier to manage.
In this tutorial, we’ll build a Dynamic Form Generator in Vue 3 that can:
-
Render different types of input fields (text, email, number, select, checkbox, radio, etc.) from a schema.
-
Apply validation rules using Vee-Validate and Yup.
-
Collect and display submitted data.
-
Easily extend to support new field types or validation rules.
By the end of this tutorial, you’ll have a solid foundation for building forms dynamically in Vue 3, which you can extend into a full-fledged form builder or integrate with backend APIs for maximum flexibility.
Project Setup
We’ll start by creating a fresh Vue 3 project using Vite. Vite is fast, lightweight, and the recommended tool for Vue 3 projects.
1. Create a New Vue 3 Project
Open your terminal and run:
npm create vite@latest vue3-dynamic-formYou’ll be prompted to choose a framework. Select:
-
Vue
-
JavaScript (you can pick TypeScript if you prefer, but in this tutorial we’ll stick with JavaScript).
Then go into the project folder and install dependencies:
cd vue3-dynamic-form
npm install
Run the development server to verify everything works:
npm run devOpen your browser at http://localhost:5173, and you should see the default Vite + Vue welcome page.

2. Install Vee-Validate and Yup
We’ll use Vee-Validate for form handling and Yup for schema-based validation.
npm install vee-validate yup-
Vee-Validate provides composable utilities for form validation in Vue 3.
-
Yup allows us to define flexible validation schemas (like required fields, min/max length, email format, etc.).
3. Clean Up the Default Project
Before we dive into coding, let’s simplify the starter template:
Open src/App.vue and replace it with this basic setup:
<script setup>
</script>

<template>
  <div class="app">
    <h1>Vue 3 Dynamic Form Generator</h1>
  </div>
</template>

<style>
.app {
  font-family: Arial, sans-serif;
  padding: 2rem;
  max-width: 600px;
  margin: auto;
}
</style>
At this point, our project is ready. Next, we’ll define the form schema that describes the structure of our dynamic form.
Defining the Form Schema
The core idea of a dynamic form generator is that form fields are not hardcoded. Instead, we define them in a schema—a JavaScript object (or JSON) that describes each field’s type, label, name, options, and validation rules.
This way, we can easily update or extend forms without touching the template.
1. Create a Form Schema File
Inside src/, create a new folder called schemas and add a file named formSchema.js.
// src/schemas/formSchema.js

export const formSchema = [
  {
    type: "text",
    label: "Full Name",
    name: "fullName",
    placeholder: "Enter your full name",
    rules: "required|min:3",
  },
  {
    type: "email",
    label: "Email Address",
    name: "email",
    placeholder: "Enter your email",
    rules: "required|email",
  },
  {
    type: "number",
    label: "Age",
    name: "age",
    placeholder: "Enter your age",
    rules: "required|min_value:18",
  },
  {
    type: "select",
    label: "Country",
    name: "country",
    options: [
      { label: "United States", value: "us" },
      { label: "Canada", value: "ca" },
      { label: "Indonesia", value: "id" },
    ],
    rules: "required",
  },
  {
    type: "checkbox",
    label: "I agree to the terms and conditions",
    name: "terms",
    rules: "required",
  },
];
2. Schema Explanation
Each object in the schema represents a form field:
-
type → The input type (
text,email,number,select,checkbox, etc.). -
label → Text shown above the field.
-
name → Unique identifier for the field (used in form data).
-
placeholder → Optional placeholder text for inputs.
-
options → For selects, radios, or checkboxes, an array of
{ label, value }pairs. -
rules → Validation rules for this field (to be used with Vee-Validate).
3. Import Schema in App.vue
Let’s bring the schema into our main app so we can use it later:
<script setup>
import { formSchema } from "./schemas/formSchema";
</script>

<template>
  <div class="app">
    <h1>Vue 3 Dynamic Form Generator</h1>
    <pre>{{ formSchema }}</pre>
  </div>
</template>
When you run the app, you should see the schema printed on the screen. This confirms it’s available for rendering in the next step.
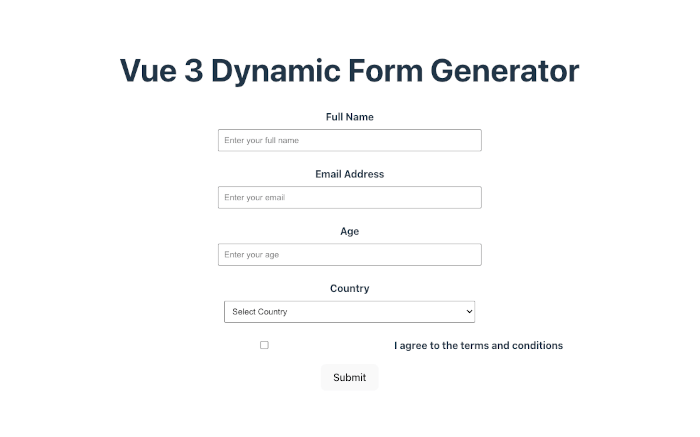
✅ Now we’re ready to build the Dynamic Form Component that will loop through this schema and render the fields automatically.
Building the Dynamic Form Component
Now that we have a schema, we need a reusable component that will:
-
Loop through the schema.
-
Render the appropriate input field (
text,email,number,select,checkbox, etc.). -
Bind the field values using
v-model.
1. Create a DynamicForm Component
Inside src/components/, create a new file called DynamicForm.vue:
<script setup>
import { ref } from "vue";

const props = defineProps({
  schema: {
    type: Array,
    required: true,
  },
});

// Holds the form data dynamically
const formData = ref({});

// Initialize form data with empty values
props.schema.forEach((field) => {
  formData.value[field.name] =
    field.type === "checkbox" ? false : ""; // default values
});

// Emit event when form is submitted
const emit = defineEmits(["submit"]);

const handleSubmit = () => {
  emit("submit", formData.value);
};
</script>

<template>
  <form @submit.prevent="handleSubmit">
    <div v-for="field in schema" :key="field.name" class="form-group">
      <!-- Text, Email, Number Inputs -->
      <div v-if="['text', 'email', 'number'].includes(field.type)">
        <label :for="field.name">{{ field.label }}</label>
        <input
          :type="field.type"
          :name="field.name"
          :id="field.name"
          v-model="formData[field.name]"
          :placeholder="field.placeholder"
        />
      </div>

      <!-- Select Dropdown -->
      <div v-else-if="field.type === 'select'">
        <label :for="field.name">{{ field.label }}</label>
        <select :name="field.name" :id="field.name" v-model="formData[field.name]">
          <option value="">Select {{ field.label }}</option>
          <option
            v-for="option in field.options"
            :key="option.value"
            :value="option.value"
          >
            {{ option.label }}
          </option>
        </select>
      </div>

      <!-- Checkbox -->
      <div v-else-if="field.type === 'checkbox'">
        <label>
          <input type="checkbox" v-model="formData[field.name]" />
          {{ field.label }}
        </label>
      </div>
    </div>

    <button type="submit">Submit</button>
  </form>
</template>

<style scoped>
.form-group {
  margin-bottom: 1rem;
}
label {
  display: block;
  font-weight: bold;
  margin-bottom: 0.5rem;
}
input,
select {
  padding: 0.5rem;
  width: 100%;
  max-width: 400px;
  margin-bottom: 0.5rem;
}
button {
  padding: 0.7rem 1.2rem;
  cursor: pointer;
}
</style>
2. Use DynamicForm in App.vue
Now, let’s replace our <pre> output with the new component:
<script setup>
import DynamicForm from "./components/DynamicForm.vue";
import { formSchema } from "./formSchema";

const handleFormSubmit = (data) => {
  console.log("Form Submitted:", data);
  alert(JSON.stringify(data, null, 2));
};
</script>

<template>
  <div class="app">
    <h1>Vue 3 Dynamic Form Generator</h1>
    <DynamicForm :schema="formSchema" @submit="handleFormSubmit" />
  </div>
</template>
3. Test the Form
Run the app (npm run dev) and open http://localhost:5173.
-
You should see a dynamic form with fields defined in
formSchema.js. -
Fill in the fields and hit Submit.
-
The form data will appear in an alert box and console. 🎉
✅ At this point, we have a working dynamic form renderer. Next, we’ll add validation with Vee-Validate + Yup to enforce rules on each field.
Form Validation with Vee-Validate + Yup
Right now, our form renders fields and collects data, but there’s no validation. We’ll integrate Vee-Validate with Yup so each field follows the rules we defined in our schema.
1. Update the Schema to Use Yup Rules
Instead of string-based rules, let’s use Yup for more flexibility. Open src/formSchema.js and update it like this:
// src/schemas/formSchema.js
import * as yup from "yup";

export const formSchema = [
  {
    type: "text",
    label: "Full Name",
    name: "fullName",
    placeholder: "Enter your full name",
    validation: yup.string().required("Full name is required").min(3, "At least 3 characters"),
  },
  {
    type: "email",
    label: "Email Address",
    name: "email",
    placeholder: "Enter your email",
    validation: yup.string().required("Email is required").email("Must be a valid email"),
  },
  {
    type: "number",
    label: "Age",
    name: "age",
    placeholder: "Enter your age",
    validation: yup.number().required("Age is required").min(18, "You must be at least 18"),
  },
  {
    type: "select",
    label: "Country",
    name: "country",
    options: [
      { label: "United States", value: "us" },
      { label: "Canada", value: "ca" },
      { label: "Indonesia", value: "id" },
    ],
    validation: yup.string().required("Country is required"),
  },
  {
    type: "checkbox",
    label: "I agree to the terms and conditions",
    name: "terms",
    validation: yup.boolean().oneOf([true], "You must accept the terms"),
  },
];
2. Update DynamicForm.vue to use Vee-Validate
We’ll replace our manual form handling with Vee-Validate’s <Form>, <Field>, and <ErrorMessage> components.
<script setup>
import { Form, Field, ErrorMessage } from "vee-validate";
import * as yup from "yup";

const props = defineProps({
  schema: {
    type: Array,
    required: true,
  },
});

// Build validation schema dynamically
const validationSchema = props.schema.reduce((shape, field) => {
  shape[field.name] = field.validation;
  return shape;
}, {});

const formValidationSchema = yup.object().shape(validationSchema);

const emit = defineEmits(["submit"]);

const handleSubmit = (values) => {
  emit("submit", values);
};
</script>

<template>
  <Form :validation-schema="formValidationSchema" @submit="handleSubmit">
    <div v-for="field in schema" :key="field.name" class="form-group">
      <!-- Text, Email, Number Inputs -->
      <div v-if="['text', 'email', 'number'].includes(field.type)">
        <label :for="field.name">{{ field.label }}</label>
        <Field
          :type="field.type"
          :name="field.name"
          :id="field.name"
          :placeholder="field.placeholder"
          as="input"
        />
        <ErrorMessage :name="field.name" class="error" />
      </div>

      <!-- Select Dropdown -->
      <div v-else-if="field.type === 'select'">
        <label :for="field.name">{{ field.label }}</label>
        <Field :name="field.name" as="select" :id="field.name">
          <option value="">Select {{ field.label }}</option>
          <option
            v-for="option in field.options"
            :key="option.value"
            :value="option.value"
          >
            {{ option.label }}
          </option>
        </Field>
        <ErrorMessage :name="field.name" class="error" />
      </div>

      <!-- Checkbox -->
      <div v-else-if="field.type === 'checkbox'">
        <label>
          <Field type="checkbox" :name="field.name" />
          {{ field.label }}
        </label>
        <ErrorMessage :name="field.name" class="error" />
      </div>
    </div>

    <button type="submit">Submit</button>
  </Form>
</template>

<style scoped>
.form-group {
  margin-bottom: 1rem;
}
label {
  display: block;
  font-weight: bold;
  margin-bottom: 0.5rem;
}
input,
select {
  padding: 0.5rem;
  width: 100%;
  max-width: 400px;
  margin-bottom: 0.5rem;
}
.error {
  color: red;
  font-size: 0.9rem;
}
button {
  padding: 0.7rem 1.2rem;
  cursor: pointer;
}
</style>
3. Test the Validation
-
Try submitting the form without filling in fields → you should see validation errors.
-
Enter invalid data (e.g., age < 18, wrong email format) → errors will display.
-
Once all inputs are valid, the form will submit successfully.
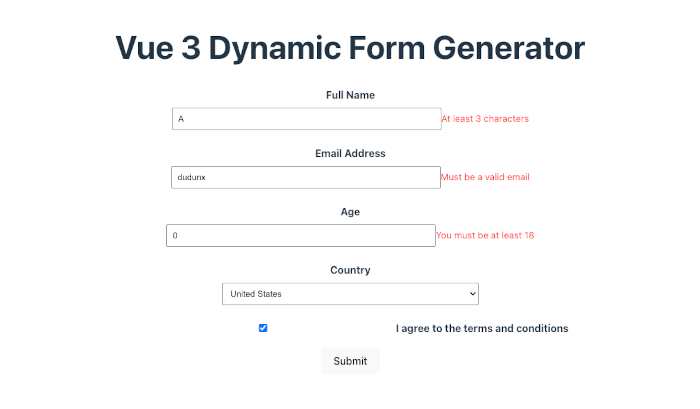
✅ Now our dynamic form generator has validation powered by Vee-Validate + Yup.
Handling Form Submission
Right now, our form emits the submitted values and we’re logging them to the console. Let’s improve this by:
-
Collecting the form data.
-
Displaying it neatly on the page.
1. Update App.vue to Store Submission Results
We’ll keep the submitted data in a ref and render it below the form.
<script setup>
import { ref } from "vue";
import { formSchema } from "./schemas/formSchema";
import DynamicForm from "./components/DynamicForm.vue";

const submittedData = ref(null);

const handleFormSubmit = (data) => {
  submittedData.value = data;
};
</script>

<template>
  <div class="app">
    <h1>Vue 3 Dynamic Form Generator</h1>

    <!-- Dynamic Form -->
    <DynamicForm :schema="formSchema" @submit="handleFormSubmit" />

    <!-- Display submitted data -->
    <div v-if="submittedData" class="result">
      <h2>Form Submitted Successfully!</h2>
      <pre>{{ submittedData }}</pre>
    </div>
  </div>
</template>

<style>
.app {
  font-family: Arial, sans-serif;
  padding: 2rem;
  max-width: 600px;
  margin: auto;
}

.result {
  margin-top: 2rem;
  padding: 1rem;
  border: 1px solid #ddd;
  background: #f9f9f9;
  border-radius: 5px;
}
</style>
2. Test It Out
-
Fill in the form with valid data.
-
Click Submit.
-
You should see the submitted data displayed below the form in JSON format.
Example output:
{
  "fullName": "John Doe",
  "email": "[email protected]",
  "age": 25,
  "country": "us",
  "terms": true
}
✅ Now our dynamic form not only validates input but also handles submissions gracefully.
Enhancements
So far, we’ve built a dynamic form generator that renders fields from a schema, applies validation, and handles submission. Let’s push it further with some useful features.
1. Add Support for Conditional Fields
Sometimes, a field should only appear if another field meets a condition (e.g., show a “State” field only if the user selects “United States”).
Example Schema with Conditional Field
{
  type: "text",
  label: "State",
  name: "state",
  placeholder: "Enter your state",
  showIf: {
    field: "country",
    value: "us",
  },
  validation: yup.string().when("country", {
    is: "us",
    then: (schema) => schema.required("State is required for US residents"),
    otherwise: (schema) => schema.notRequired(),
  }),
}
Update DynamicForm.vue to Handle showIf
<div
  v-for="field in schema"
  :key="field.name"
  v-if="!field.showIf || formValues[field.showIf.field] === field.showIf.value"
  class="form-group"
>
  <!-- Render inputs as before -->
</div>
Now the State field only shows when the user selects the United States.
2. Nested Fields / Grouping
You might need grouped fields, like an Address section with multiple inputs.
Example Schema with Group
{
  type: "group",
  label: "Address",
  name: "address",
  fields: [
    {
      type: "text",
      label: "Street",
      name: "street",
      validation: yup.string().required("Street is required"),
    },
    {
      type: "text",
      label: "City",
      name: "city",
      validation: yup.string().required("City is required"),
    },
  ],
}
Update DynamicForm.vue to Handle Groups
<div v-else-if="field.type === 'group'">
  <fieldset>
    <legend>{{ field.label }}</legend>
    <DynamicForm :schema="field.fields" @submit="handleSubmit" />
  </fieldset>
</div>
This allows recursive rendering of forms inside forms.
3. Reusable Schema-Driven Validation
Right now, we’re defining validation per field. To standardize, you could:
-
Create a
rules.jsfile with common validation schemas (requiredEmail,requiredNumber, etc.). -
Reuse them in
formSchema.jsto avoid duplication.
4. Styling & UI Libraries
We’ve kept things simple with plain HTML. You can:
-
Add Tailwind CSS for quick styling.
-
Integrate with UI kits like Vuetify, Element Plus, or Naive UI for polished components.
✅ With these enhancements, your form generator is flexible enough to power real-world applications—from surveys to dynamic admin dashboards.
Conclusion
In this tutorial, we built a Dynamic Form Generator in Vue 3 that can render form fields from a schema, validate inputs using Vee-Validate and Yup, and handle form submissions seamlessly.
Here’s what we covered:
-
Project Setup with Vue 3 and Vite.
-
Defining a form schema in JSON/Yup for flexible configuration.
-
Building a reusable form component that renders inputs dynamically.
-
Adding validation with Vee-Validate + Yup.
-
Handling submissions and displaying results on the page.
-
Enhancements like conditional fields, nested groups, and reusable validation rules.
With this foundation, you can extend the form generator into a full-fledged form builder—integrating APIs to load schemas dynamically, adding drag-and-drop for form creation, or styling with UI frameworks.
Dynamic forms save development time, reduce repetition, and make your applications more maintainable. Whether you’re building admin dashboards, survey tools, or CMS features, this approach gives you flexibility and scalability out of the box.
You can get the full source code on our GitHub.
That's just the basics. If you need more deep learning about Vue/Vue.js, you can take the following cheap course:
- Vue - The Complete Guide (incl. Router & Composition API)
- Vue JS - The Complete Guide [2025]
- Complete Vue Developer Bootcamp (Pinia, Vitest)
- Vue.js 3 Masterclass: Build 7 Real-World Apps
- Build Web Apps with Vue JS 3 & Firebase
- Vue.js 3 - The Complete Guide Interview Q&S
- Vue JS 3 For Modern Web Development - Beginner to Advanced
- Nuxt 3 & Supabase Mastery: Build 2 Full-Stack Apps
- Vue.js 3 Essentials: Build Dynamic Web Apps with Confidence
- Complete Vue.js 3 Course: Vuejs 3, Vite, TailwindCSS, Pinia
Thanks!