Authentication is a critical part of most modern web applications. Whether you're building a dashboard, SaaS app, or social platform, you need a secure and reliable way for users to sign in. In this tutorial, we'll show you how to implement user authentication in a Nuxt 3 application using Firebase Authentication, supporting both Google sign-in and email/password login.
Firebase provides a simple and scalable authentication system that supports multiple providers out of the box, including Google, Facebook, Apple, and traditional email/password methods. Combined with Nuxt 3, the latest and most powerful version of the Nuxt framework built on Vue 3 and Vite, this stack gives you a fast and secure foundation for building modern web apps.
What You’ll Learn
By the end of this tutorial, you will have a Nuxt 3 app with:
-
Firebase Authentication configured
-
Log in with Google
-
Log in and sign up using your email and password
-
Route protection (middleware) for authenticated pages
-
User session handling across page reloads
This tutorial is beginner-friendly but assumes you're familiar with basic Vue/Nuxt concepts.
Let’s get started by setting up the project prerequisites.
1. Prerequisites
Before we dive in, make sure you have the following installed and ready:
✅ Tools & Accounts
-
Node.js v18+ – You can download it from nodejs.org
-
Firebase account – Sign up or log in at console.firebase.google.com
-
Basic Vue/Nuxt knowledge – Familiarity with components and lifecycle
🧰 Optional but Helpful
-
VS Code or your preferred code editor
-
Google account (for testing Google sign-in)
Once you’re set up, we’ll scaffold a fresh Nuxt 3 project.
2. Setting Up a Nuxt 3 Project
Open your terminal and run the following commands to create and start a new Nuxt 3 project:
npx nuxi init nuxt3-firebase-auth
cd nuxt3-firebase-auth
npm install
npm run dev
After running npm run dev, your app will be available at http://localhost:3000.
You now have a basic Nuxt 3 app ready to integrate with Firebase!
3. Install Required Packages
We only need the official Firebase JavaScript SDK to integrate Firebase services into our Nuxt 3 app.
In your project root, run:
npm install firebaseThis will install all Firebase modules, including auth, which we’ll use for authentication.
4. Configure Firebase Project
Now, let’s set up your Firebase project and get the credentials to connect it with your Nuxt 3 app.
🔧 Step-by-Step Setup
-
Click “Add project”, and follow the steps to create a new Firebase project
-
Once created, go to the Authentication section:
-
Click "Get Started"
-
Enable Email/Password under Sign-in method
-
Enable Google under Sign-in method
-
-
Next, go to Project Settings > General
-
Scroll down to Your apps
-
Click the </> (Web) icon to create a new Web app
-
Give it a name (e.g.,
NuxtAuthApp), and register the app -
Copy the Firebase configuration object shown:
const firebaseConfig = {
  apiKey: "YOUR_API_KEY",
  authDomain: "YOUR_PROJECT.firebaseapp.com",
  projectId: "YOUR_PROJECT_ID",
  storageBucket: "YOUR_PROJECT.appspot.com",
  messagingSenderId: "SENDER_ID",
  appId: "APP_ID"
}
-
We’ll use this in the next step to initialize Firebase in our Nuxt app.
5. Create Firebase Plugin in Nuxt 3
Nuxt 3 utilizes a plugin system to initialize services such as Firebase. We’ll create a client-only plugin to set up Firebase Auth.
🔧 Step 1: Create Plugin File
Create a new file in your Nuxt app:
plugins/firebase.client.ts
import { initializeApp } from 'firebase/app'
import { getAuth } from 'firebase/auth'

// Replace this config with your Firebase project config
const firebaseConfig = {
  apiKey: 'YOUR_API_KEY',
  authDomain: 'YOUR_PROJECT.firebaseapp.com',
  projectId: 'YOUR_PROJECT_ID',
  storageBucket: 'YOUR_PROJECT.appspot.com',
  messagingSenderId: 'YOUR_SENDER_ID',
  appId: 'YOUR_APP_ID',
}

const app = initializeApp(firebaseConfig)
const auth = getAuth(app)

export default defineNuxtPlugin(() => {
  return {
    provide: {
      auth,
    },
  }
})
🔥 Note: The
.client.tssuffix ensures this plugin only runs on the client-side—Firebase Auth doesn’t support server-side environments.
🧪 Step 2: Use the Plugin
Now that we’ve provided auth, we can access it anywhere in our Nuxt app like this:
const { $auth } = useNuxtApp()
6. Build the Auth UI (Login, Signup, Logout)
We’ll create a simple authentication form that supports:
-
Email/password login and registration
-
Google sign-in
-
Logout functionality
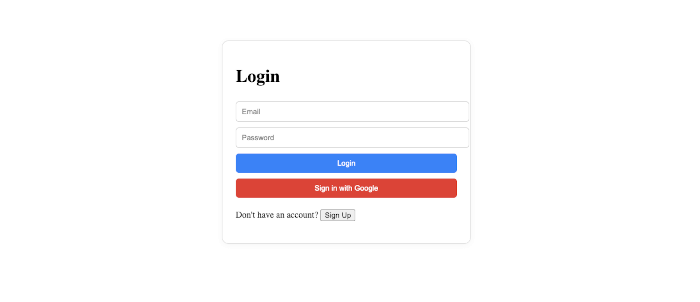
Step 1: Create a Login Page
Create a new page:
pages/login.vue
<template>
  <div class="login-container">
    <h1 class="text-2xl font-bold mb-4">Login</h1>

    <form @submit.prevent="loginWithEmail" class="space-y-3">
      <input v-model="email" type="email" placeholder="Email" class="input" required />
      <input v-model="password" type="password" placeholder="Password" class="input" required />
      <button type="submit" class="btn">Login</button>
    </form>

    <button @click="signInWithGoogle" class="btn-google mt-4">Sign in with Google</button>

    <p class="mt-4">
      Don't have an account?
      <button @click="signupWithEmail" class="text-blue-600 underline">Sign Up</button>
    </p>
  </div>
</template>

<script setup lang="ts">
import {
  signInWithEmailAndPassword,
  createUserWithEmailAndPassword,
  signInWithPopup,
  GoogleAuthProvider,
  signOut,
} from 'firebase/auth'

const { $auth } = useNuxtApp()

const email = ref('')
const password = ref('')
const router = useRouter()

const loginWithEmail = async () => {
  try {
    await signInWithEmailAndPassword($auth, email.value, password.value)
    router.push('/dashboard')
  } catch (error) {
    if (error instanceof Error) {
      alert(error.message)
    } else {
      alert('An unexpected error occurred')
    }
  }
}

const signupWithEmail = async () => {
  try {
    await createUserWithEmailAndPassword($auth, email.value, password.value)
    router.push('/dashboard')
  } catch (error) {
    if (error instanceof Error) {
      alert(error.message)
    } else {
      alert('An unexpected error occurred')
    }
  }
}

const signInWithGoogle = async () => {
  try {
    const provider = new GoogleAuthProvider()
    await signInWithPopup($auth, provider)
    router.push('/dashboard')
  } catch (error) {
    if (error instanceof Error) {
      alert(error.message)
    } else {
      alert('An unexpected error occurred')
    }
  }
}
</script>

<style scoped>
.login-container {
  max-width: 400px;
  margin: 80px auto;
  padding: 24px;
  border: 1px solid #ddd;
  border-radius: 12px;
  box-shadow: 0 2px 8px rgba(0, 0, 0, 0.05);
}
.input {
  width: 100%;
  padding: 10px;
  border: 1px solid #ccc;
  border-radius: 6px;
  margin: 5px auto;
}
.btn {
  width: 100%;
  padding: 10px;
  background-color: #3b82f6;
  color: white;
  border: none;
  border-radius: 6px;
  margin: 5px auto;
}
.btn-google {
  width: 100%;
  padding: 10px;
  background-color: #db4437;
  color: white;
  border: none;
  border-radius: 6px;
  margin: 5px auto;
}
</style>
Step 2: Create a Logout Button (Optional)
In pages/dashboard.vue or your protected page, add:
<template>
  <div>
    <h1>Welcome!</h1>
    <button @click="logout" class="btn">Logout</button>
  </div>
</template>

<script setup lang="ts">
import { signOut } from 'firebase/auth'

const { $auth } = useNuxtApp()
const router = useRouter()

const logout = async () => {
  await signOut($auth)
  router.push('/login')
}
</script>
Step 3: Create an Entry Page
In pages/index.vue or your protected page, add:
<template>
  <div class="home">
    <h1 class="text-3xl font-bold mb-4">Welcome to Nuxt 3 + Firebase Auth</h1>
    <p class="mb-6">This is the homepage. Try accessing the <code>/dashboard</code> route or <code>/login</code> to get started.</p>

    <NuxtLink to="/login" class="btn">Go to Login</NuxtLink>
  </div>
</template>

<style scoped>
.home {
  max-width: 600px;
  margin: 100px auto;
  padding: 24px;
  text-align: center;
}
.btn {
  padding: 10px 20px;
  background-color: #3b82f6;
  color: white;
  border: none;
  border-radius: 6px;
  text-decoration: none;
}
</style>
Update app.vue:
<template>
  <NuxtPage />
</template>
With that, we now have a full login, signup, and Google OAuth UI wired to Firebase Auth!
7. Use Firebase Auth State in Nuxt
Firebase Auth automatically keeps users logged in; however, we need to listen to changes in the authentication state and react accordingly in the UI and route logic.
We'll use a composable to manage this.
🔧 Step 1: Create useAuth.ts Composable
Create the file:
composables/useAuth.ts
import { onAuthStateChanged, type User } from 'firebase/auth'

export const useAuthUser = () => useState<User | null>('authUser', () => null)

export const initUserObserver = () => {
    const { $auth } = useNuxtApp()
    const authUser = useAuthUser()

    onAuthStateChanged($auth, (user) => {
        authUser.value = user
    })
}
🧠
useState('authUser', ...)ensures global reactivity in Nuxt across components and pages.
🔧 Step 2: Call initUserObserver on App Start
Update your app.vue to call the observer when the app loads:
<script setup lang="ts">
import { initUserObserver } from './composables/useAuth';

onMounted(() => {
  initUserObserver()
})
</script>
You can now access the logged-in user globally:
const user = useAuthUser()
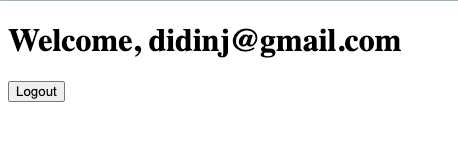
console.log(user.value?.email)Optional: Show Auth User in dashboard.vue
<template>
  <div>
    <h1>Welcome, {{ user?.email }}</h1>
    <button @click="logout" class="btn">Logout</button>
  </div>
</template>

<script setup lang="ts">
import { signOut } from 'firebase/auth'
import { useAuthUser } from '~/composables/useAuth'

const { $auth } = useNuxtApp()
const router = useRouter()
const user = useAuthUser()

const logout = async () => {
  await signOut($auth)
  router.push('/login')
}
</script>
Your app now reacts to authentication state changes and retains the user session on reloads! 🎉
8. Protect Routes with Middleware
In Nuxt 3, middleware is the best way to control access to routes. We’ll create an auth middleware to check if a user is logged in before allowing access to protected pages.
🔧 Step 1: Create Middleware File
Create the file:
middleware/auth.global.ts
(This will apply to all routes—optional. For per-page protection, use auth.ts instead.)
import { useAuthUser } from "~/composables/useAuth"

export default defineNuxtRouteMiddleware((to, from) => {
    const user = useAuthUser()

    // Skip middleware on the login page
    if (to.path === '/login') return

    // If user is not logged in, redirect to login
    if (!user.value) {
        return navigateTo('/login')
    }
})
💡 For specific route protection, use definePageMeta({ middleware: 'auth' }) in the page component instead of auth.global.ts.
🛡 Example: Route-Specific Middleware
middleware/auth.ts (just rename it)
Then in your page (e.g., pages/dashboard.vue):
definePageMeta({
  middleware: 'auth'
})
🔁 Now test your app:
-
Go to
/dashboardas an unauthenticated user ➝ gets redirected to/login -
After login ➝ redirected to
/dashboard -
Reload page ➝ session persists via
onAuthStateChanged
9. Final Testing
Before deploying or extending your Nuxt 3 + Firebase app, it’s important to test all flows to ensure authentication works properly.
✅ Test Checklist
🔑 Email/Password Sign-Up
-
Go to
/login -
Enter a new email and password
-
Click Sign Up
-
You should be redirected to
/dashboard -
Check Firebase Console > Authentication to verify the new user is registered
🔐 Email/Password Login
-
Logout (click the Logout button on
/dashboard) -
Try logging back in with the same email and password
-
You should be redirected to
/dashboardagain
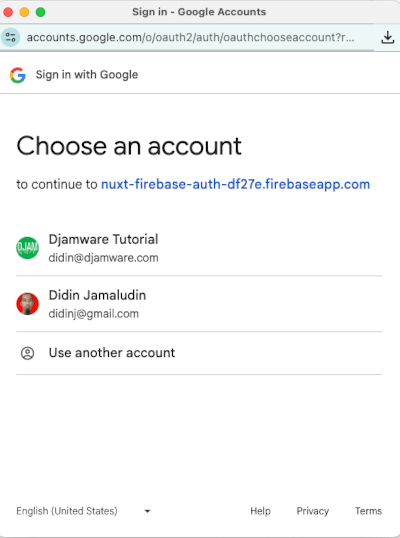
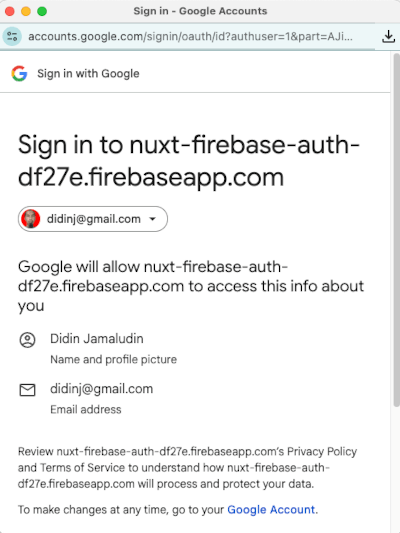
🔁 Google Sign-In
-
Click Sign in with Google
-
Choose your Google account
-
You should be redirected to
/dashboard -
Firebase should list the account as a Google user
🚫 Route Protection
-
Try accessing
/dashboardwhile logged out -
You should be redirected to
/login
🔄 Auth Persistence
-
Login with either method
-
Refresh the page
-
You should remain logged in thanks to
onAuthStateChanged
10. Conclusion + Key Takeaways
In this tutorial, we built a complete Firebase Authentication system in a Nuxt 3 app. You now have:
-
🔐 Google Sign-In and Email/Password Login
-
🔁 Session persistence with
onAuthStateChanged -
🔒 Route protection using Nuxt 3 middleware
-
⚙️ Reusable auth composables for global access to the user state
This setup gives you a strong foundation to build secure, modern apps with Nuxt 3 and Firebase.
You can get the full source code on our GitHub.
That's just the basics. If you need more deep learning about Nuxt.js, you can take the following cheap course:
- Nuxt 3 & Supabase Mastery: Build 2 Full-Stack Apps
- Build Web Apps with Nuxt.js 3: Master TypeScript & API [New]
- The Nuxt 3 Bootcamp - The Complete Developer Guide
- Complete Nuxt.js Course (EXTRA React)
- The Complete NUXT 3 Bootcamp: Full-Stack Guide
- Nuxt 3 Authentication with Laravel Sanctum:A Practical Guide
- Learn How to Make Your Nuxt 3 App SEO-Friendly
- Headless Prestashop with Nuxt JS
Thanks!