In this tutorial, you’ll learn how to build a secure user authentication system using NestJS 11, JWT (JSON Web Token), MongoDB, and an Angular 20 frontend. You’ll create a full-stack application where users can register, log in, and access protected routes, all powered by the latest TypeScript and NestJS features.
NestJS makes it easy to implement scalable and maintainable backends by leveraging decorators, dependency injection, and modular architecture — while Angular 20 provides a modern reactive frontend framework that integrates smoothly with REST APIs.
By the end of this tutorial, you’ll have a complete understanding of how to:
-
Build and secure REST API endpoints in NestJS using JWT authentication.
-
Hash and verify passwords using bcrypt.
-
Manage users with Mongoose models and MongoDB Atlas or a local database.
-
Implement a clean Angular 20 standalone component frontend for user registration and login.
-
Protect routes on both backend and frontend sides.
Whether you’re building a production-ready app or just learning secure authentication principles, this step-by-step guide will give you everything you need to get started confidently.
Prerequisites
Before diving into the code, make sure you have the following tools and environment set up. This tutorial assumes that you have a basic understanding of JavaScript, TypeScript, and Angular, but you don’t need any prior experience with NestJS — we’ll cover everything step by step.
🧰 Required Tools
Ensure that the following are installed on your machine:
-
Node.js 20+ – The latest stable version (LTS) recommended.
👉 Download here -
npm 10+ or yarn – Comes with Node.js by default.
-
NestJS CLI – For creating and managing the NestJS project.
npm install -g @nestjs/cli -
Angular CLI 20+ – For generating the Angular frontend project.
npm install -g @angular/cli -
MongoDB – You can either:
-
Install MongoDB locally (MongoDB Download), or
-
Use a free MongoDB Atlas cloud instance.
-
-
Code Editor – Visual Studio Code or any preferred IDE.
🧠 Basic Knowledge
You should be familiar with:
-
TypeScript syntax and decorators.
-
REST API concepts (GET, POST, etc.).
-
Basic Angular component and service structure.
-
JSON Web Tokens (JWT) concepts (optional but helpful).
⚙️ What You’ll Build
Here’s a quick overview of what we’ll build in this tutorial:
-
A NestJS 11 backend that handles:
-
User registration (with password hashing)
-
User login (with JWT token generation)
-
Protected routes that require authentication
-
-
An Angular 20 frontend with:
-
Standalone login and register pages
-
Auth service for API communication
-
Route guards to protect authenticated pages
-
When you’re done, you’ll have a complete authentication system that can serve as a foundation for larger full-stack applications.
Backend Setup (NestJS 11 + MongoDB + JWT)
In this section, you’ll create a NestJS backend that connects to MongoDB, registers and logs in users, and secures routes using JWT authentication.
1. Create a New NestJS Project
Open your terminal and run:
nest new nestjs-auth-backendSelect npm or yarn as the package manager. Once it finishes, navigate to the new project directory:
cd nestjs-auth-backendThen start the development server to make sure everything works:
npm run start:devYou should see output like:
[Nest] 73741  - 10/21/2025, 8:02:00 AM     LOG [NestFactory] Starting Nest application...
[Nest] 73741  - 10/21/2025, 8:02:00 AM     LOG [InstanceLoader] AppModule dependencies initialized +5ms
[Nest] 73741  - 10/21/2025, 8:02:00 AM     LOG [RoutesResolver] AppController {/}: +1ms
[Nest] 73741  - 10/21/2025, 8:02:00 AM     LOG [RouterExplorer] Mapped {/, GET} route +1ms
[Nest] 73741  - 10/21/2025, 8:02:00 AM     LOG [NestApplication] Nest application successfully started +1ms
2. Install Required Dependencies
You’ll need several packages for authentication, JWT, and MongoDB integration.
npm install @nestjs/mongoose mongoose @nestjs/jwt @nestjs/passport passport passport-jwt bcrypt
npm install -D @types/passport-jwt @types/bcrypt
Here’s what they do:
-
@nestjs/mongooseandmongoose– ODM for MongoDB. -
@nestjs/jwtandpassport-jwt– Handle JWT creation and validation. -
bcrypt– Securely hash user passwords.
3. Configure MongoDB Connection
Open src/app.module.ts and modify it like this:
import { Module } from '@nestjs/common';
import { AppController } from './app.controller';
import { AppService } from './app.service';
import { MongooseModule } from '@nestjs/mongoose';

@Module({
  imports: [
    MongooseModule.forRoot('mongodb://localhost:27017/nestjs-auth'),
    AuthModule,
  ],
  controllers: [AppController],
  providers: [AppService],
})
export class AppModule { }
If you’re using MongoDB Atlas, replace the connection string with your cluster URI.
4. Create the Authentication Module
Generate the module, service, and controller using NestJS CLI:
nest generate module auth
nest generate service auth
nest generate controller auth
This creates:
src/auth/
 ├── auth.controller.ts
 ├── auth.module.ts
 ├── auth.service.ts
5. Create the User Schema and Interface
Inside the src/auth folder, create a file named user.schema.ts:
import { Prop, Schema, SchemaFactory } from '@nestjs/mongoose';
import { Document } from 'mongoose';

export type UserDocument = User & Document;

@Schema()
export class User {
  @Prop({ required: true, unique: true })
  email: string;

  @Prop({ required: true })
  password: string;
}

export const UserSchema = SchemaFactory.createForClass(User);
Then import it in auth.module.ts:
import { Module } from '@nestjs/common';
import { MongooseModule } from '@nestjs/mongoose';
import { User, UserSchema } from './auth/user.schema';
import { JwtModule } from '@nestjs/jwt';
import { AuthController } from './auth/auth.controller';
import { AuthService } from './auth/auth.service';
import { JwtStrategy } from './jwt.strategy';

@Module({
  imports: [
    MongooseModule.forFeature([{ name: User.name, schema: UserSchema }]),
    JwtModule.register({
      secret: 'yourSecretKey', // use env variable in production
      signOptions: { expiresIn: '1d' },
    }),
  ],
  controllers: [AuthController],
  providers: [AuthService, JwtStrategy],
})
export class AppModule { }
6. Implement the Auth Service
Open auth.service.ts and add the following code:
import { Injectable, UnauthorizedException } from '@nestjs/common';
import { InjectModel } from '@nestjs/mongoose';
import { User, UserDocument } from './user.schema';
import { Model } from 'mongoose';
import { JwtService } from '@nestjs/jwt';
import * as bcrypt from 'bcrypt';

@Injectable()
export class AuthService {
    constructor(
        @InjectModel(User.name) private userModel: Model<UserDocument>,
        private jwtService: JwtService,
    ) { }

    async register(email: string, password: string) {
        const existingUser = await this.userModel.findOne({ email });
        if (existingUser) {
            throw new UnauthorizedException('Email already registered');
        }

        const hashedPassword = await bcrypt.hash(password, 10);
        const user = new this.userModel({ email, password: hashedPassword });
        await user.save();

        return { message: 'User registered successfully' };
    }

    async login(email: string, password: string) {
        const user = await this.userModel.findOne({ email });
        if (!user) {
            throw new UnauthorizedException('Invalid credentials');
        }

        const isMatch = await bcrypt.compare(password, user.password);
        if (!isMatch) {
            throw new UnauthorizedException('Invalid credentials');
        }

        const payload = { email: user.email, sub: user._id };
        const access_token = this.jwtService.sign(payload);

        return { access_token };
    }
}
7. Create the Auth Controller
Open auth.controller.ts and add routes for registration and login:
import { Body, Controller, Get, Post, UseGuards, Request } from '@nestjs/common';
import { AuthService } from './auth.service';
import { JwtAuthGuard } from './jwt-auth.guard';

@Controller('auth')
export class AuthController {
    constructor(private readonly authService: AuthService) { }

    @Post('register')
    async register(@Body() body: { email: string; password: string }) {
        return this.authService.register(body.email, body.password);
    }

    @Post('login')
    async login(@Body() body: { email: string; password: string }) {
        return this.authService.login(body.email, body.password);
    }

    @UseGuards(JwtAuthGuard)
    @Get('profile')
    getProfile(@Request() req) {
        return req.user;
    }
}
8. Add JWT Strategy and Guard
Create jwt.strategy.ts inside the auth folder:
import { Injectable } from '@nestjs/common';
import { PassportStrategy } from '@nestjs/passport';
import { ExtractJwt, Strategy } from 'passport-jwt';

@Injectable()
export class JwtStrategy extends PassportStrategy(Strategy) {
  constructor() {
    super({
      jwtFromRequest: ExtractJwt.fromAuthHeaderAsBearerToken(),
      ignoreExpiration: false,
      secretOrKey: 'yourSecretKey',
    });
  }

  async validate(payload: any) {
    return { userId: payload.sub, email: payload.email };
  }
}
Then create a guard jwt-auth.guard.ts:
import { Injectable } from '@nestjs/common';
import { AuthGuard } from '@nestjs/passport';

@Injectable()
export class JwtAuthGuard extends AuthGuard('jwt') {}
9. Test Your API with Postman or cURL
Start the backend server:
npm run start:devUse Postman to test the routes:
Register a user
POST http://localhost:3000/auth/register
Body: { "email": "[email protected]", "password": "123456" }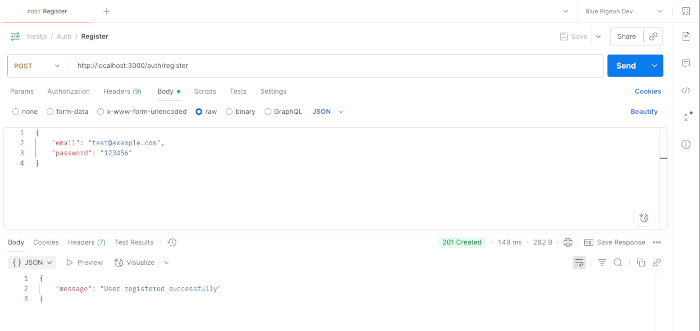
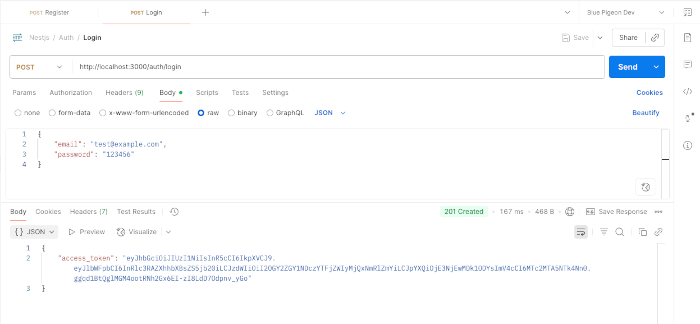
Login
POST http://localhost:3000/auth/login
Body: { "email": "[email protected]", "password": "123456" }
You should receive a JWT token.
Access Protected Route
GET http://localhost:3000/auth/profile
Header: Authorization: Bearer <token>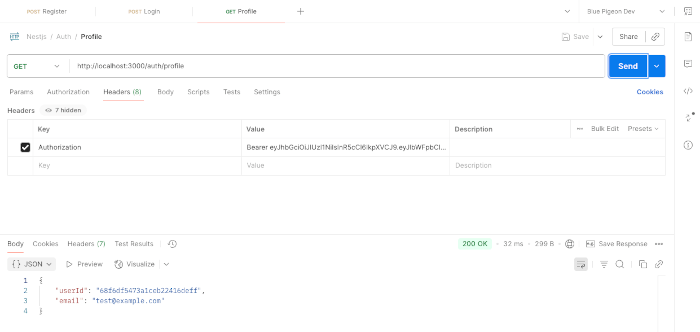
✅ Your backend authentication API is now complete!
Frontend Setup (Angular 20 + Standalone Components)
In this section, you’ll create a simple yet functional Angular 20 frontend that communicates with the NestJS backend for authentication.
1. Create a New Angular 20 Project
Open a terminal in your workspace and run:
ng new angular-auth-frontend --standaloneWhen prompted:
-
Add routing: Yes
-
CSS preprocessor: CSS
Then navigate into the project directory:
cd angular-auth-frontendStart the development server to ensure everything works:
ng serveVisit http://localhost:4200 — you should see the default Angular welcome page.
2. Install Required Dependencies
We’ll need Angular HTTP Client (already included), and optionally Bootstrap for styling.
npm install bootstrapThen import Bootstrap into your global styles file (src/styles.css):
@import 'bootstrap/dist/css/bootstrap.min.css';3. Setup Routing
Open src/app/app.routes.ts and define routes for Login, Register, and Profile pages.
import { Routes } from '@angular/router';
import { LoginComponent } from './login.component/login.component';
import { AuthGuard } from './auth.guard-guard';
import { ProfileComponent } from './profile.component/profile.component';
import { RegisterComponent } from './register.component/register.component';

export const routes: Routes = [
  { path: '', redirectTo: 'login', pathMatch: 'full' },
  { path: 'login', component: LoginComponent },
  { path: 'register', component: RegisterComponent },
  { path: 'profile', component: ProfileComponent, canActivate: [AuthGuard] },
];
4. Create the Auth Service
Generate a service that communicates with the NestJS backend:
ng generate service auth.serviceOpen src/app/auth.service.ts and add the following:
import { Injectable } from '@angular/core';
import { HttpClient, HttpHeaders } from '@angular/common/http';
import { Router } from '@angular/router';
import { Observable, tap } from 'rxjs';

@Injectable({
  providedIn: 'root',
})
export class AuthService {
  private apiUrl = 'http://localhost:3000/auth';

  constructor(private http: HttpClient, private router: Router) {}

  register(email: string, password: string): Observable<any> {
    return this.http.post(`${this.apiUrl}/register`, { email, password });
  }

  login(email: string, password: string): Observable<any> {
    return this.http.post(`${this.apiUrl}/login`, { email, password }).pipe(
      tap((res: any) => {
        localStorage.setItem('token', res.access_token);
      })
    );
  }

  logout(): void {
    localStorage.removeItem('token');
    this.router.navigate(['/login']);
  }

  getProfile(): Observable<any> {
    const token = localStorage.getItem('token');
    const headers = new HttpHeaders().set('Authorization', `Bearer ${token}`);
    return this.http.get(`${this.apiUrl}/profile`, { headers });
  }

  isAuthenticated(): boolean {
    return !!localStorage.getItem('token');
  }
}
Update app/app.config.ts to provide HttpClient.
import { ApplicationConfig, provideBrowserGlobalErrorListeners, provideZoneChangeDetection } from '@angular/core';
import { provideRouter } from '@angular/router';
import { routes } from './app.routes';
import { provideHttpClient } from '@angular/common/http';
export const appConfig: ApplicationConfig = {
providers: [
provideBrowserGlobalErrorListeners(),
provideZoneChangeDetection({ eventCoalescing: true }),
provideRouter(routes),
provideHttpClient()
]
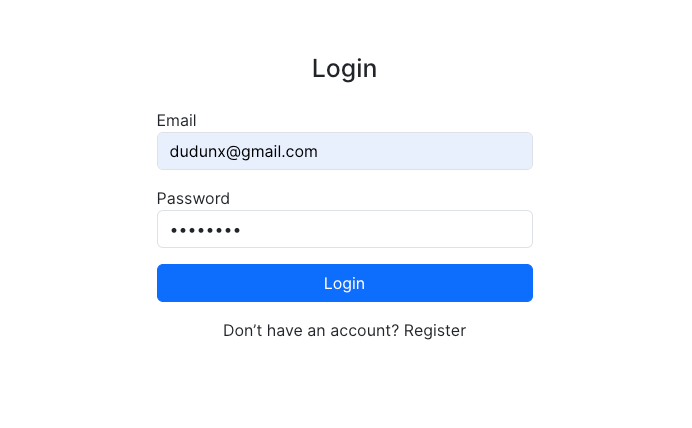
};5. Create the Login Component
Generate the component:
ng generate component login.component --standaloneReplace the content of src/app/login.component/login.component.ts with:
import { Component } from '@angular/core';
import { FormsModule } from '@angular/forms';
import { CommonModule } from '@angular/common';
import { AuthService } from '../auth.service';
import { Router } from '@angular/router';

@Component({
  selector: 'app-login',
  standalone: true,
  imports: [FormsModule, CommonModule],
  templateUrl: './login.component.html',
})
export class LoginComponent {
  email = '';
  password = '';
  errorMessage = '';

  constructor(private authService: AuthService, private router: Router) {}

  login() {
    this.authService.login(this.email, this.password).subscribe({
      next: () => this.router.navigate(['/profile']),
      error: (err) => (this.errorMessage = err.error.message || 'Login failed'),
    });
  }
}
Then create a simple template (login.component.html):
<div class="container mt-5" style="max-width: 400px;">
<h3 class="text-center mb-4">Login</h3>
<form (ngSubmit)="login()">
<div class="mb-3">
<label>Email</label>
<input [(ngModel)]="email" name="email" class="form-control" type="email" required />
</div>
<div class="mb-3">
<label>Password</label>
<input [(ngModel)]="password" name="password" class="form-control" type="password" required />
</div>
<div *ngIf="errorMessage" class="alert alert-danger">{{ errorMessage }}</div>
<button class="btn btn-primary w-100">Login</button>
</form>
<div class="text-center mt-3">
<a routerLink="/register">Don’t have an account? Register</a>
</div>
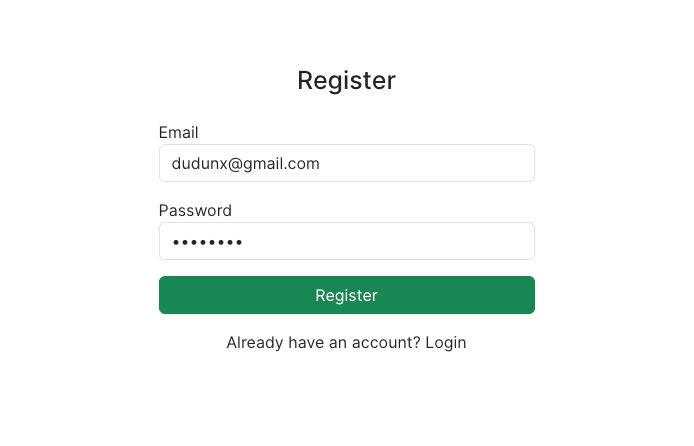
</div>6. Create the Register Component
Generate the component:
ng generate component register.component --standaloneReplace the content of register.component.ts with:
import { Component } from '@angular/core';
import { FormsModule } from '@angular/forms';
import { CommonModule } from '@angular/common';
import { AuthService } from '../auth.service';
import { Router } from '@angular/router';

@Component({
  selector: 'app-register',
  standalone: true,
  imports: [FormsModule, CommonModule],
  templateUrl: './register.component.html',
})
export class RegisterComponent {
  email = '';
  password = '';
  successMessage = '';
  errorMessage = '';

  constructor(private authService: AuthService, private router: Router) {}

  register() {
    this.authService.register(this.email, this.password).subscribe({
      next: () => {
        this.successMessage = 'Registration successful! You can now log in.';
        this.errorMessage = '';
      },
      error: (err) => {
        this.errorMessage = err.error.message || 'Registration failed';
        this.successMessage = '';
      },
    });
  }
}
And add the template (register.component.html):
7. Create the Profile Component
Generate the component:
ng generate component profile.component --standaloneReplace its code with:
import { Component, OnInit } from '@angular/core';
import { CommonModule } from '@angular/common';
import { AuthService } from '../auth.service';
import { Router } from '@angular/router';

@Component({
  selector: 'app-profile',
  standalone: true,
  imports: [CommonModule],
  templateUrl: './profile.component.html',
})
export class ProfileComponent implements OnInit {
  user: any;

  constructor(private authService: AuthService, private router: Router) {}

  ngOnInit(): void {
    this.authService.getProfile().subscribe({
      next: (data) => (this.user = data),
      error: () => this.router.navigate(['/login']),
    });
  }

  logout() {
    this.authService.logout();
  }
}
Template (profile.component.html):
<div class="container mt-5" style="max-width: 400px;">
  <h3 class="text-center mb-4">Profile</h3>

  <div *ngIf="user">
    <p><strong>Email:</strong> {{ user.email }}</p>
  </div>

  <button class="btn btn-danger w-100 mt-3" (click)="logout()">Logout</button>
</div>
8. Create an Auth Guard
Generate an Auth Guard to protect routes:
ng generate guard auth.guardReplace its content with:
import { Injectable } from '@angular/core';
import { CanActivate, Router } from '@angular/router';
import { AuthService } from './auth.service';

@Injectable({ providedIn: 'root' })
export class AuthGuard implements CanActivate {
  constructor(private authService: AuthService, private router: Router) {}

  canActivate(): boolean {
    if (this.authService.isAuthenticated()) {
      return true;
    }
    this.router.navigate(['/login']);
    return false;
  }
}
9. Test the Frontend
Now run both servers:
# Backend
npm run start:dev

# Frontend (in another terminal)
ng serve-
Visit http://localhost:4200/register → create an account.
-
Login with the same credentials.
-
You should be redirected to the Profile page showing your email.
-
Try accessing
/profilewithout logging in — you’ll be redirected to/login.
✅ Congratulations! You now have a working full-stack authentication app with NestJS, MongoDB, JWT, and Angular 20 standalone components.
Connecting Angular with NestJS API (CORS, Environment Config, etc.)
In this section, you’ll ensure that your Angular app can securely communicate with your NestJS backend by properly configuring CORS, environment variables, and HTTP endpoints.
1. Enable CORS in NestJS
By default, browsers block cross-origin requests if the frontend and backend run on different ports (e.g., Angular on 4200, NestJS on 3000).
To fix this, enable CORS in your NestJS app.
Open src/main.ts and update it like this:
import { NestFactory } from '@nestjs/core';
import { AppModule } from './app.module';

async function bootstrap() {
  const app = await NestFactory.create(AppModule);

  app.enableCors({
    origin: 'http://localhost:4200', // Angular frontend URL
    credentials: true,
  });

  await app.listen(process.env.PORT ?? 3000);
}
bootstrap();
This allows your Angular app to make API calls to the NestJS server during development.
🔒 Note: In production, replace the origin with your deployed frontend domain to prevent unwanted access.
2. Use Environment Variables for Secrets and Configs
Hardcoding secrets like JWT keys or DB URLs isn’t secure.
Let’s store them in environment variables instead.
1. Install @nestjs/config
npm install @nestjs/config2. Create an .env file in the root directory:
PORT=3000
MONGO_URI=mongodb://localhost:27017/nestjs-auth
JWT_SECRET=yourSuperSecretKey
3. Update app.module.ts to load these variables:
import { Module } from '@nestjs/common';
import { AppController } from './app.controller';
import { AppService } from './app.service';
import { MongooseModule } from '@nestjs/mongoose';
import { AuthModule } from './auth/auth.module';
import { ConfigModule } from '@nestjs/config';

@Module({
  imports: [
    ConfigModule.forRoot({ isGlobal: true }),
    MongooseModule.forRoot(process.env.MONGO_URI || 'mongodb://localhost:27017/your-database'),
    AuthModule,
  ],
  controllers: [AppController],
  providers: [AppService],
})
export class AppModule { }
4. Update auth.module.ts to use the secret from env:
import { Module } from '@nestjs/common';
import { MongooseModule } from '@nestjs/mongoose';
import { AuthService } from './auth.service';
import { AuthController } from './auth.controller';
import { User, UserSchema } from './user.schema';
import { JwtModule } from '@nestjs/jwt';
import { JwtStrategy } from './jwt.strategy';
import { ConfigModule, ConfigService } from '@nestjs/config';
import { PassportModule } from '@nestjs/passport';

@Module({
  imports: [
    ConfigModule.forRoot({ isGlobal: true }),
    MongooseModule.forFeature([{ name: User.name, schema: UserSchema }]),
    PassportModule,
    JwtModule.registerAsync({
      imports: [ConfigModule],
      inject: [ConfigService],
      useFactory: async (configService: ConfigService) => ({
        secret: configService.get<string>('JWT_SECRET') || 'fallbackSecret',
        signOptions: {
          expiresIn: configService.get('JWT_EXPIRES_IN') || '1d',
        },
      }),
    }),
  ],
  controllers: [AuthController],
  providers: [AuthService, JwtStrategy],
})
export class AuthModule { }
Now your sensitive configurations are safely loaded from environment variables.
3. Configure Angular Environment Variables
Let’s make the frontend API URL configurable as well.
Open src/environments/environment.ts (or create it if missing):
export const environment = {
  production: false,
  apiUrl: 'http://localhost:3000/auth'
};
For production, create src/environments/environment.prod.ts:
export const environment = {
  production: true,
  apiUrl: 'https://your-production-api.com/auth'
};
Then modify auth.service.ts to use these variables:
import { Injectable } from '@angular/core';
import { HttpClient, HttpHeaders } from '@angular/common/http';
import { Router } from '@angular/router';
import { Observable, tap } from 'rxjs';
import { environment } from '../environments/environment';

@Injectable({
  providedIn: 'root',
})
export class AuthService {
  private apiUrl = environment.apiUrl;

  constructor(private http: HttpClient, private router: Router) {}

  register(email: string, password: string): Observable<any> {
    return this.http.post(`${this.apiUrl}/register`, { email, password });
  }

  login(email: string, password: string): Observable<any> {
    return this.http.post(`${this.apiUrl}/login`, { email, password }).pipe(
      tap((res: any) => {
        localStorage.setItem('token', res.access_token);
      })
    );
  }

  // ... rest of the methods remain unchanged
}
4. Add Proxy Configuration (Optional)
If you prefer not to enable CORS in NestJS during local development, you can use an Angular proxy.
Create a file named proxy.conf.json in the Angular root directory:
{
  "/auth": {
    "target": "http://localhost:3000",
    "secure": false,
    "changeOrigin": true
  }
}
Then update your package.json scripts:
"start": "ng serve --proxy-config proxy.conf.json",This proxies requests from http://localhost:4200/auth/... to http://localhost:3000/auth/..., avoiding CORS altogether.
5. Verify the Connection
Now restart both servers:
# Backend
npm run start:dev

# Frontend
npm start
Then:
-
Register a new user — you should see a success message.
-
Login and open /profile — your user email should appear.
-
Check the Network tab — requests to
/auth/...should return proper responses from your NestJS backend.
✅ You’ve now successfully connected your Angular 20 frontend to your NestJS 11 backend, using best practices for CORS, environment configuration, and secure API access.
Testing the Authentication Flow
Now that both backend and frontend are connected, it’s time to verify that our secure authentication system works end to end — from registration to accessing protected resources.
🔹 Step 1: Run the Backend and Frontend
Make sure your NestJS backend and Angular frontend are both running:
# Terminal 1 – Backend
npm run start:dev

# Terminal 2 – Frontend
ng serve-
Backend should run at
http://localhost:3000 -
Frontend should run at
http://localhost:4200
🔹 Step 2: Register a New User
-
Open
http://localhost:4200/register -
Fill in your details (e.g., username, email, password)
-
Submit — the browser should send a
POST /auth/registerrequest.
✅ If successful, you’ll see a success message or be redirected to the login page.
In MongoDB, a new user document should appear in the users collection (password will be hashed).
🔹 Step 3: Login and Store JWT Token
-
Open
http://localhost:4200/login -
Enter your registered credentials.
-
When successful, the frontend receives a JWT token from the NestJS API.
This token is stored in localStorage or sessionStorage:
localStorage.setItem('token', response.token);
You can verify it’s stored by opening DevTools → Application → Local Storage.
🔹 Step 4: Access Protected Routes
Now try to navigate to a protected route, e.g., /dashboard.
The Angular AuthInterceptor will automatically add the token to the request header:
Authorization: Bearer eyJhbGciOiJIUzI1NiIsInR5cCI6...On the backend, the JWT guard validates the token.
If valid → it grants access.
If invalid/expired → returns 401 Unauthorized.

You should see your dashboard or protected content load successfully.
🔹 Step 5: Test Token Expiry or Logout
-
Logout by removing the token:
localStorage.removeItem('token'); this.router.navigate(['/login']); -
Try accessing
/dashboardagain — you’ll be redirected to the login page. -
You can also manually edit or delete the token in DevTools to simulate expiration.
✅ Expected Results Summary
| Test Case | Expected Result |
|---|---|
| Register new user | User created in MongoDB |
| Login with valid credentials | JWT token returned and stored |
| Login with invalid credentials | Error message shown |
| Access protected route (with token) | Success (200 OK) |
| Access protected route (without token) | Redirected to login |
| Logout | Token cleared, redirected to login |
Common Mistakes and Best Practices
Now that your NestJS + Angular authentication system is working end-to-end, let’s go over the most common pitfalls developers encounter — and how to avoid them. These tips will help you maintain a secure, scalable, and production-ready application.
🔹 1. Forgetting to Set JWT_SECRET
Mistake:
Developers often forget to define JWT_SECRET in the .env file or misconfigure JwtModule, leading to the error:
Error: secretOrPrivateKey must have a value
Best Practice:
Always define environment variables in a .env file and load them using NestJS ConfigModule.
Provide a fallback secret in development mode, but never hardcode it in production.
secret: process.env.JWT_SECRET || 'fallbackSecret'🔹 2. Storing Passwords in Plain Text
Mistake:
Saving passwords without hashing is a major security flaw.
Best Practice:
Always hash passwords using a strong algorithm like bcrypt before saving to MongoDB.
user.password = await bcrypt.hash(password, 10);🔹 3. Missing Token Validation in Guards
Mistake:
Allowing access to protected routes without proper JWT validation or missing a guard on routes.
Best Practice:
Always use @UseGuards(JwtAuthGuard) on every route that requires authentication.
This ensures only valid tokens can access protected resources.
🔹 4. Storing JWT in Local Storage (Security Considerations)
Mistake:
Storing tokens in localStorage can make your app vulnerable to XSS (Cross-Site Scripting) attacks.
Best Practice:
For highly secure apps, consider using HTTP-only cookies for storing tokens.
For typical SPAs like this tutorial, localStorage is acceptable with proper sanitization and CSP headers.
🔹 5. Ignoring Token Expiration
Mistake:
Not handling expired tokens leads to confusing “Unauthorized” errors on the frontend.
Best Practice:
Implement logic in the frontend AuthInterceptor to:
-
Detect 401 responses.
-
Auto-logout or refresh token when it expires.
🔹 6. Not Handling CORS Properly
Mistake:
CORS misconfiguration between Angular and NestJS results in blocked requests.
Best Practice:
Enable CORS correctly in your NestJS main.ts:
app.enableCors({
  origin: 'http://localhost:4200',
  credentials: true,
});
🔹 7. Exposing Sensitive Data in Responses
Mistake:
Returning entire user documents from MongoDB, including the hashed password.
Best Practice:
Always sanitize response objects:
const { password, ...userWithoutPassword } = user.toObject();
return userWithoutPassword;
🔹 8. Missing Environment Separation
Mistake:
Using the same .env file for both development and production.
Best Practice:
Use multiple .env files:
.env.development
.env.production
and configure the right one during deployment.
🔹 9. Skipping Validation for Login/Register Inputs
Mistake:
Allowing unvalidated input can lead to errors or injection attacks.
Best Practice:
Use class-validator decorators in DTOs to enforce validation rules:
@IsEmail()
email: string;

@MinLength(6)
password: string;
🔹 10. Not Testing the Full Flow
Mistake:
Only testing backend endpoints with Postman, not ensuring Angular integration works as expected.
Best Practice:
Test the entire login/register → token → guard → logout cycle using the browser.
Use browser DevTools to inspect token flow and ensure everything aligns.
🧠 Pro Tip:
Add a simple token refresh mechanism if you plan to scale the system.
Use short-lived access tokens and long-lived refresh tokens for stronger security and a smoother UX.
Conclusion and Next Steps
Congratulations! 🎉 You’ve successfully built a secure user authentication system using NestJS 11, JWT, MongoDB, and a modern Angular 20 (standalone) frontend.
Through this tutorial, you learned how to:
-
Set up a NestJS backend with modular architecture and environment-based configuration.
-
Integrate Mongoose for MongoDB data persistence.
-
Secure authentication with JWT tokens and guards for protected routes.
-
Build a responsive Angular frontend with standalone components for registration, login, and token-based access.
-
Connect both layers with proper CORS and environment configurations.
-
Test the full flow of user registration → login → access → logout.
You now have a complete authentication boilerplate that can serve as the foundation for larger enterprise applications.
🚀 Next Steps and Enhancements
Here are some ideas to take your project even further:
-
Implement Role-Based Access Control (RBAC)
Add roles likeadmin,user, andmoderator, and protect routes accordingly using NestJS custom decorators and guards. -
Add Refresh Tokens
Use short-lived access tokens and a refresh token mechanism to improve security and user experience. -
Switch to HTTP-Only Cookies
For production environments, store tokens in HTTP-only cookies instead oflocalStorageto mitigate XSS attacks. -
Add Email Verification and Password Reset
Integrate an email service like SendGrid or Nodemailer for verifying new users and resetting passwords. -
Enhance the UI with Angular Material
Improve user experience with styled forms, feedback dialogs, and better navigation flow. -
Deploy to the Cloud
Deploy the backend on Render, Railway, or AWS, and the Angular frontend on Vercel or Netlify.
Use MongoDB Atlas for a secure, managed database.
✨ Final Thoughts
By combining NestJS, JWT, and Angular, you’ve built a robust, scalable, and secure authentication workflow — a pattern used in real-world production systems today.
Keep refining your stack, follow best practices, and continue experimenting with NestJS modules and Angular’s reactive features.
You’re well on your way to mastering full-stack TypeScript development.
You can get the full source code of NestJS Backend and Angular Frontend on our GitHub.
That's just the basics. If you need more deep learning about Nest.js, you can take the following cheap course:
- NestJS: The Complete Developer's Guide
- NestJS Masterclass - NodeJS Framework Backend Development
- NestJS Mastery: Build & Deploy a Production-Ready API
- NestJS Zero to Hero - Modern TypeScript Back-end Development
- NestJS Microservices: Build & Deploy a Scaleable Backend
- NestJS: Build a Real-Time Social Media API (/w WebSockets)
- NestJS Unleashed: Develop Robust and Maintainable Backends
- The Nest JS Bootcamp - Complete Developer Guide
Thanks!