In today’s modern web development landscape, APIs are the backbone of most applications. Traditionally, developers have relied on REST APIs to communicate between the frontend and backend. However, as applications become more complex, REST’s limitations — such as over-fetching and under-fetching of data — can slow down performance and complicate data management.
That’s where GraphQL comes in. Developed by Facebook, GraphQL provides a powerful query language that allows clients to request exactly the data they need and nothing more. It’s flexible, efficient, and perfectly suited for modern applications that consume multiple data sources or require highly dynamic UIs.
Meanwhile, NestJS has emerged as one of the most robust frameworks for building scalable, maintainable server-side applications with Node.js. Inspired by Angular’s architecture, NestJS leverages TypeScript, decorators, and dependency injection to provide a modular and testable structure. Its first-class support for GraphQL integration makes it an excellent choice for building powerful APIs.
In this tutorial, we’ll walk you step-by-step through building a NestJS GraphQL API from scratch. You’ll learn how to:
-
Set up a new NestJS project.
-
Integrate the GraphQL module using Apollo Server.
-
Create queries and mutations for a simple
Userentity. -
Test the API using the built-in GraphQL Playground.
By the end of this guide, you’ll have a fully functional GraphQL API powered by NestJS — one that you can easily extend with databases, authentication, and more advanced features.
🧠 What You’ll Learn
-
How to set up a NestJS project using the Nest CLI.
-
How to configure and use GraphQL with the Apollo Driver.
-
How to create a schema automatically from TypeScript decorators.
-
How to write GraphQL queries and mutations.
-
How to test your API using the GraphQL Playground.
⚙️ Prerequisites
Before you begin, make sure you have the following installed:
-
Node.js (v20 or later)
-
npm or yarn
-
A basic understanding of TypeScript and APIs
🧰 What We’ll Build
We’ll build a simple User Management API that allows you to:
-
Create new users (mutation)
-
Retrieve all users (query)
-
Get a single user by ID (query)
All data will be stored in memory for simplicity, but you can later integrate a database such as PostgreSQL or MongoDB.
🚀 Let’s Get Started
1. Create a New NestJS Project
The first step in building our GraphQL API is to set up a brand-new NestJS project. NestJS provides an official CLI (Command Line Interface) that makes project generation fast and consistent.
🧩 Step 1: Install the NestJS CLI
If you haven’t installed the NestJS CLI globally yet, you can do so with the following command:
npm install -g @nestjs/cliThis will install the NestJS command-line tool that helps generate new projects, modules, services, controllers, and more — all using a clean and consistent structure.
To verify the installation, run:
nest --versionYou should see a version number printed to the terminal (e.g., 11.1.10 or newer).
🧩 Step 2: Create a New Project
Next, create a new NestJS project using the CLI command:
nest new nestjs-graphql-apiThe CLI will prompt you to choose a package manager. You can select npm or yarn, depending on your preference. Once selected, NestJS will generate a ready-to-use project structure and automatically install dependencies.
After setup completes, navigate into the project folder:
cd nestjs-graphql-apiYou’ll see a directory structure similar to this:
nestjs-graphql-api/
├── src/
│   ├── app.controller.ts
│   ├── app.module.ts
│   ├── app.service.ts
│   └── main.ts
├── test/
├── package.json
├── tsconfig.json
└── nest-cli.json
🧩 Step 3: Run the Application
Before we start adding GraphQL, let’s make sure the base NestJS application runs correctly.
Start the development server with:
npm run start:devThen open your browser and go to:
👉 http://localhost:3000
You should see the message:
Hello World!This confirms that your NestJS application is running successfully.
🧩 Step 4: Clean Up the Default Files
Since we’ll be building our own API using GraphQL (not REST controllers), you can safely remove or modify the default REST components:
-
Delete or comment out
app.controller.tsandapp.service.ts. -
Update
app.module.tsto remove their imports and references.
Your src/app.module.ts should now look like this minimal setup:
import { Module } from '@nestjs/common';

@Module({
  imports: [],
  controllers: [],
  providers: [],
})
export class AppModule { }
This gives us a clean starting point for adding the GraphQL module in the next section.
✅ Summary
You’ve successfully:
-
Installed the NestJS CLI.
-
Generated a new NestJS project.
-
Verified that it runs on
localhost:3000. -
Cleaned up the default files to prepare for GraphQL integration.
In the next section, we’ll install and configure GraphQL and Apollo Server inside our NestJS project to start building our GraphQL API schema.
2. Install and Configure GraphQL
NestJS provides first-class support for GraphQL through a dedicated module that works seamlessly with Apollo Server.
In this section, we’ll install the required dependencies and configure GraphQL to automatically generate a schema from TypeScript decorators.
🧩 Step 1: Install GraphQL Dependencies
NestJS uses @nestjs/graphql to integrate GraphQL functionality, and it supports multiple GraphQL drivers — we’ll use Apollo Server, the most popular option.
Run the following command to install all required packages:
npm install @nestjs/graphql @nestjs/apollo @apollo/server graphql @as-integrations/express5
npm i --save-dev @types/node
Here’s what each package does:
-
@nestjs/graphql – NestJS module that provides GraphQL decorators and integration.
-
@nestjs/apollo – Apollo Server driver for NestJS.
-
@apollo/server – Core Apollo Server library.
-
graphql – The GraphQL specification and tools used to parse and execute GraphQL queries.
🧩 Step 2: Configure GraphQL in the Root Module
Once installed, open src/app.module.ts and modify it to configure the GraphQL module.
We’ll set up autoSchemaFile, which tells NestJS to automatically generate a GraphQL schema based on our TypeScript decorators (so you don’t have to manually write .gql schema files).
Replace the content of src/app.module.ts with:
import { Module } from '@nestjs/common';
import { GraphQLModule } from '@nestjs/graphql';
import { ApolloDriver, ApolloDriverConfig } from '@nestjs/apollo';
import { join } from 'path';

@Module({
  imports: [
    GraphQLModule.forRoot<ApolloDriverConfig>({
      driver: ApolloDriver,
      autoSchemaFile: join(process.cwd(), 'src/schema.gql'),
      playground: true,
    }),
  ],
  controllers: [],
  providers: [],
})
export class AppModule { }
🧩 Step 3: What This Configuration Does
-
driver: ApolloDriver
Tells NestJS to use Apollo Server as the GraphQL backend. -
autoSchemaFile
Automatically generates aschema.gqlfile from TypeScript classes and decorators (you’ll see this file appear once you run the app). -
playground: true
Enables the GraphQL Playground, a built-in interactive UI for testing queries and mutations athttp://localhost:3000/graphql.
You can think of this setup as similar to defining API routes automatically — except here, the “routes” (queries and mutations) come from your TypeScript decorators.
🧩 Step 4: Run the Application
Now, let’s make sure the configuration works.
Run your NestJS app again:
npm run start:devThen open your browser and visit:
👉 http://localhost:3000/graphql
You should see this error message.
GraphQLError: Query root type must be provided.That error appears because GraphQL requires at least one Query type (i.e., a root query) to generate a valid schema — and currently, our NestJS project doesn’t define any.
At this stage, the schema will still be empty because we haven’t defined any entities, queries, or mutations yet — but that’s exactly what we’ll do next.
✅ Summary
So far, you’ve:
-
Installed all the necessary GraphQL and Apollo dependencies.
-
Configured the GraphQL module in your main application.
-
Verified that the GraphQL Playground is running successfully.
In the next section, we’ll create our first GraphQL module — the Users module, and start defining the schema using TypeScript decorators.
3. Create the Users Module
Now that GraphQL is installed and configured, it’s time to create our first module: Users.
This module will contain everything related to users — including the schema definitions, data handling logic, and resolvers for GraphQL queries and mutations.
🧩 Step 1: Generate the Users Module
NestJS makes this step easy using the CLI. Run the following commands in your project root:
nest generate module users
nest generate service users
nest generate resolver users
Alternatively, you can use shorthand:
nest g mo users
nest g s users
nest g r users
This will create three new files inside src/users/:
src/users/
├── users.module.ts
├── users.service.ts
└── users.resolver.ts
🧩 Step 2: Define the User Entity
Entities in GraphQL define the structure of the data (like models).
Create a new file src/users/entities/user.entity.ts and add the following:
import { Field, ID, ObjectType } from '@nestjs/graphql';

@ObjectType()
export class User {
    @Field(() => ID)
    id: number;

    @Field()
    name: string;

    @Field()
    email: string;
}
Here’s what’s happening:
-
@ObjectType()marks the class as a GraphQL type. -
@Field()exposes each property to the GraphQL schema. -
IDandStringtypes automatically map to the appropriate GraphQL scalar types.
🧩 Step 3: Create a DTO (Data Transfer Object)
This defines the structure of input data when creating a new user.
Create a new file:
src/users/dto/create-user.input.ts
import { Field, InputType } from '@nestjs/graphql';

@InputType()
export class CreateUserInput {
    @Field()
    name: string;

    @Field()
    email: string;
}
@InputType() tells GraphQL that this class is used as an input object for mutations.
🧩 Step 4: Implement the Users Service
The service layer handles business logic — here we’ll use an in-memory array to store users.
Open src/users/users.service.ts and replace its content with:
import { Injectable } from '@nestjs/common';
import { User } from './entities/user.entity';
import { CreateUserInput } from './dto/create-user.input';

@Injectable()
export class UsersService {
    private users: User[] = [];
    private idCounter = 1;

    create(createUserInput: CreateUserInput): User {
        const user = { id: this.idCounter++, ...createUserInput };
        this.users.push(user);
        return user;
    }

    findAll(): User[] {
        return this.users;
    }

    findOne(id: number): User | undefined {
        return this.users.find(user => user.id === id);
    }
}
This service supports:
-
Creating a user (
create) -
Retrieving all users (
findAll) -
Retrieving a single user (
findOne)
🧩 Step 5: Define the Users Resolver
Resolvers connect GraphQL operations (queries/mutations) to your service logic.
Open src/users/users.resolver.ts and update it as follows:
import { Args, Int, Mutation, Query, Resolver } from '@nestjs/graphql';
import { User } from './entities/user.entity';
import { CreateUserInput } from './dto/create-user.input';
import { UsersService } from './users.service';

@Resolver(() => User)
export class UsersResolver {
    constructor(private readonly usersService: UsersService) { }

    @Mutation(() => User)
    createUser(@Args('createUserInput') createUserInput: CreateUserInput) {
        return this.usersService.create(createUserInput);
    }

    @Query(() => [User], { name: 'users' })
    findAll() {
        return this.usersService.findAll();
    }

    @Query(() => User, { name: 'user' })
    findOne(@Args('id', { type: () => Int }) id: number) {
        return this.usersService.findOne(id);
    }
}
Now, we’ve defined:
-
Mutation →
createUser -
Queries →
users,user
These will automatically form the Query root type GraphQL requires — fixing the “Query root type must be provided” error.
🧩 Step 6: Import the Users Module
Finally, open src/app.module.ts and import the UsersModule:
import { Module } from '@nestjs/common';
import { GraphQLModule } from '@nestjs/graphql';
import { ApolloDriver, ApolloDriverConfig } from '@nestjs/apollo';
import { join } from 'path';
import { UsersModule } from './users/users.module';

@Module({
  imports: [
    GraphQLModule.forRoot<ApolloDriverConfig>({
      driver: ApolloDriver,
      autoSchemaFile: join(process.cwd(), 'src/schema.gql'),
      playground: true,
    }),
    UsersModule,
  ],
  controllers: [],
  providers: [],
})
export class AppModule { }
🧩 Step 7: Test Your GraphQL API
Now restart your NestJS app:
npm run start:devOpen the GraphQL Playground at:
👉 http://localhost:3000/graphql
Then try this mutation and query:
mutation {
  createUser(createUserInput: { name: "Alice", email: "[email protected]" }) {
    id
    name
    email
  }
}

query {
  users {
    id
    name
    email
  }
}
You should now see your User data returned — and the error Query root type must be provided will disappear ✅.
✅ Summary
You’ve successfully:
-
Created a Users module with entity, DTO, service, and resolver.
-
Defined GraphQL queries and mutations.
-
Fixed the “Query root type must be provided” error by defining root queries.
In the next section, we’ll extend the functionality by adding Update and Delete mutations to complete the CRUD operations for our GraphQL API.
4. Add Update and Delete Mutations
So far, we’ve implemented three core operations:
-
✅ Create a user
-
✅ Get all users
-
✅ Get a user by ID
To complete the CRUD functionality, we’ll now add:
-
Update user
-
Delete user
This will teach your readers how to handle input types for updates, modify existing data, and return meaningful results.
🧩 Step 1: Create an Update DTO
Just like we created an InputType for creating users, we also need one for updating users.
Create a file:
src/users/dto/update-user.input.ts
import { Field, InputType, Int, PartialType } from '@nestjs/graphql';
import { CreateUserInput } from './create-user.input';

@InputType()
export class UpdateUserInput extends PartialType(CreateUserInput) {
    @Field(() => Int)
    id: number;
}
✅ What’s happening here:
PartialType(CreateUserInput) makes all fields optional (except id)
We add an ID to identify which user to update
🧩 Step 2: Update the Users Service
Open src/users/users.service.ts and add two new methods:
    update(id: number, updateUserInput: any) {
        const userIndex = this.users.findIndex(user => user.id === id);
        if (userIndex === -1) return null;

        this.users[userIndex] = {
            ...this.users[userIndex],
            ...updateUserInput,
        };

        return this.users[userIndex];
    }

    remove(id: number) {
        const userIndex = this.users.findIndex(user => user.id === id);
        if (userIndex === -1) return null;

        const deletedUser = this.users[userIndex];
        this.users.splice(userIndex, 1);
        return deletedUser;
    }
✅ What this service now supports:
-
Updating only the provided fields
-
Removing a user and returning the deleted object
🧩 Step 3: Add Mutations to the Resolver
Open src/users/users.resolver.ts and update it by adding:
import { UpdateUserInput } from './dto/update-user.input';

@Mutation(() => User)
updateUser(@Args('updateUserInput') updateUserInput: UpdateUserInput) {
  return this.usersService.update(updateUserInput.id, updateUserInput);
}

@Mutation(() => User)
removeUser(@Args('id', { type: () => Int }) id: number) {
  return this.usersService.remove(id);
}
Now your resolver exposes updateUser and removeUser as GraphQL mutations.
🧪 Step 4: Test the Update and Delete Mutations
With the app running (npm run start:dev), open:
👉 http://localhost:3000/graphql
Update example
mutation {
updateUser(updateUserInput: { id: 1, name: "Alice Updated" }) {
id
name
email
}
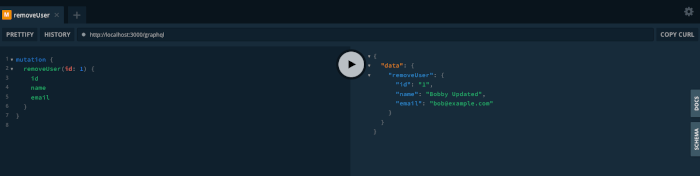
}Delete example
mutation {
  removeUser(id: 1) {
    id
    name
    email
  }
}
Query to confirm
query {
  users {
    id
    name
    email
  }
}
You should now see the updated list — proving your mutations work ✅
✅ Section Wrap-Up
In this section, you:
| Feature | Status |
|---|---|
Created UpdateUserInput |
✅ |
| Added update logic in the service | ✅ |
| Added delete logic in the service | ✅ |
| Exposed both mutations in the resolver | ✅ |
| Tested in GraphQL Playground | ✅ |
Your API now supports full CRUD operations with GraphQL and NestJS — a complete working module ready for database integration later.
5. Generate and Explore the GraphQL Schema
One of the most powerful features of NestJS’s GraphQL integration is its automatic schema generation.
Instead of manually maintaining .graphql schema files, NestJS builds your schema dynamically from the decorators in your TypeScript classes.
Let’s explore how this works in your project.
🧩 Step 1: Understanding Auto Schema Generation
In your app.module.ts, recall that we configured GraphQL as follows:
GraphQLModule.forRoot<ApolloDriverConfig>({
  driver: ApolloDriver,
  autoSchemaFile: join(process.cwd(), 'src/schema.gql'),
  playground: true,
})
The key option here is:
autoSchemaFile: join(process.cwd(), 'src/schema.gql')This tells NestJS to generate a schema.gql file is automatically in your src/ directory every time the app starts.
🧩 Step 2: Locate the Generated Schema
Start your app again:
npm run start:devThen check your project structure — you’ll now see a new file:
src/
├── schema.gql
├── app.module.ts
└── users/
    ├── users.module.ts
    ├── users.service.ts
    ├── users.resolver.ts
    ├── dto/
    │   ├── create-user.input.ts
    │   └── update-user.input.ts
    └── entities/
        └── user.entity.ts
🧩 Step 3: Open and Inspect schema.gql
Open src/schema.gql. You’ll see a schema similar to this:
# ------------------------------------------------------
# THIS FILE WAS AUTOMATICALLY GENERATED (DO NOT MODIFY)
# ------------------------------------------------------

type User {
  id: ID!
  name: String!
  email: String!
}

type Query {
  users: [User!]!
  user(id: Int!): User!
}

type Mutation {
  createUser(createUserInput: CreateUserInput!): User!
  updateUser(updateUserInput: UpdateUserInput!): User!
  removeUser(id: Int!): User!
}

input CreateUserInput {
  name: String!
  email: String!
}

input UpdateUserInput {
  name: String
  email: String
  id: Int!
}
🧠 Step 4: How NestJS Builds This Schema
Here’s what happens behind the scenes:
-
Decorators define schema elements
-
@ObjectType()→typedefinitions (e.g.,User) -
@InputType()→inputdefinitions (e.g.,CreateUserInput,UpdateUserInput) -
@Query()and@Mutation()→ root schema operations
-
-
TypeScript metadata
NestJS uses TypeScript’s reflection capabilities (reflect-metadata) to infer types likeString,Int, andID. -
GraphQLModule auto-generates
schema.gql
Every time you start or rebuild the project, the module scans all resolvers and DTOs to generate an up-to-date schema.
This approach ensures your GraphQL schema always matches your TypeScript code — no need to maintain it manually!
🧩 Step 5: Validate in GraphQL Playground
You can verify the schema visually in the GraphQL Playground UI.
Visit:
👉 http://localhost:3000/graphql
On the right side, open the “Docs” tab — you’ll see the exact schema definitions (queries, mutations, and types) as they appear in schema.gql.
This provides a real-time, interactive view of your API.
🧩 Step 6: Schema Advantages
Using automatic schema generation gives you several key benefits:
| Benefit | Description |
|---|---|
| Type safety | Strong TypeScript integration ensures schema and code stay in sync. |
| Less boilerplate | No need to write or update .graphql files manually. |
| Faster development | Schema updates automatically when you change DTOs or resolvers. |
| Consistent API | Guaranteed one-to-one mapping between backend logic and API schema. |
✅ Section Wrap-Up
In this section, you learned:
-
How
autoSchemaFileworks in the NestJS GraphQL module. -
Where to find and inspect your generated
schema.gqlfile. -
How NestJS decorators automatically create GraphQL types, queries, and mutations.
-
How to validate the generated schema in the GraphQL Playground.
Now you’ve got a fully functioning NestJS + GraphQL API with a live, auto-generated schema — an excellent foundation for real-world backend applications.
6. Connect GraphQL API to a Database (TypeORM Example)
🧠 What You’ll Learn
-
How to set up a PostgreSQL database for your NestJS app
-
How to configure TypeORM in NestJS
-
How to create entities that work with both TypeORM and GraphQL
-
How to update your resolvers and services to interact with the database
🧩 Step 1: Install TypeORM and PostgreSQL Driver
In your project directory, run:
npm install @nestjs/typeorm typeorm pgExplanation:
-
@nestjs/typeorm— NestJS integration for TypeORM -
typeorm— TypeORM itself (object-relational mapper) -
pg— PostgreSQL driver for Node.js
💡 You can substitute
pgwithmysql2,sqlite3, ormongodbif you prefer other databases — TypeORM supports all of them.
🧩 Step 2: Set Up a Local PostgreSQL Database
If you already have PostgreSQL installed, create a database for this tutorial:
CREATE DATABASE nestjs_graphql_db;If you’re using Docker, you can spin up PostgreSQL easily with:
docker run --name nestjs-postgres -e POSTGRES_PASSWORD=secret -e POSTGRES_USER=postgres -e POSTGRES_DB=nestjs_graphql_db -p 5432:5432 -d postgres🧩 Step 3: Configure TypeORM in app.module.ts
Open src/app.module.ts and import the TypeOrmModule.
Then, register it with your PostgreSQL connection settings.
import { Module } from '@nestjs/common';
import { GraphQLModule } from '@nestjs/graphql';
import { ApolloDriver, ApolloDriverConfig } from '@nestjs/apollo';
import { join } from 'path';
import { UsersModule } from './users/users.module';
import { TypeOrmModule } from '@nestjs/typeorm';

@Module({
  imports: [
    GraphQLModule.forRoot<ApolloDriverConfig>({
      driver: ApolloDriver,
      autoSchemaFile: join(process.cwd(), 'src/schema.gql'),
      playground: true,
    }),
    TypeOrmModule.forRoot({
      type: 'postgres',
      host: 'localhost',
      port: 5432,
      username: 'postgres',
      password: 'secret',
      database: 'nestjs_graphql_db',
      autoLoadEntities: true,
      synchronize: true, // for dev only
    }),
    UsersModule,
  ],
  controllers: [],
  providers: [],
})
export class AppModule { }
✅ Notes:
-
autoLoadEntities: trueautomatically loads all entities registered through feature modules. -
synchronize: trueautomatically creates tables — great for development (avoid using in production).
🧩 Step 4: Update the User Entity
We’ll enhance the existing GraphQL User entity to also be a TypeORM entity.
Open src/users/entities/user.entity.ts and replace it with:
import { ObjectType, Field, ID } from '@nestjs/graphql';
import { Entity, Column, PrimaryGeneratedColumn } from 'typeorm';

@ObjectType()
@Entity()
export class User {
    @Field(() => ID)
    @PrimaryGeneratedColumn()
    id: number;

    @Field()
    @Column()
    name: string;

    @Field()
    @Column({ unique: true })
    email: string;
}
✅ Notes:
-
@Entity()tells TypeORM that this class represents a database table. -
@PrimaryGeneratedColumn()creates an auto-incrementing ID column. -
The same decorators (
@Field()) still map this entity to GraphQL — meaning one class works for both ORM and schema generation.
🧩 Step 5: Update the Users Module for TypeORM
Open src/users/users.module.ts and import the entity into TypeOrmModule.forFeature():
import { Module } from '@nestjs/common';
import { UsersService } from './users.service';
import { UsersResolver } from './users.resolver';
import { TypeOrmModule } from '@nestjs/typeorm';
import { User } from './entities/user.entity';

@Module({
  imports: [TypeOrmModule.forFeature([User])],
  providers: [UsersService, UsersResolver]
})
export class UsersModule {}
This makes the User entity available for repository injection in the service.
🧩 Step 6: Update the Users Service
Replace the in-memory array logic in src/users/users.service.ts with TypeORM repository methods.
import { Injectable } from '@nestjs/common';
import { User } from './entities/user.entity';
import { CreateUserInput } from './dto/create-user.input';
import { InjectRepository } from '@nestjs/typeorm';
import { Repository } from 'typeorm';
import { UpdateUserInput } from './dto/update-user.input';

@Injectable()
export class UsersService {
    constructor(
        @InjectRepository(User)
        private usersRepository: Repository<User>,
    ) { }

    create(createUserInput: CreateUserInput): Promise<User> {
        const user = this.usersRepository.create(createUserInput);
        return this.usersRepository.save(user);
    }

    findAll(): Promise<User[]> {
        return this.usersRepository.find();
    }

    findOne(id: number): Promise<User | null> {
        return this.usersRepository.findOneBy({ id });
    }

    async update(id: number, updateUserInput: UpdateUserInput): Promise<User | null> {
        await this.usersRepository.update(id, updateUserInput);
        return this.findOne(id);
    }

    async remove(id: number): Promise<User | null> {
        const user = await this.findOne(id);
        if (user) {
            await this.usersRepository.delete(id);
        }
        return user;
    }
}
✅ Key takeaways:
-
We inject
Repository<User>via NestJS’s dependency injection. -
Methods are now asynchronous (
Promise<User>). -
TypeORM handles all database operations:
save,find,update,delete.
🧩 Step 7: Test the GraphQL API Again
Restart your app:
npm run start:devThen go to http://localhost:3000/graphql and try:
Create User
mutation {
  createUser(createUserInput: { name: "Bob", email: "[email protected]" }) {
    id
    name
    email
  }
}
Get All Users
query {
  users {
    id
    name
    email
  }
}
Update User
mutation {
  updateUser(updateUserInput: { id: 1, name: "Bobby Updated" }) {
    id
    name
    email
  }
}
Delete User
mutation {
  removeUser(id: 1) {
    id
    name
    email
  }
}
You should now see data persisting to your PostgreSQL database 🎉
✅ Section Wrap-Up
You’ve successfully connected your NestJS GraphQL API to a PostgreSQL database using TypeORM.
Here’s what your app can now do:
| Feature | Description |
|---|---|
| 🧱 TypeORM integration | Database connection and entity synchronization |
| 🧩 GraphQL + TypeORM entity | A single class acts as both an ORM entity and a GraphQL type |
| 🔁 Full CRUD | Create, read, update, and delete users |
| 🗄️ Data persistence | Data is stored permanently in PostgreSQL |
7. Add Validation and Error Handling
🧠 Why Validation and Error Handling Matter
In GraphQL APIs, errors are inevitable — users might send incomplete data, duplicate emails, or request non-existent records.
Without proper validation and error handling, these problems can cause:
-
Database errors
-
Security vulnerabilities
-
Poor client experience
NestJS provides built-in tools to handle these problems elegantly:
-
Pipes (especially the built-in
ValidationPipe) -
Class-validator decorators
-
HttpException and custom exception filters
We’ll use these to make our API safer and more predictable.
🧩 Step 1: Install Class-Validator and Class-Transformer
These two libraries work with NestJS’s validation system:
npm install class-validator class-transformer-
class-validator→ lets you use decorators like@IsEmail()and@Length() -
class-transformer→ helps NestJS automatically transform incoming input objects into DTO classes for validation
🧩 Step 2: Enable Global Validation Pipe
Open src/main.ts and update it to enable validation globally:
import { NestFactory } from '@nestjs/core';
import { AppModule } from './app.module';
import { ValidationPipe } from '@nestjs/common';

async function bootstrap() {
  const app = await NestFactory.create(AppModule);
  // Enable validation globally
  app.useGlobalPipes(new ValidationPipe());
  await app.listen(process.env.PORT ?? 3000);
}
bootstrap();
This ensures that every GraphQL mutation or query input DTO gets validated automatically before it reaches your service logic.
🧩 Step 3: Add Validation Rules to DTOs
Open src/users/dto/create-user.input.ts and update it like this:
import { Field, InputType } from '@nestjs/graphql';
import { IsEmail, Length } from 'class-validator';

@InputType()
export class CreateUserInput {
    @Field()
    @Length(3, 50, { message: 'Name must be between 3 and 50 characters long.' })
    name: string;

    @Field()
    @IsEmail({}, { message: 'Please provide a valid email address.' })
    email: string;
}
For the update DTO, open src/users/dto/update-user.input.ts:
import { Field, InputType, Int, PartialType } from '@nestjs/graphql';
import { IsEmail, IsOptional, Length } from 'class-validator';
import { CreateUserInput } from './create-user.input';

@InputType()
export class UpdateUserInput extends PartialType(CreateUserInput) {
    @Field(() => Int)
    id: number;

    @Field({ nullable: true })
    @IsOptional()
    @Length(3, 50)
    name?: string;

    @Field({ nullable: true })
    @IsOptional()
    @IsEmail()
    email?: string;
}
Now, if clients send invalid input (e.g., a name that’s too short or an invalid email), GraphQL will respond with clear validation error messages.
🧩 Step 4: Handle Exceptions in Services
Validation prevents many problems, but some still occur at runtime — for example, trying to update or delete a non-existent user, or inserting a duplicate email.
Let’s handle those gracefully using HttpException.
Open src/users/users.service.ts and update your methods as follows:
import { BadRequestException, Injectable, NotFoundException } from '@nestjs/common';
import { User } from './entities/user.entity';
import { CreateUserInput } from './dto/create-user.input';
import { InjectRepository } from '@nestjs/typeorm';
import { Repository } from 'typeorm';
import { UpdateUserInput } from './dto/update-user.input';

@Injectable()
export class UsersService {
    constructor(
        @InjectRepository(User)
        private usersRepository: Repository<User>,
    ) { }

    async create(createUserInput: CreateUserInput): Promise<User> {
        const existing = await this.usersRepository.findOneBy({ email: createUserInput.email });
        if (existing) {
            throw new BadRequestException('Email is already registered.');
        }

        const user = this.usersRepository.create(createUserInput);
        return this.usersRepository.save(user);
    }

    findAll(): Promise<User[]> {
        return this.usersRepository.find();
    }

    async findOne(id: number): Promise<User> {
        const user = await this.usersRepository.findOneBy({ id });
        if (!user) {
            throw new NotFoundException(`User with ID ${id} not found.`);
        }
        return user;
    }

    async update(id: number, updateUserInput: UpdateUserInput): Promise<User> {
        const user = await this.findOne(id);
        Object.assign(user, updateUserInput);
        return this.usersRepository.save(user);
    }

    async remove(id: number): Promise<User> {
        const user = await this.findOne(id);
        await this.usersRepository.remove(user);
        return user;
    }
}
✅ What happens now:
-
If you try to create a user with an existing email → you’ll get a
BadRequestException -
If you update or delete a non-existent user → you’ll get a
NotFoundException -
GraphQL automatically formats these exceptions and returns clean error responses
🧩 Step 5: Test Validation and Error Handling
Start your app again:
npm run start:devNow try these cases in GraphQL Playground:
❌ Invalid Email
mutation {
  createUser(createUserInput: { name: "John", email: "invalid-email" }) {
    id
    name
  }
}
Response:
{
  "errors": [
    {
      "message": "Please provide a valid email address."
    }
  ]
}
❌ Duplicate Email
mutation {
  createUser(createUserInput: { name: "John", email: "[email protected]" }) {
    id
  }
}
Response:
{
  "errors": [
    {
      "message": "Email is already registered."
    }
  ]
}
❌ Non-existent User
mutation {
  removeUser(id: 999) {
    id
  }
}
Response:
{
  "errors": [
    {
      "message": "User with ID 999 not found."
    }
  ]
}
Everything is now properly validated and handled 🎯
✅ Section Wrap-Up
You’ve now improved your API by adding robust input validation and structured error handling.
| Feature | Description |
|---|---|
| ✅ ValidationPipe | Validates all GraphQL inputs automatically |
| ✅ DTO decorators | Enforce data rules via class-validator |
| ✅ Exception handling | Clean GraphQL error messages |
| ✅ Resilient API | Prevents invalid or duplicate data |
Your NestJS GraphQL API is now secure, stable, and production-ready.
8. Add Authentication and Authorization (JWT + Guards)
🧠 What You’ll Learn
-
How to set up JWT-based authentication in NestJS
-
How to create an
AuthModulewith login and register mutations -
How to protect GraphQL resolvers using Guards and Decorators
-
How to attach the authenticated user to GraphQL’s context
🧩 Step 1: Install Authentication Dependencies
Run the following command to install the necessary packages:
npm install @nestjs/jwt @nestjs/passport passport passport-jwt bcrypt
npm install -D @types/passport-jwt
Explanation:
-
@nestjs/jwt→ JWT utility for NestJS -
passport&passport-jwt→ handle authentication strategies -
bcrypt→ securely hashes user passwords -
@types/passport-jwt→ TypeScript definitions for Passport JWT
🧩 Step 2: Create an Auth Module
Generate the module and its service/resolver:
nest g module auth
nest g service auth
nest g resolver auth
🧩 Step 3: Add Password Field to the User Entity
We’ll store hashed passwords for authentication.
Open src/users/entities/user.entity.ts and update it:
import { ObjectType, Field, ID } from '@nestjs/graphql';
import { Entity, Column, PrimaryGeneratedColumn } from 'typeorm';

@ObjectType()
@Entity()
export class User {
    @Field(() => ID)
    @PrimaryGeneratedColumn()
    id: number;

    @Field()
    @Column()
    name: string;

    @Field()
    @Column({ unique: true })
    email: string;

    @Column() // not exposed in GraphQL
    password: string;
}
⚠️ Note: Do not add
@Field()to thepasswordfield — it must not be accessible via GraphQL queries.
🧩 Step 4: Update User Creation to Hash Passwords
Open src/users/users.service.ts and modify the create method:
import * as bcrypt from 'bcrypt';

async create(createUserInput: CreateUserInput): Promise<User> {
  const existing = await this.usersRepository.findOneBy({ email: createUserInput.email });
  if (existing) {
    throw new BadRequestException('Email is already registered.');
  }

  const hashedPassword = await bcrypt.hash(createUserInput.password, 10);
  const user = this.usersRepository.create({
    ...createUserInput,
    password: hashedPassword,
  });

  return this.usersRepository.save(user);
}
Then, open src/users/dto/create-user.input.ts and add a password field:
import { Field, InputType } from '@nestjs/graphql';
import { IsEmail, Length, MinLength } from 'class-validator';

@InputType()
export class CreateUserInput {
    @Field()
    @Length(3, 50)
    name: string;

    @Field()
    @IsEmail()
    email: string;

    @Field()
    @MinLength(6, { message: 'Password must be at least 6 characters long.' })
    password: string;
}
🧩 Step 5: Configure JWT in AuthModule
Open src/auth/auth.module.ts and set up the JWT and Passport modules:
import { Module } from '@nestjs/common';
import { AuthService } from './auth.service';
import { AuthResolver } from './auth.resolver';
import { UsersModule } from 'src/users/users.module';
import { PassportModule } from '@nestjs/passport';
import { JwtModule } from '@nestjs/jwt';

@Module({
  imports: [
    UsersModule,
    PassportModule,
    JwtModule.register({
      secret: 'jwt-secret-key', // replace with process.env.JWT_SECRET in production
      signOptions: { expiresIn: '1d' },
    }),
  ],
  providers: [AuthService, AuthResolver]
})
export class AuthModule { }
🧩 Step 6: Implement the Auth Service
Open src/auth/auth.service.ts:
import { Injectable, UnauthorizedException } from '@nestjs/common';
import { JwtService } from '@nestjs/jwt';
import { UsersService } from '../users/users.service';
import * as bcrypt from 'bcrypt';

@Injectable()
export class AuthService {
    constructor(
        private usersService: UsersService,
        private jwtService: JwtService,
    ) { }

    async validateUser(email: string, password: string) {
        const user = await this.usersService.findByEmail(email);
        if (user && (await bcrypt.compare(password, user.password))) {
            const { password, ...result } = user;
            return result;
        }
        return null;
    }

    async login(email: string, password: string) {
        const user = await this.validateUser(email, password);
        if (!user) {
            throw new UnauthorizedException('Invalid email or password.');
        }

        const payload = { email: user.email, sub: user.id };
        return {
            access_token: this.jwtService.sign(payload),
            user,
        };
    }
}
Now, add this helper method in your UsersService (src/users/users.service.ts):
    findByEmail(email: string): Promise<User | null> {
        return this.usersRepository.findOneBy({ email });
    }
🧩 Step 7: Create the Auth Resolver
Open src/auth/auth.resolver.ts and implement the login mutation:
import { Resolver, Mutation, Args } from '@nestjs/graphql';
import { AuthService } from './auth.service';

@Resolver()
export class AuthResolver {
    constructor(private readonly authService: AuthService) { }

    @Mutation(() => String)
    async login(
        @Args('email') email: string,
        @Args('password') password: string,
    ): Promise<string> {
        const { access_token } = await this.authService.login(email, password);
        return access_token;
    }
}
🧩 Step 8: Create the JWT Strategy
Create a new file: src/auth/jwt.strategy.ts
import { Injectable } from '@nestjs/common';
import { PassportStrategy } from '@nestjs/passport';
import { ExtractJwt, Strategy } from 'passport-jwt';

@Injectable()
export class JwtStrategy extends PassportStrategy(Strategy) {
    constructor() {
        super({
            jwtFromRequest: ExtractJwt.fromAuthHeaderAsBearerToken(),
            ignoreExpiration: false,
            secretOrKey: 'jwt-secret-key', // use env var in production
        });
    }

    async validate(payload: any) {
        return { userId: payload.sub, email: payload.email };
    }
}
🧩 Step 9: Add an Auth Guard
Create a new file: src/auth/gql-auth.guard.ts
import { ExecutionContext, Injectable } from '@nestjs/common';
import { AuthGuard } from '@nestjs/passport';
import { GqlExecutionContext } from '@nestjs/graphql';

@Injectable()
export class GqlAuthGuard extends AuthGuard('jwt') {
    getRequest(context: ExecutionContext) {
        const ctx = GqlExecutionContext.create(context);
        return ctx.getContext().req;
    }
}
This converts the default HTTP guard into one compatible with GraphQL contexts.
🧩 Step 10: Protect Mutations with the Auth Guard
Open src/users/users.resolver.ts and secure sensitive operations:
import { UseGuards } from '@nestjs/common';
import { GqlAuthGuard } from '../auth/gql-auth.guard';

@Mutation(() => User)
@UseGuards(GqlAuthGuard)
createUser(@Args('createUserInput') createUserInput: CreateUserInput) {
  return this.usersService.create(createUserInput);
}

@Mutation(() => User)
@UseGuards(GqlAuthGuard)
updateUser(@Args('updateUserInput') updateUserInput: UpdateUserInput) {
  return this.usersService.update(updateUserInput.id, updateUserInput);
}

@Mutation(() => User)
@UseGuards(GqlAuthGuard)
removeUser(@Args('id', { type: () => Int }) id: number) {
  return this.usersService.remove(id);
}
🧩 Step 11: Test Authentication Flow
-
Register a user
mutation { createUser(createUserInput: { name: "Alice", email: "[email protected]", password: "mypassword" }) { id name email } } -
Login
mutation {
  login(email: "[email protected]", password: "mypassword")
}
You’ll receive a JWT like this:
{ "data": { "login": "eyJhbGciOiJIUzI1NiIsInR5cCI6IkpXVCJ9..." } } -
Use the Token
-
In the GraphQL Playground, click the HTTP HEADERS tab (bottom left).
-
Add:
{ "Authorization": "Bearer eyJhbGciOiJIUzI1NiIsInR5cCI6IkpXVCJ9..." } -
Now, you can access protected mutations.
-
✅ Section Wrap-Up
You’ve now implemented JWT authentication and authorization guards in your NestJS GraphQL API.
| Feature | Description |
|---|---|
| 🔐 JWT Auth | Secure login and access token generation |
| 🧱 Guards | Protect specific GraphQL mutations |
| 🧠 Strategy | Passport JWT strategy integrated |
| 🧍 Context | An authenticated user is injected into requests |
| ⚙️ Secure API | Only authorized users can modify data |
Your API is now secure, persistent, validated, and fully production-ready.
9. Testing, Deployment, and Final Thoughts
In this final section, we’ll cover:
-
🧪 How to test your GraphQL API
-
⚙️ How to use environment variables securely
-
☁️ How to deploy your NestJS GraphQL app to popular cloud platforms
-
🧭 A final recap of what we’ve built
🧩 Step 1: Test Your GraphQL API
NestJS integrates perfectly with Jest (preconfigured in every new NestJS project), but since we’re building a GraphQL API, we’ll test it manually through the GraphQL Playground and automatically with Jest for services.
✅ Manual Testing (Playground)
Run your app:
npm run start:devThen open http://localhost:3000/graphql
You can test all operations:
Register a user:
mutation {
  createUser(createUserInput: {
    name: "John Doe"
    email: "[email protected]"
    password: "password123"
  }) {
    id
    name
    email
  }
}
Login:
mutation {
  login(email: "[email protected]", password: "password123")
}
Query users (authorized):
query {
  users {
    id
    name
    email
  }
}
If you receive valid responses, and JWT-protected mutations only work with an Authorization header — your API works perfectly.
✅ Automated Unit Testing (Optional)
If you want to test your service logic with Jest:
Create a file src/users/users.service.spec.ts:
import { Test, TestingModule } from '@nestjs/testing';
import { UsersService } from './users.service';
import { getRepositoryToken } from '@nestjs/typeorm';
import { User } from './entities/user.entity';
import { Repository } from 'typeorm';

describe('UsersService', () => {
  let service: UsersService;
  let repo: Repository<User>;

  beforeEach(async () => {
    const module: TestingModule = await Test.createTestingModule({
      providers: [
        UsersService,
        {
          provide: getRepositoryToken(User),
          useClass: Repository,
        },
      ],
    }).compile();

    service = module.get<UsersService>(UsersService);
    repo = module.get<Repository<User>>(getRepositoryToken(User));
  });

  it('should be defined', () => {
    expect(service).toBeDefined();
  });
});
Run the test:
npm run testThis verifies that your service is correctly wired and ready for deeper unit testing.
🧩 Step 2: Manage Environment Variables
It’s a best practice not to hardcode sensitive values (like JWT secrets or DB credentials).
Install the config package:
npm install @nestjs/configThen modify your app.module.ts:
import { Module } from '@nestjs/common';
import { GraphQLModule } from '@nestjs/graphql';
import { ApolloDriver, ApolloDriverConfig } from '@nestjs/apollo';
import { join } from 'path';
import { UsersModule } from './users/users.module';
import { TypeOrmModule } from '@nestjs/typeorm';
import { AuthModule } from './auth/auth.module';
import { ConfigModule } from '@nestjs/config';

@Module({
  imports: [
    ConfigModule.forRoot({ isGlobal: true }),
    GraphQLModule.forRoot<ApolloDriverConfig>({
      driver: ApolloDriver,
      autoSchemaFile: join(process.cwd(), 'src/schema.gql'),
      playground: true,
    }),
    TypeOrmModule.forRoot({
      type: 'postgres',
      host: process.env.DB_HOST,
      port: parseInt(process.env.DB_PORT ?? '5432'),
      username: process.env.DB_USER,
      password: process.env.DB_PASS,
      database: process.env.DB_NAME,
      autoLoadEntities: true,
      synchronize: true,
    }),
    UsersModule,
    AuthModule,
  ],
  controllers: [],
  providers: [],
})
export class AppModule { }
Create a .env file in your project root:
DB_HOST=localhost
DB_PORT=5432
DB_USER=postgres
DB_PASS=secret
DB_NAME=nestjs_graphql_db
JWT_SECRET=my-super-secret-key
Then, replace your jwt-secret-key in AuthModule and JwtStrategy with:
secret: process.env.JWT_SECRET,✅ This keeps your app secure and ready for deployment.
🧩 Step 3: Prepare for Deployment
You can deploy your NestJS GraphQL API to several platforms easily.
Let’s cover Render, Railway, and Vercel (for serverless).
🚀 Option 1: Deploy to Render
-
Push your code to GitHub.
-
Go to Render.com → Create a new Web Service.
-
Connect your GitHub repository.
-
Set environment variables under the “Environment” section.
-
Use the build command:
npm install && npm run buildAnd the start command:
npm run start:prod
Render automatically provisions a PostgreSQL database if needed.
🚂 Option 2: Deploy to Railway
-
Sign up at Railway.app.
-
Create a new project → Deploy from GitHub.
-
Add a PostgreSQL Plugin.
-
Railway auto-generates environment variables like
PGHOST,PGDATABASE, etc. -
Map them in your
.envand update the TypeORM configuration accordingly.
☁️ Option 3: Deploy to Vercel (Serverless)
Vercel supports NestJS GraphQL APIs with serverless adapters.
You’ll need to:
-
Use a custom entry point (e.g.,
vercel.json) -
Use the NestJS Express adapter
-
Disable long-running connections if using Apollo Server (set
subscriptions: false)
This option is great for lightweight APIs or prototypes.
🧩 Step 4: Production Optimization
Before deployment, apply these best practices:
-
Disable
synchronize: truein production; use migrations instead. -
Add logging and rate limiting for security.
-
Use HTTPS and environment variables for all secrets.
-
Implement caching if you expect large queries.
✅ Final Thoughts
Congratulations! 🎉
You’ve built a modern, production-ready GraphQL API using NestJS, TypeORM, PostgreSQL, and JWT Authentication — all from scratch.
Let’s recap what we’ve achieved:
| Feature | Description |
|---|---|
| ⚙️ NestJS Setup | Modular, TypeScript-based Node.js framework |
| 🧠 GraphQL Integration | Auto schema generation via decorators |
| 🧩 CRUD Operations | Full create/read/update/delete with resolvers |
| 🗄️ Database Persistence | PostgreSQL via TypeORM |
| 🧾 Validation | class-validator for input validation |
| 🚨 Error Handling | Clean exception responses |
| 🔐 Authentication | JWT login and guard-protected resolvers |
| ☁️ Deployment Ready | Configurable, secure, and cloud-friendly |
This architecture is scalable and adaptable — you can easily add features like:
-
Role-based access control
-
File uploads via GraphQL
-
WebSockets for real-time subscriptions
-
Microservices with NestJS and gRPC
✍️ Conclusion
By following this guide, you’ve learned how to:
-
Build a structured NestJS project.
-
Integrate GraphQL with Apollo Server.
-
Implement TypeORM entities with auto-generated schemas.
-
Add robust validation, error handling, and authentication.
-
Prepare the app for real-world deployment.
You now have the solid foundation for any modern backend application — all with NestJS and GraphQL.
You can find the full source code on our GitHub.
That's just the basics. If you need more deep learning about Nest.js, you can take the following cheap course:
- NestJS: The Complete Developer's Guide
- NestJS Masterclass - NodeJS Framework Backend Development
- NestJS Mastery: Build & Deploy a Production-Ready API
- NestJS Zero to Hero - Modern TypeScript Back-end Development
- NestJS Microservices: Build & Deploy a Scaleable Backend
- NestJS: Build a Real-Time Social Media API (/w WebSockets)
- NestJS Unleashed: Develop Robust and Maintainable Backends
- The Nest JS Bootcamp - Complete Developer Guide
Thanks!