
In the modern web development landscape, static site generation (SSG) has become a go-to approach for creating fast, secure, and SEO-friendly websites. With Nuxt 3 and its Content Module, building a blog that’s both developer-friendly and performance-optimized has never been easier. Nuxt 3 offers the flexibility of Vue 3 with server-side rendering, static generation, and hybrid deployment options, while the Content Module lets you write your articles in Markdown or JSON without needing a separate CMS.
In this tutorial, we’ll walk through building a simple yet powerful blog using Nuxt 3, the @nuxt/content module, and static generation. By the end, you’ll have a fully functional, statically generated blog ready to deploy anywhere — from Vercel to Netlify.
What you’ll learn:
-
How to set up a Nuxt 3 project with the Content Module
-
Writing blog posts in Markdown
-
Creating dynamic routes for articles
-
Adding syntax highlighting for code snippets
-
Implementing SEO-friendly meta tags
-
Generating and deploying a static site
Prerequisites
Before you begin, make sure you have the following installed:
-
Node.js (version 18 or above)
-
npm or yarn package manager
-
Basic knowledge of Vue.js and Nuxt
1. Setting Up a Nuxt 3 Project
First, create a new Nuxt 3 project using the official Nuxt CLI:
npx [email protected] init nuxt3-blog
cd nuxt3-blog
npm install
Once the dependencies are installed, run the development server:
npm run devOpen your browser and go to http://localhost:3000 to see your fresh Nuxt 3 app.
2. Installing the Nuxt Content Module
The @nuxt/content module lets you store and query Markdown, YAML, CSV, or JSON files directly inside your Nuxt project. This is perfect for our blog.
Install it by running:
npm install @nuxt/contentThen, enable it in your nuxt.config.ts:
export default defineNuxtConfig({
  modules: ['@nuxt/content']
})
Create content.config.ts at the root of your project.
import { defineContentConfig, defineCollection } from '@nuxt/content'

export default defineContentConfig({
    collections: {
        content: defineCollection({
            type: 'page',
            source: '**/*.md'
        })
    }
})
Now, create a new folder called content at the root of your project. This is where all your blog posts will live.
3. Writing Your First Blog Post
With the Content Module installed, you can store your blog posts in the content directory.
We’ll start with a simple Markdown file.
Create a new file at:
content/hello-world.mdAdd the following content:
---
title: "Hello World with Nuxt 3"
description: "Our first blog post using Nuxt 3 and the Content Module."
date: 2025-08-13
tags: ["nuxt3", "blog", "markdown"]
---

Welcome to our **first blog post**! 🎉

This post is written in Markdown and automatically processed by the Nuxt Content Module.

Here’s some sample code:

```js
console.log("Hello Nuxt 3!");
```
What’s happening here:
-
The section between `---` is called **front matter**, used for storing metadata like `title`, `description`, and `tags`.
-
The rest of the file is regular Markdown, which will be rendered into HTML.
4. Creating a Blog Listing Page
Let’s create a page that lists all blog posts dynamically.
Create a new file:
pages/index.vueAdd the following code:
<script setup lang="ts">
const { data: posts } = await useAsyncData(() => queryCollection('content').all())
</script>
<template>
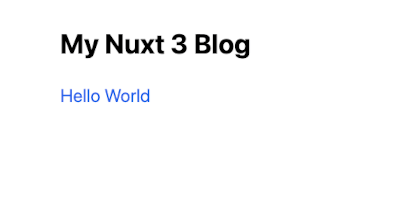
<main class="container mx-auto py-10">
<h1 class="text-4xl font-bold mb-8">My Nuxt 3 Blog</h1>
<div v-if="posts">
<div v-for="post in posts" :key="post.path" class="mb-6">
<NuxtLink :to="post.path" class="text-2xl text-blue-600 hover:underline">
{{ post.title }}
</NuxtLink>
</div>
</div>
<p v-else>No posts found.</p>
</main>
</template>Key points:
-
We use
queryContent()from#contentto fetch all posts. -
Sorting by
{ date: -1 }ensures the newest posts appear first. -
Each post’s
_pathis automatically generated based on the file name and folder structure.
5. Viewing Individual Blog Posts
Nuxt Content automatically creates routes for your Markdown files, but to customize the layout, we can use a dynamic route.
Create a file:
pages/[...slug].vueAdd the following:
<script setup lang="ts">
import { useRoute } from 'vue-router'
const route = useRoute()
const { data: post } = await useAsyncData(() => queryCollection('content').path(route.path).first())
</script>
<template>
<main class="container mx-auto py-10">
<NuxtLink to="/" class="text-blue-600 hover:underline">← Back to blog</NuxtLink>
<article class="prose lg:prose-xl mt-6">
<h1>{{ post?.title }}</h1>
<p class="text-gray-500 text-sm">{{ post?.description }}</p>
<ContentRenderer :value="post!" />
</article>
</main>
</template>Explanation:
-
pages/[...slug].vuecatches all dynamic routes, socontent/hello-world.mdbecomes/hello-world. -
ContentRendereris provided by the Content Module to render the parsed Markdown content.
6. Adding Syntax Highlighting and Styling
We’ll use Shiki (the same high-quality syntax highlighter Nuxt Content uses internally) and Tailwind CSS for general styling.
1️⃣ Install Tailwind CSS (for base styles)
If you haven’t installed Tailwind yet:
npx [email protected] module add tailwindcssThis will configure Tailwind automatically in your Nuxt project.
2️⃣ Enable Shiki in Nuxt Content
Open your nuxt.config.ts and update your content module configuration to enable Shiki syntax highlighting.
// nuxt.config.ts
export default defineNuxtConfig({
  modules: ['@nuxt/content', '@nuxtjs/tailwindcss'],
  content: {
    highlight: {
      theme: 'github-dark', // You can use 'github-light', 'nord', etc.
    },
  },
})
3️⃣ Add Markdown Styling
We’ll use prose styles from the Tailwind Typography plugin for nice-looking articles.
Install the plugin:
npm install @tailwindcss/typographyThen enable it in tailwind.config.js:
// tailwind.config.js
export default {
  content: [
    './components/**/*.{vue,js,ts}',
    './layouts/**/*.vue',
    './pages/**/*.vue',
    './app.vue',
  ],
  theme: {
    extend: {},
  },
  plugins: [require('@tailwindcss/typography')],
}
4️⃣ Apply Styles to Blog Posts
Edit your blog post page (pages/[slug].vue) so the content is styled:
<template>
  <div class="max-w-3xl mx-auto py-10">
    <ContentDoc>
      <template #default="{ doc }">
        <article class="prose dark:prose-invert prose-lg">
          <h1>{{ doc.title }}</h1>
          <p class="text-gray-500 text-sm">{{ doc.date }}</p>
          <ContentRenderer :value="doc" />
        </article>
      </template>
    </ContentDoc>
  </div>
</template>
5️⃣ Test with a Markdown File Containing Code
Example content/hello-world.md:
---
title: Hello World
date: 2025-08-13
---

# My First Blog Post

Here is some **JavaScript** code:

```js
function greet(name) {
  console.log(`Hello, ${name}!`)
}
greet('Nuxt')
```
Now run:
npm run devVisit http://localhost:3000/hello-world — you should see:
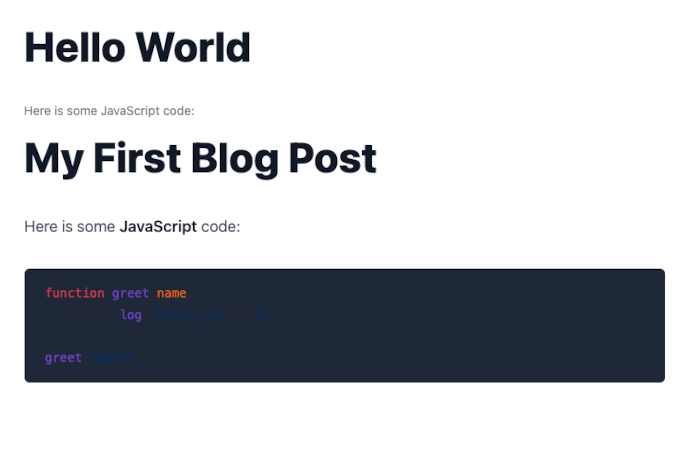
✅ Beautiful typography
✅ Syntax highlighting for your code
✅ Dark mode support (if your system uses it)
7. Adding Blog Pagination and Categories
1. Pagination Setup
We’ll create a blog listing page with pagination.
pages/blog.vue
<template>
  <div class="max-w-3xl mx-auto px-4">
    <h1 class="text-3xl font-bold mb-6">Blog</h1>

    <div v-for="post in paginatedPosts" :key="post.path" class="mb-6">
      <NuxtLink :to="post.path" class="text-xl font-semibold hover:underline">
        {{ post.title }}
      </NuxtLink>
      <p class="text-gray-600">{{ post.description }}</p>
      <div class="text-sm text-gray-500">
        {{ new Date(post.date).toLocaleDateString() }}
      </div>
    </div>

    <!-- Pagination Controls -->
    <div class="flex justify-between mt-8">
      <button
        class="px-4 py-2 bg-gray-200 rounded disabled:opacity-50"
        :disabled="currentPage === 1"
        @click="currentPage--"
      >
        Prev
      </button>
      <button
        class="px-4 py-2 bg-gray-200 rounded disabled:opacity-50"
        :disabled="currentPage === totalPages"
        @click="currentPage++"
      >
        Next
      </button>
    </div>
  </div>
</template>

<script setup lang="ts">
import { ref, computed } from 'vue'

const postsPerPage = 5
const currentPage = ref(1)

const { data: allPosts } = await useAsyncData(() => {
  return queryCollection('blog')
  .where('_partial', '=', false)
  .order('date', 'desc')
  .all()
})

const totalPages = computed(() =>
  Math.ceil(allPosts.value?.length! / postsPerPage)
)

const paginatedPosts = computed(() => {
  const start = (currentPage.value - 1) * postsPerPage
  return allPosts.value?.slice(start, start + postsPerPage)
})
</script>
2. Adding Categories
We’ll add a category field in the frontmatter of each post’s .md file:
Example content/blog/my-first-post.md
---
title: My First Post
description: This is my first Nuxt blog post.
date: 2025-08-10
category: "Nuxt.js"
---

Hello world!
3. Category Filter Page
We can dynamically create category pages.
pages/blog/category/[category].vue
<template>
  <div class="max-w-3xl mx-auto px-4">
    <h1 class="text-3xl font-bold mb-6">
      Posts in "{{ category }}"
    </h1>

    <div v-for="post in posts" :key="post.path" class="mb-6">
      <NuxtLink :to="post.path" class="text-xl font-semibold hover:underline">
        {{ post.title }}
      </NuxtLink>
      <p class="text-gray-600">{{ post.description }}</p>
      <div class="text-sm text-gray-500">
        {{ new Date(post.date).toLocaleDateString() }}
      </div>
    </div>
  </div>
</template>

<script setup lang="ts">
import { useRoute } from 'vue-router'

const route = useRoute()
const category = route.params.category as string

const { data: posts } = await useAsyncData(() => {
  return queryCollection('blog')
  .where('category', '=', category)
  .order('date', 'desc')
  .all()
})
</script>
4. Category Links on the Main Blog Page
Add this inside the loop in pages/blog/index.vue so users can click categories:
<NuxtLink
  :to="`/blog/category/${post.category}`"
  class="text-sm text-blue-600 hover:underline"
>
  {{ post.category }}
</NuxtLink>
5. Bonus: Listing All Categories
You can get all unique categories dynamically:
const categories = [...new Set(allPosts.map(post => post.category))]Then, display them as clickable links on the blog homepage or sidebar.
Conclusion
In this tutorial, we successfully built a Markdown-powered blog with Nuxt 3 and @nuxt/content 3 from scratch. We covered the essentials — from creating and rendering Markdown posts, adding syntax highlighting for code snippets, applying custom styles, and finally enhancing the blog with pagination and categories.
By leveraging Nuxt Content, we avoided the complexity of setting up a full backend while still enjoying a smooth content authoring experience. Markdown files act as our database, giving us the flexibility to focus purely on writing and presentation.
This approach works perfectly for developer blogs, technical documentation, or any static content site. You can take it further by:
-
Adding search functionality with Fuse.js or similar libraries
-
Integrating SEO meta tags for better discoverability
-
Setting up automatic deployment with Git-based hosting (e.g., Netlify, Vercel)
With Nuxt 3’s ecosystem and @nuxt/content 3, building a content-driven site is both fast and enjoyable. Now you have a fully functional, styled, and paginated blog that’s easy to maintain and expand.
You can find the full source code on our GitHub.
That's just the basics. If you need more deep learning about Nuxt.js, you can take the following cheap course:
- Nuxt 3 & Supabase Mastery: Build 2 Full-Stack Apps
- Build Web Apps with Nuxt.js 3: Master TypeScript & API [New]
- The Nuxt 3 Bootcamp - The Complete Developer Guide
- Complete Nuxt.js Course (EXTRA React)
- The Complete NUXT 3 Bootcamp: Full-Stack Guide
- Nuxt 3 Authentication with Laravel Sanctum:A Practical Guide
- Learn How to Make Your Nuxt 3 App SEO-Friendly
- Headless Prestashop with Nuxt JS
Happy coding and blogging! 🚀