
Modern web applications need strong security from the very beginning. Whether you’re building internal dashboards, admin portals, or customer-facing systems, you need a reliable way to authenticate users and protect API endpoints. In this tutorial, we’ll walk through how to build a secure Blazor WebAssembly application using ASP.NET Core 10 and JWT (JSON Web Token) authentication—a combination well-suited for modern, scalable, and high-performance web apps.
Blazor WebAssembly enables you to build rich client-side applications using C# instead of JavaScript, while ASP.NET Core 10 provides a powerful backend for issuing and validating JWTs. Together, they give you a clean separation of concerns: the Blazor client handles the UI and user session, while the API handles authentication, data access, and security rules.
By the end of this tutorial, you will learn how to:
-
Create a Blazor WebAssembly app (Hosted) with an ASP.NET Core 10 Web API
-
Build a secure authentication system using JWT access tokens
-
Implement refresh tokens for long-lived sessions
-
Protect API endpoints with
[Authorize] -
Secure Blazor components and routes
-
Store tokens safely and follow modern security best practices
-
Prepare your app for real-world deployment
Whether you’re upgrading from an older .NET version or starting a new project, this step-by-step guide will help you understand exactly how JWT authentication works in Blazor WebAssembly and how to apply it to your applications.
What’s New or Relevant in ASP.NET Core 10 + Blazor WebAssembly
Before we start building the project, it’s useful to understand what ASP.NET Core 10 brings to the table—especially when working with Blazor WebAssembly and authentication. While .NET 10 continues the strong foundation from previous versions, several improvements directly impact performance, security, and the developer experience.
Below are the most relevant updates you should know.
1. Better Performance for Blazor WebAssembly Apps
ASP.NET Core 10 includes a series of performance-focused enhancements for Blazor WebAssembly:
✔ Faster app startup
The runtime now performs optimized loading of assemblies and static files, reducing the initial page load time. This helps JWT-protected apps feel snappier, especially after authentication redirects.
✔ Improved build output & bundling
The new build pipeline reduces payload size, meaning users download fewer resources before the app becomes interactive.
These changes make Blazor WebAssembly much more suitable for production-level applications where performance matters.
2. Enhanced Diagnostics and Observability
Blazor (both WASM and Server) now exposes more built-in diagnostics and logging options. This is particularly valuable when tracing authentication events:
-
track when the app loads/unloads components
-
detect authentication state changes
-
debug API calls wrapped with JWT in HttpClient
-
monitor refresh token workflows
This makes debugging secure authentication flows much easier than before.
3. Updated Middleware and Hosting Improvements
ASP.NET Core 10 brings small but meaningful improvements that affect our authentication setup:
✔ More consistent middleware ordering
Authentication and authorization middleware behave more predictably, especially when combined with other middleware like CORS and exception handling.
✔ Improved minimal API flexibility
If you choose to use minimal APIs for your auth endpoints:
-
attribute routing
-
typed results
-
dependency injection
all work more smoothly in .NET 10, allowing cleaner code for login, register, and refresh endpoints.
4. Security and Patch Improvements
Security patches released alongside the .NET 10 wave include fixes in Kestrel and authentication infrastructure. When building JWT-protected apps, it’s important to:
-
keep the .NET 10 runtime updated
-
apply patches promptly
-
configure HTTPS & strict token validation
-
rotate signing keys for JWT in production
We will cover all of these in the Security Hardening section later in the tutorial.
5. Strengthened Web API Pipeline (for JWT)
ASP.NET Core 10 provides more robust helpers and defaults for:
-
token validation
-
header parsing
-
authentication challenges (
401 Unauthorized) -
authorization failures (
403 Forbidden)
Combined, these improvements mean your Web API can handle JWT authentication more reliably with less boilerplate.
Summary
In short, ASP.NET Core 10 and the latest Blazor WebAssembly improvements give us:
-
faster load times
-
better diagnostics
-
more predictable middleware
-
improved Web API behavior
-
stronger security posture
These enhancements make .NET 10 an excellent foundation for a secure Blazor WebAssembly application with JWT authentication.
Project Setup and Technology Stack Overview
Before we dive into building authentication and wiring up JWT validation, let’s set up the foundation for our application. In this section, we will define the technology stack, explain why each piece is needed, and prepare the initial project structure using the latest ASP.NET Core 10 tooling.
1. Project Structure Overview
In .NET 10, the traditional “Blazor WebAssembly Hosted” template has been removed. Instead, Microsoft now provides the unified Blazor Web App template. This gives you a powerful new baseline, and you can still build a WASM + API architecture by adding a separate Web API project manually.
Here’s the structure we will use:
MySecureApp/
│
├── Client/      → Blazor WebAssembly project (frontend)
├── Server/      → ASP.NET Core 10 Web API project (JWT auth)
└── Shared/      → Shared models and DTOs
Functionally, this mirrors the old hosted template while staying aligned with .NET 10’s modern tooling.
2. Technologies Used
Here’s a quick overview of the main technologies involved and their role in this system:
✔ ASP.NET Core 10 Web API
-
Issues JWT access tokens
-
Generates and stores refresh tokens
-
Validates incoming tokens
-
Protects endpoints with
[Authorize]
✔ Blazor WebAssembly (WASM)
-
Handles the UI and routing
-
Manages authentication state
-
Stores short-lived access tokens
-
Automatically attaches Bearer tokens to API calls
✔ JSON Web Tokens (JWT)
-
Used for stateless authentication
-
Access token contains user identity + roles/claims
-
Refresh token allows silent re-authentication
-
Works well across distributed systems and SPA architectures
✔ EF Core / Identity (Optional)
For this tutorial, you can choose either:
-
Simple custom user model, or
-
ASP.NET Core Identity (richer features)
We will use a custom user model to keep the tutorial lean and more hands-on.
3. Development Tools Required
Make sure you have the following installed:
-
.NET 10 SDK (latest stable build)
-
Visual Studio 2022 / VS Code / Rider
-
SQLite or SQL Server (optional) if you plan to store users in a database
-
Postman / Thunder Client for testing API endpoints
4. Create the Solution Folder
Create a new folder:
mkdir MySecureApp
cd MySecureApp
5. Create the Blazor WebAssembly Client
.NET 10 uses a unified Blazor Web App template.
To generate a pure WebAssembly client, use:
dotnet new blazorwasm -o ClientThis creates a standalone Blazor WebAssembly app with routing, pages, and all the client-side logic we’ll later enhance with authentication.
6. Create the ASP.NET Core 10 Web API (Server)
Next, create the Web API that will issue JWTs and protect secure endpoints:
dotnet new webapi -o ServerThis will have:
-
Controllers folder
-
WeatherForecast example (you’ll delete it later)
-
HTTPS is enabled by default
-
basic appsettings.json
Next, add a reference to the shared models (we will create that next):
dotnet new classlib -o Shared7. Add Project References
Inside the Server project, reference the Shared project:
cd Server
dotnet add reference ../Shared
cd ..
Inside the Client project:
cd Client
dotnet add reference ../Shared
cd ..
This allows us to share:
-
DTOs (LoginRequest, LoginResponse)
-
Model classes
-
Validation rules
-
Enums, roles, etc.
8. Folder Structure Check
At this point, your structure should look like:
MySecureApp/
│   MySecureApp.sln (optional)
│
├── Client/
├── Server/
└── Shared/
(Optional but recommended)
Create a solution file and add the projects:
dotnet new sln -n MySecureApp
dotnet sln add Client
dotnet sln add Server
dotnet sln add Shared
9. Install Necessary Packages (Server API)
Inside the Server project, install JWT-related packages:
dotnet add Server package Microsoft.AspNetCore.Authentication.JwtBearer
dotnet add Server package System.IdentityModel.Tokens.Jwt
dotnet add Client package System.IdentityModel.Tokens.Jwt
dotnet add Client package Microsoft.Extensions.Http
If you want EF Core:
dotnet add Server package Microsoft.EntityFrameworkCore
dotnet add Server package Microsoft.EntityFrameworkCore.Sqlite
7. Why This Structure Works
Even though .NET 10 removed the hosted template, this architecture still gives you:
✔ Separate API & client (clean and modular approach)
✔ SPA + JWT authentication support
✔ Clear boundaries between frontend and backend
✔ Easy deployment
✔ Easy to add role-based authorization
✔ Ability to reuse Shared DTOs across client and server
This structure is widely used in production Blazor WASM apps today.
8. You’re Ready for Authentication
With:
-
Blazor WASM client
-
ASP.NET Core 10 Web API
-
Shared models
-
Required NuGet packages
…we can now start building the authentication layer.
Server Setup — Configuring JWT Authentication in ASP.NET Core 10
In this section, we’ll configure the ASP.NET Core 10 Web API to:
-
Validate JWT access tokens
-
Recognize authorized users
-
Enforce
[Authorize]on protected endpoints -
Prepare services such as signing keys and token lifetimes
This involves updating the Program.cs, adding appsettings.json values, and registering required services.
1. Add JWT Settings to appsettings.json
Inside the Server project, open appsettings.json and add a new JWT configuration section:
"Jwt": {
  "Key": "THIS IS A SUPER SECRET KEY FOR JWT SIGNING",
  "Issuer": "MySecureApp",
  "Audience": "MySecureAppClient",
  "AccessTokenValidityMinutes": 15,
  "RefreshTokenValidityDays": 7
}
✔ Notes:
-
Key will later be moved to environment variables or Azure Key Vault for production.
-
AccessTokenValidityMinutes should be short (15 minutes is common).
-
RefreshTokenValidityDays controls how long a refresh token remains valid.
2. Configure JWT Authentication in Program.cs
Open:
Server/Program.csAdd these namespaces at the top:
using Microsoft.AspNetCore.Authentication.JwtBearer;
using Microsoft.IdentityModel.Tokens;
using System.Text;
Now, configure JWT authentication before app.Build():
var builder = WebApplication.CreateBuilder(args);

// 1. Read JWT configuration
var jwtSettings = builder.Configuration.GetSection("Jwt");
var key = Encoding.UTF8.GetBytes(jwtSettings["Key"]);

// 2. Add Authentication & JWT Bearer
builder.Services.AddAuthentication(options =>
{
    options.DefaultAuthenticateScheme = JwtBearerDefaults.AuthenticationScheme;
    options.DefaultChallengeScheme = JwtBearerDefaults.AuthenticationScheme;
})
.AddJwtBearer(options =>
{
    options.TokenValidationParameters = new TokenValidationParameters
    {
        ValidateIssuer = true,
        ValidateAudience = true,
        ValidateLifetime = true,
        ValidateIssuerSigningKey = true,

        ValidIssuer = jwtSettings["Issuer"],
        ValidAudience = jwtSettings["Audience"],
        IssuerSigningKey = new SymmetricSecurityKey(key)
    };
});

builder.Services.AddAuthorization(); // Required for [Authorize]
builder.Services.AddControllers();

var app = builder.Build();

app.UseHttpsRedirection();

// authentication -> authorization
app.UseAuthentication();
app.UseAuthorization();

app.MapControllers();

app.Run();
3. Explanation of Key Validation Rules
✔ ValidateIssuer
Ensures tokens only from your server are accepted.
✔ ValidateAudience
Ensures tokens can only be used by the intended client app (Blazor WASM).
✔ ValidateLifetime
Rejects expired tokens.
✔ ValidateIssuerSigningKey
Ensures the token has not been tampered with.
✔ IssuerSigningKey
This is your HMAC SHA-256 symmetric key (the “secret key”).
4. Add CORS (Important for Blazor WASM)
Since your Blazor client and API run on different ports during development, enable CORS.
Add this before builder.Build():
builder.Services.AddCors(options =>
{
    options.AddPolicy("AllowClient",
        policy => policy
            .AllowAnyHeader()
            .AllowAnyMethod()
            .AllowCredentials()
            .WithOrigins("https://localhost:5001") // Blazor default dev URL
    );
});
And add this before app.UseAuthentication():
app.UseCors("AllowClient");You may update the client URL depending on your environment.
5. Test That Authentication Middleware is Working
Add a temporary test endpoint in any controller:
[ApiController]
[Route("api/[controller]")]
public class TestController : ControllerBase
{
    [HttpGet("public")]
    public IActionResult PublicEndpoint() => Ok("Public OK");

    [Authorize]
    [HttpGet("secure")]
    public IActionResult SecureEndpoint() => Ok("Secure OK");
}
When you run:
dotnet runCheck in the browser or Postman:
-
GET /api/test/public→ returns 200 OK -
GET /api/test/secure→ returns 401 Unauthorized
because there is no JWT yet (correct behavior)
This confirms:
-
Authentication middleware works
-
[Authorize]protection works -
JWT settings were loaded correctly
6. Summary
So far, you have:
✔ Configured JWT authentication and validation
✔ Added CORS support
✔ Enabled Authentication + Authorization middleware
✔ Verified protection with a secure test endpoint
✔ Prepared the API to issue JWT tokens next
The server is now ready to generate access tokens and refresh tokens.
Creating the User Model, Login Endpoint, and Token Generation Service
Now that ASP.NET Core 10 is configured to validate JWT tokens, the next step is to generate them.
In this section, we will:
-
Create simple user models
-
Build login request/response DTOs
-
Implement a
TokenServicethat creates JWT access tokens -
Implement refresh token generation
-
Add a
AuthControllerwith a login endpoint
This completes the foundational authentication pipeline.
1. Create the User Model (Server)
Inside the Server project, create a folder:
Server/Models/User.csAdd:
namespace Server.Models;

public class User
{
    public int Id { get; set; }
    public string Username { get; set; } = default!;
    public string PasswordHash { get; set; } = default!;
    public string Role { get; set; } = "User";

    // Refresh token support
    public string? RefreshToken { get; set; }
    public DateTime? RefreshTokenExpiration { get; set; }
}
✔ Notes:
-
In a production app, password hashing should use Identity or BCrypt.
-
Here, we keep things simple but secure enough for a tutorial.
-
The refresh token and its expiration will be stored per user.
2. Create the Login DTOs
Inside Shared project:
Shared/Auth/LoginRequest.csnamespace Shared.Auth;
public class LoginRequest
{
public string Username { get; set; } = default!;
public string Password { get; set; } = default!;
}And:
Shared/Auth/LoginResponse.csnamespace Shared.Auth;
public class LoginResponse
{
public string AccessToken { get; set; } = default!;
public string RefreshToken { get; set; } = default!;
public DateTime Expiration { get; set; }
public string Username { get; set; } = default!;
public string Role { get; set; } = default!;
}3. Create the TokenService
Inside the Server project, create:
Server/Services/TokenService.csWith this code:
using Microsoft.IdentityModel.Tokens;
using System.IdentityModel.Tokens.Jwt;
using System.Security.Claims;
using System.Text;
using Server.Models;

namespace Server.Services;

public class TokenService(IConfiguration config)
{
    private readonly IConfiguration _config = config;

    public string CreateAccessToken(User user, out DateTime expiration)
    {
        var jwtSettings = _config.GetSection("Jwt");

        expiration = DateTime.UtcNow.AddMinutes(
            double.Parse(jwtSettings["AccessTokenValidityMinutes"]!)
        );

        var claims = new[]
        {
            new Claim(JwtRegisteredClaimNames.Sub, user.Username),
            new Claim(ClaimTypes.Role, user.Role),
            new Claim(JwtRegisteredClaimNames.Jti, Guid.NewGuid().ToString())
        };

        var key = new SymmetricSecurityKey(Encoding.UTF8.GetBytes(jwtSettings["Key"]!));
        var creds = new SigningCredentials(key, SecurityAlgorithms.HmacSha256);

        var token = new JwtSecurityToken(
            issuer: jwtSettings["Issuer"],
            audience: jwtSettings["Audience"],
            claims: claims,
            expires: expiration,
            signingCredentials: creds
        );

        return new JwtSecurityTokenHandler().WriteToken(token);
    }

    public (string RefreshToken, DateTime Expiration) CreateRefreshToken()
    {
        var expiration = DateTime.UtcNow.AddDays(
            double.Parse(_config["Jwt:RefreshTokenValidityDays"]!)
        );

        return (Guid.NewGuid().ToString(), expiration);
    }
}
4. Register TokenService in Program.cs
Add:
using Server.Services;

builder.Services.AddScoped<TokenService>();
Place it before builder.Build().
5. Create an In-Memory User Store (for now)
Create:
Server/Data/UserStore.csusing Server.Models;
namespace Server.Data;
public static class UserStore
{
public static List<User> Users = new()
{
new User { Id = 1, Username = "admin", PasswordHash = "admin123", Role = "Admin" },
new User { Id = 2, Username = "user", PasswordHash = "user123", Role = "User" }
};
}✔ Note:
You can replace this with EF Core later.
6. Create the AuthController
Inside:
Server/Controllers/AuthController.csusing Microsoft.AspNetCore.Mvc;
using Server.Data;
using Server.Services;
using Shared.Auth;
namespace Server.Controllers;
[ApiController]
[Route("api/[controller]")]
public class AuthController(TokenService tokenService) : ControllerBase
{
private readonly TokenService _tokenService = tokenService;
[HttpPost("login")]
public IActionResult Login(LoginRequest request)
{
var user = UserStore.Users
.FirstOrDefault(u => u.Username == request.Username
&& u.PasswordHash == request.Password);
if (user == null)
return Unauthorized("Invalid username or password");
// Generate access token + expiration
var accessToken = _tokenService.CreateAccessToken(user, out var accessTokenExpiration);
// Generate refresh token
var (refreshToken, refreshExpiry) = _tokenService.CreateRefreshToken();
// Save refresh token in user store
user.RefreshToken = refreshToken;
user.RefreshTokenExpiration = refreshExpiry;
return Ok(new LoginResponse
{
Username = user.Username,
Role = user.Role,
AccessToken = accessToken,
RefreshToken = refreshToken,
Expiration = accessTokenExpiration
});
}
}(We’ll simplify the expiration code in a moment — next sections make it cleaner.)
7. Test the Login Endpoint
Run the server:
dotnet run --project ServerUse Postman/Thunder Client:
POST
https://localhost:5231/api/auth/login
Body (JSON):
{
  "username": "admin",
  "password": "admin123"
}
Expected result:
-
AccessToken
-
RefreshToken
-
Expiration
-
Username
-
Role
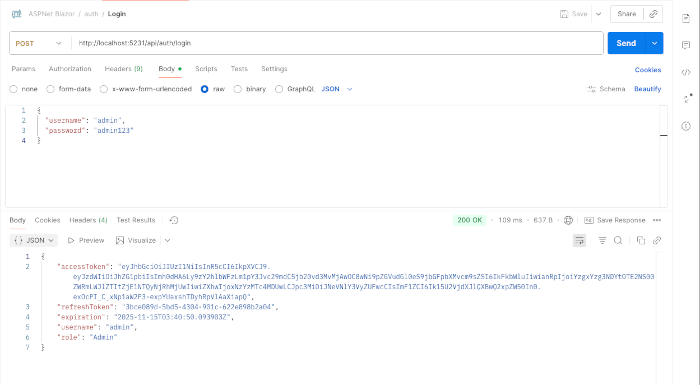
You now have a working JWT issuer.
8. Summary
You just implemented:
✔ User model
✔ Login request/response DTOs
✔ Access token generation
✔ Refresh token generation
✔ AuthController with login endpoint
✔ In-memory users
✔ Full JWT-based authentication pipeline
The server is now fully capable of issuing JWTs and refresh tokens.
Implementing the Refresh Token Endpoint and Securing Protected API Routes
When a user logs in, they receive:
-
Access Token (short-lived, e.g., 15 minutes)
-
Refresh Token (long-lived, e.g., 7 days)
The access token is used for authenticated requests.
When it expires, the client uses the refresh token to request a new access token without re-entering login credentials.
We’ll implement:
-
RefreshToken endpoint
-
Token rotation (best security practice)
-
Protected API routes using
[Authorize]
1. Create RefreshTokenRequest DTO
In the Shared/Auth folder, add:
Shared/Auth/RefreshTokenRequest.csnamespace Shared.Auth;
public class RefreshTokenRequest
{
public string RefreshToken { get; set; } = default!;
public string Username { get; set; } = default!;
}2. Add Refresh Token Logic in AuthController
Open:
Server/Controllers/AuthController.csAdd a new endpoint:
[HttpPost("refresh")]
public IActionResult Refresh(RefreshTokenRequest request)
{
    var user = UserStore.Users.FirstOrDefault(u =>
        u.Username == request.Username &&
        u.RefreshToken == request.RefreshToken &&
        u.RefreshTokenExpiration > DateTime.UtcNow
    );

    if (user == null)
        return Unauthorized("Invalid refresh token");

    // Generate new JWT access token
    var accessToken = _tokenService.CreateAccessToken(user, out var newExpiration);

    // Rotate refresh token (important security measure)
    var (newRefreshToken, newRefreshExpiry) = _tokenService.CreateRefreshToken();

    user.RefreshToken = newRefreshToken;
    user.RefreshTokenExpiration = newRefreshExpiry;

    return Ok(new LoginResponse
    {
        Username = user.Username,
        Role = user.Role,
        AccessToken = accessToken,
        RefreshToken = newRefreshToken,
        Expiration = newExpiration
    });
}
✔ What this does:
-
Validates the refresh token
-
Generates a new access token
-
Rotates the refresh token (prevents token replay attacks)
-
Returns fresh tokens to the client
3. Add Token Expiration Validation
Refresh endpoint already handles:
-
Expired refresh tokens
-
Mismatched tokens
-
Unknown users
-
Replayed tokens
This completes the secure refresh token workflow.
4. Create a Secure API Controller
Now let’s protect a real API route.
Create:
Server/Controllers/ValuesController.csusing Microsoft.AspNetCore.Authorization;
using Microsoft.AspNetCore.Mvc;
namespace Server.Controllers;
[ApiController]
[Route("api/[controller]")]
public class ValuesController : ControllerBase
{
[HttpGet("public")]
public IActionResult PublicValue()
=> Ok("This is a public value");
[Authorize]
[HttpGet("secure")]
public IActionResult SecureValue()
=> Ok("This is a secure value only for authenticated users");
[Authorize(Roles = "Admin")]
[HttpGet("admin")]
public IActionResult AdminValue()
=> Ok("This is ADMIN-only data");
}✔ Endpoints:
| Endpoint | Protection | Description |
|---|---|---|
/api/values/public |
None | Public |
/api/values/secure |
Login required | Any authenticated user |
/api/values/admin |
Admin only | Requires Role = "Admin" |
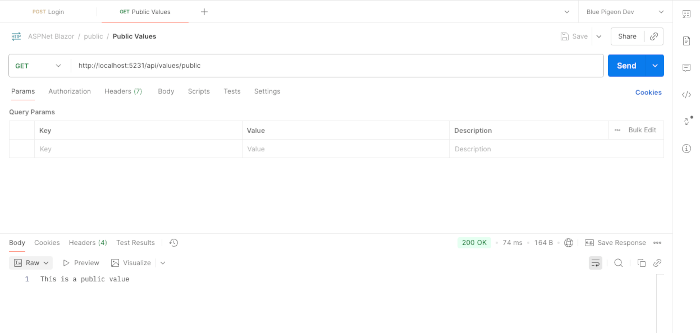
5. Test Secure Endpoints
1️⃣ Test public endpoint:
GET /api/values/public✔ Works without authentication.
2️⃣ Test secure endpoint:
GET /api/values/secure❌ Returns 401 Unauthorized
until you pass the access token.
3️⃣ Test secure endpoint with token
In Postman, add a header:
Authorization: Bearer <ACCESS_TOKEN>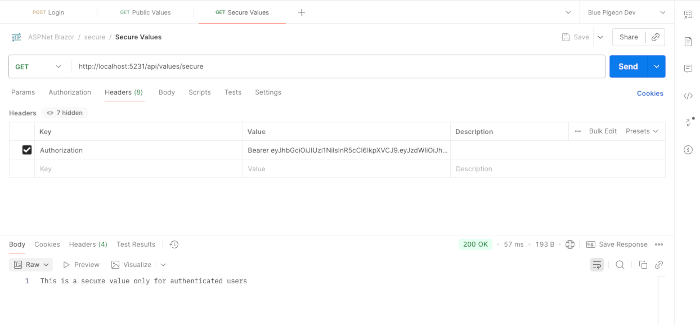
✔ Returns 200 OK
4️⃣ Test admin endpoint
If you logged in as:
{
  "username": "admin",
  "password": "admin123"
}
Then:
GET /api/values/admin✔ Should return admin-only message.
6. Summary of Section 6
You just implemented:
✔ Refresh token endpoint
✔ Refresh token validation
✔ Refresh token rotation
✔ Role-based authorization
✔ Public + secure + admin-only endpoints
✔ Complete JWT lifecycle
At this point, the backend authentication flow is complete.
Client Setup — Authentication State, Token Storage, and HttpClient Integration
In this section, you will:
-
Add login & logout functionality
-
Store access/refresh tokens safely
-
Implement a custom
AuthenticationStateProvider -
Automatically attach JWT tokens to API calls
-
Automatically refresh the access token when it expires
-
Protect Blazor pages using
[Authorize]and<AuthorizeView>
This creates a full “SPA-style” authentication system just like Angular/React — but entirely in C#.
1. Add Required Folders in Client Project
Inside Client, create folders:
Client/
 ├── Authentication/
 ├── Services/
 └── Models/
We’ll fill these soon.
2. Install Package for Authorization Support
Blazor WASM requires this package for authentication:
dotnet add Client package Microsoft.AspNetCore.Components.Authorization3. Create TokenStorage Service (Client)
Token storage can be:
-
Access token → in-memory (safest)
-
Refresh token →
localStorage(acceptable for SPAs)
This keeps security high while maintaining usability.
Create:
Client/Services/TokenStorage.csusing Microsoft.JSInterop;
namespace Client.Services;
public class TokenStorage
{
private readonly IJSRuntime _js;
private string? _accessToken;
public TokenStorage(IJSRuntime js)
{
_js = js;
}
// Access token (in-memory only)
public string? GetAccessToken() => _accessToken;
public void SetAccessToken(string token) => _accessToken = token;
public void ClearAccessToken() => _accessToken = null;
// Refresh token (localStorage)
public async Task<string?> GetRefreshTokenAsync()
=> await _js.InvokeAsync<string>("localStorage.getItem", "refreshToken");
public async Task SetRefreshTokenAsync(string token)
=> await _js.InvokeVoidAsync("localStorage.setItem", "refreshToken", token);
public async Task ClearRefreshTokenAsync()
=> await _js.InvokeVoidAsync("localStorage.removeItem", "refreshToken");
}4. Create a Custom AuthenticationStateProvider
Blazor’s built-in AuthenticationStateProvider tells the framework:
-
whether the user is logged in
-
what their claims/roles are
-
when the user logs in/out
Create:
Client/Authentication/AppAuthenticationStateProvider.csusing System.Security.Claims;
using System.IdentityModel.Tokens.Jwt;
using Microsoft.AspNetCore.Components.Authorization;
using Client.Services;
using Shared.Auth;
namespace Client.Authentication;
public class AppAuthenticationStateProvider : AuthenticationStateProvider
{
private readonly TokenStorage _tokenStorage;
public AppAuthenticationStateProvider(TokenStorage tokenStorage)
{
_tokenStorage = tokenStorage;
}
public override Task<AuthenticationState> GetAuthenticationStateAsync()
{
var token = _tokenStorage.GetAccessToken();
if (string.IsNullOrEmpty(token))
return Task.FromResult(new AuthenticationState(new ClaimsPrincipal(new ClaimsIdentity())));
var handler = new JwtSecurityTokenHandler();
var jwt = handler.ReadJwtToken(token);
var identity = new ClaimsIdentity(jwt.Claims, "jwt");
var user = new ClaimsPrincipal(identity);
return Task.FromResult(new AuthenticationState(user));
}
public void NotifyUserAuthentication(string token)
{
var handler = new JwtSecurityTokenHandler();
var jwt = handler.ReadJwtToken(token);
var identity = new ClaimsIdentity(jwt.Claims, "jwt");
var user = new ClaimsPrincipal(identity);
NotifyAuthenticationStateChanged(
Task.FromResult(new AuthenticationState(user))
);
}
public void NotifyUserLogout()
{
NotifyAuthenticationStateChanged(
Task.FromResult(new AuthenticationState(
new ClaimsPrincipal(new ClaimsIdentity())
))
);
}
}This provider:
-
Reads claims from the JWT
-
Keeps the authentication state consistent
-
Notifies the UI when the user logs in/out
5. Register Authentication Services in Program.cs (Client)
Open:
Client/Program.csAdd:
using Microsoft.AspNetCore.Components.Authorization;
using Client.Services;
using Client.Authentication;
Register services:
builder.Services.AddScoped<TokenStorage>();
builder.Services.AddScoped<AuthenticationStateProvider, AppAuthenticationStateProvider>();
builder.Services.AddAuthorizationCore();
Replace the default HttpClient with one that will later attach JWT tokens:
builder.Services.AddScoped(sp =>
    new HttpClient
    {
        BaseAddress = new Uri("https://localhost:5231") // API URL
    });
6. Create an ApiService for Login & Refresh
Create:
Client/Services/ApiService.csusing System.Net.Http.Json;
using Shared.Auth;
namespace Client.Services;
public class ApiService
{
private readonly HttpClient _http;
public ApiService(HttpClient http)
{
_http = http;
}
public async Task<LoginResponse?> LoginAsync(LoginRequest request)
{
var response = await _http.PostAsJsonAsync("api/auth/login", request);
if (!response.IsSuccessStatusCode)
return null;
return await response.Content.ReadFromJsonAsync<LoginResponse>();
}
public async Task<LoginResponse?> RefreshAsync(RefreshTokenRequest request)
{
var response = await _http.PostAsJsonAsync("api/auth/refresh", request);
if (!response.IsSuccessStatusCode)
return null;
return await response.Content.ReadFromJsonAsync<LoginResponse>();
}
}7. Create AuthService (Orchestrator)
This service ties everything together:
-
Logs in
-
Saves tokens
-
Updates the authentication state
-
Refreshes the access token automatically
Create:
Client/Services/AuthService.csusing Client.Authentication;
using Microsoft.AspNetCore.Components.Authorization;
using Shared.Auth;
namespace Client.Services;
public class AuthService
{
private readonly ApiService _api;
private readonly TokenStorage _tokens;
private readonly AppAuthenticationStateProvider _authState;
public AuthService(ApiService api, TokenStorage tokens, AuthenticationStateProvider authState)
{
_api = api;
_tokens = tokens;
_authState = (AppAuthenticationStateProvider)authState;
}
public async Task<bool> LoginAsync(string username, string password)
{
var result = await _api.LoginAsync(new LoginRequest
{
Username = username,
Password = password
});
if (result == null)
return false;
_tokens.SetAccessToken(result.AccessToken);
await _tokens.SetRefreshTokenAsync(result.RefreshToken);
_authState.NotifyUserAuthentication(result.AccessToken);
return true;
}
public async Task<bool> RefreshAsync()
{
var refresh = await _tokens.GetRefreshTokenAsync();
if (refresh == null) return false;
var result = await _api.RefreshAsync(new RefreshTokenRequest
{
Username = "",
RefreshToken = refresh
});
if (result == null) return false;
_tokens.SetAccessToken(result.AccessToken);
await _tokens.SetRefreshTokenAsync(result.RefreshToken);
_authState.NotifyUserAuthentication(result.AccessToken);
return true;
}
public async Task LogoutAsync()
{
_tokens.ClearAccessToken();
await _tokens.ClearRefreshTokenAsync();
_authState.NotifyUserLogout();
}
}Register AuthService in Program.cs:
builder.Services.AddScoped<AuthService>();
builder.Services.AddScoped<ApiService>();
8. Protecting Blazor Components & Pages
You can now protect an entire page:
@attribute [Authorize]
<h3>Secure Page</h3>
Or protect parts of the UI:
<AuthorizeView>
    <Authorized>
        <p>You are logged in.</p>
    </Authorized>
    <NotAuthorized>
        <p>Please log in.</p>
    </NotAuthorized>
</AuthorizeView>
You can also restrict by role:
@attribute [Authorize(Roles = "Admin")]9. Adding Login UI
Add a login form under Client/Pages/Login.razor:
@page "/login"
@using Client.Services
@inject AuthService Auth
@inject NavigationManager Nav

<h3>Login</h3>

<input @bind="username" placeholder="Username" />
<br />
<input @bind="password" placeholder="Password" type="password" />
<br />
<button @onclick="HandleLogin">Login</button>

@if (error != null)
{
    <p style="color:red">@error</p>
}

@code {
    string username = "";
    string password = "";
    string? error;

    private async Task HandleLogin()
    {
        var ok = await Auth.LoginAsync(username, password);

        if (!ok)
        {
            error = "Invalid credentials";
            return;
        }

        Nav.NavigateTo("/");
    }
}
✔ Section 7 Summary
You implemented:
-
Custom AuthenticationStateProvider
-
TokenStorage (access token in memory, refresh token in localStorage)
-
ApiService
-
AuthService (login, logout, refresh)
-
UI login page
-
Authorization rules for components/pages
Your Blazor WASM app can now:
✔ Log in
✔ Store JWT
✔ Refresh JWT
✔ Show authenticated UI
✔ Hide unauthorized UI
✔ Call protected API endpoints
Automatically Attaching JWT to API Requests & Handling 401 Responses
Up to this point:
-
The user can log in
-
The client stores access & refresh tokens
-
Protected pages work
-
API calls can be made manually by attaching the token
Now we will:
✔ Automatically attach the JWT to every outgoing API request
✔ Detect expired access tokens
✔ Attempt a refresh automatically
✔ Retry the original API request
✔ Logout the user if refresh fails
This provides a modern "silent re-authentication" user experience.
1. Create a DelegatingHandler for HttpClient
We intercept outgoing HTTP requests using a custom message handler.
Create:
Client/Services/AuthMessageHandler.csAdd:
using System.Net.Http.Headers;
using System.Net;
using Client.Services;
using Shared.Auth;

namespace Client.Services;

public class AuthMessageHandler : DelegatingHandler
{
    private readonly TokenStorage _tokenStorage;
    private readonly AuthService _auth;

    public AuthMessageHandler(TokenStorage tokenStorage, AuthService auth)
    {
        _tokenStorage = tokenStorage;
        _auth = auth;
    }

    protected override async Task<HttpResponseMessage> SendAsync(
        HttpRequestMessage request,
        CancellationToken cancellationToken)
    {
        var accessToken = _tokenStorage.GetAccessToken();

        // Attach access token to every request if available
        if (!string.IsNullOrEmpty(accessToken))
        {
            request.Headers.Authorization =
                new AuthenticationHeaderValue("Bearer", accessToken);
        }

        // Send the request
        var response = await base.SendAsync(request, cancellationToken);

        // If Unauthorized (token expired), attempt refresh
        if (response.StatusCode == HttpStatusCode.Unauthorized)
        {
            // Try to refresh token
            var refreshed = await _auth.RefreshAsync();

            if (refreshed)
            {
                // Retry the request with new access token
                accessToken = _tokenStorage.GetAccessToken();

                request.Headers.Authorization =
                    new AuthenticationHeaderValue("Bearer", accessToken);

                // Important: create a NEW request message
                var retryRequest = CloneRequest(request);

                return await base.SendAsync(retryRequest, cancellationToken);
            }
        }

        return response;
    }

    private static HttpRequestMessage CloneRequest(HttpRequestMessage request)
    {
        var clone = new HttpRequestMessage(request.Method, request.RequestUri);

        // Copy content (if any)
        if (request.Content != null)
            clone.Content = new StreamContent(request.Content.ReadAsStream());

        foreach (var header in request.Headers)
            clone.Headers.TryAddWithoutValidation(header.Key, header.Value);

        foreach (var property in request.Properties)
            clone.Properties.Add(property);

        return clone;
    }
}
✔ This handler does the heavy lifting:
-
Injects the access token
-
Detects expired tokens
-
Calls
/refreshsilently -
Retries the request
-
Only logs out if refresh fails
This is exactly how modern SPAs work.
2. Register the handler in Program.cs (Client)
Open:
Client/Program.csAdd:
builder.Services.AddTransient<AuthMessageHandler>();Replace your HttpClient registration with:
builder.Services.AddHttpClient<ApiService>(client =>
{
    client.BaseAddress = new Uri("https://localhost:5001");
})
.AddHttpMessageHandler<AuthMessageHandler>();
Remove or comment out the old:
builder.Services.AddScoped(sp => new HttpClient { ... });Now every ApiService call goes through AuthMessageHandler.
3. Verify Auto-Attach & Auto-Refresh
Once you log in, call a secure endpoint in your UI:
GET /api/values/secureEven without manually attaching the Authorization header, it will work.
Then, when the access token expires:
-
The server returns 401 Unauthorized
-
The handler calls the refresh endpoint
-
A new access token is issued
-
The original request is retried
-
Everything continues seamlessly
The user never sees a login screen unless refresh fails.
4. Protecting API Calls from Components
Example in a Blazor component:
@inject ApiService Api

<button @onclick="LoadData">Load Secure Data</button>

<p>@result</p>

@code {
    string? result;

    private async Task LoadData()
    {
        result = await Api.Http.GetStringAsync("api/values/secure");
    }
}
(This assumes you expose _http or create methods inside ApiService — next section improves this.)
5. Summary of Section 8
You now have a fully functional SPA-style authentication pipeline:
✔ Access token attached automatically
✔ Expired tokens detected
✔ Refresh performed automatically
✔ Requests seamlessly retried
✔ User logged out gracefully if refresh fails
Your Blazor WebAssembly client now matches professional-grade SPA behavior seen in Angular, React, Vue, etc.
Protecting Blazor Routes, Pages, and Role-Based UI
You now have:
-
A login system
-
Token storage
-
Authentication state provider
-
Automatic JWT attachment
-
Auto-refresh tokens
Now we’ll add:
✔ Protected pages using [Authorize]
✔ Role-based pages
✔ Show/hide UI elements based on authentication
✔ Redirect unauthorized users
✔ Navigation menus that adapt to login state
This makes your Blazor WASM app behave like a real authenticated SPA.
1. Enable Authorization in App.razor
Open:
Client/App.razorReplace the default content with:
<CascadingAuthenticationState>
    <Router AppAssembly="@typeof(App).Assembly">
        <Found Context="routeData">
            <AuthorizeRouteView RouteData="@routeData"
                                DefaultLayout="@typeof(MainLayout)">
                <NotAuthorized>
                    <RedirectToLogin />
                </NotAuthorized>
            </AuthorizeRouteView>
        </Found>
        <NotFound>
            <LayoutView Layout="@typeof(MainLayout)">
                <p>Sorry, there's nothing here.</p>
            </LayoutView>
        </NotFound>
    </Router>
</CascadingAuthenticationState>
✔ Why this matters
AuthorizeRouteView enables:
-
Page-level
[Authorize] -
Custom “Not Authorized” behavior
-
Role-based protection
2. Create RedirectToLogin Component
Inside Client/Shared/RedirectToLogin.razor:
@inject NavigationManager Nav

@code {
    protected override void OnInitialized()
    {
        Nav.NavigateTo($"/login?returnUrl={Uri.EscapeDataString(Nav.Uri)}");
    }
}
Now, anytime a user visits a protected page without auth, they get redirected to /login.
3. Protecting Pages with [Authorize]
Let’s create a protected page.
Create:
Client/Pages/SecurePage.razor@page "/secure"
@using Microsoft.AspNetCore.Authorization
@attribute [Authorize]
<h3>Secure Page</h3>
<p>Only authenticated users can see this page.</p>When unauthorized users access /secure, they get redirected to the login page.
4. Protecting Pages by Role
Create an admin-only page:
Client/Pages/AdminPage.razor@page "/admin"
@using Microsoft.AspNetCore.Authorization
@attribute [Authorize(Roles = "Admin")]
<h3>Admin Dashboard</h3>
<p>This page is restricted to Admin users only.</p>If a normal user tries to open /admin, they will be redirected to the login.
5. Show/Hide UI Elements Based on Auth State
Let’s modify the navigation menu.
Open:
Client/Shared/NavMenu.razorAdd authorization views:
<AuthorizeView>
    <Authorized>
        <li class="nav-item px-3">
            <NavLink href="/secure">Secure</NavLink>
        </li>
        <li class="nav-item px-3" >
            <NavLink href="/admin">Admin</NavLink>
        </li>
        <li class="nav-item px-3">
            <LogoutButton />
        </li>
    </Authorized>

    <NotAuthorized>
        <li class="nav-item px-3">
            <NavLink href="/login">Login</NavLink>
        </li>
    </NotAuthorized>
</AuthorizeView>
Now the menu changes depending on the authentication status.
6. Show Data Only to Users with Certain Roles
Anywhere in your UI:
<AuthorizeView Roles="Admin">
    <Authorized>
        <p>You are an Admin.</p>
    </Authorized>
</AuthorizeView>
Or for regular users:
<AuthorizeView>
    <Authorized>
        <p>You are logged in.</p>
    </Authorized>
    <NotAuthorized>
        <p>You are a guest.</p>
    </NotAuthorized>
</AuthorizeView>
7. Create a Logout Button Component
Create:
Client/Shared/LogoutButton.razor@using Client.Services
@inject AuthService Auth
@inject NavigationManager Nav
<button class="btn btn-link" @onclick="Logout">Logout</button>
@code {
private async Task Logout()
{
await Auth.LogoutAsync();
Nav.NavigateTo("/login");
}
}This clears:
-
access token
-
refresh token
-
authentication state
8. Redirect After Login
Update your login page:
@page "/login"
@inject NavigationManager Nav
Add support for return URLs:
@code {
    [Parameter]
    public string? returnUrl { get; set; }

    private async Task HandleLogin()
    {
        var ok = await Auth.LoginAsync(username, password);

        if (!ok)
        {
            error = "Invalid credentials";
            return;
        }

        var target = returnUrl ?? "/";
        Nav.NavigateTo(target);
    }
}
Now users return to the page they originally tried to access.
9. Summary of Section 9
You now have:
✔ Protected pages using [Authorize]
✔ Role-based restricted pages
✔ Protected components using <AuthorizeView>
✔ Automatic redirect for unauthorized users
✔ Dynamic navigation menu based on login state
✔ Logout button + token cleanup
✔ Login page redirecting back to the intended page
Your Blazor WASM app now behaves like a real production SPA with robust UI-level security.
Deployment, Security Hardening, and Production Best Practices
So far, we’ve built a fully functional Blazor WebAssembly application with secure JWT authentication, refresh tokens, protected routes, and role-based UI. Before deploying this application, it’s crucial to apply important security and performance best practices.
Web security is not just about writing correct code — it’s also about configuring your server, environment, and client properly. This section will guide you through the most important steps to make your application ready for production.
1. Enforce HTTPS Everywhere
By default, ASP.NET Core uses HTTPS in development.
In production, you must ensure:
-
Deploy behind HTTPS
-
Configure HSTS
-
Redirect all HTTP → HTTPS
Add to Program.cs in the Server project:
app.UseHttpsRedirection();
app.UseHsts();
If hosting behind Nginx or IIS, ensure they forward HTTPS headers correctly.
2. Secure Your JWT Signing Key
Your JWT signing key must never be inside appsettings.json in production.
Use environment variables:
export Jwt__Key="your-production-secret"Or Azure Key Vault:
builder.Configuration.AddAzureKeyVault(...);Recommended algorithms:
-
HS256 (HMAC) is fine for most apps.
-
RS256 (asymmetric keys) is better for microservices or multi-server environments.
Never commit secrets to Git.
3. Short Access Tokens + Long Refresh Tokens
Keep access tokens short-lived for better security:
"AccessTokenValidityMinutes": 15Refresh tokens can live longer:
"RefreshTokenValidityDays": 7Why this matters:
-
If someone steals an access token → it becomes useless quickly
-
Refresh tokens are protected via rotation and server-side validation
4. Enforce Refresh Token Rotation
We already implemented token rotation in Section 6.
This is crucial because it ensures:
-
Every refresh creates a brand-new refresh token
-
Stolen refresh tokens become invalid after use
-
Replay attacks are minimized
This is the same approach used by:
-
Google OAuth
-
Microsoft Identity Platform
-
Auth0
5. CORS Configuration for Production
In development, you are allowed:
.WithOrigins("https://localhost:5001")In production, update this to your actual domain:
.WithOrigins("https://mysecureapp.com")Never use:
.AllowAnyOrigin()Especially when using credentials.
6. Serve Blazor WASM from a CDN (Optional)
Blazor WebAssembly is just static files:
-
index.html -
.dllfiles -
.wasmruntime
You can host these on:
-
Azure Storage + CDN
-
Amazon S3 + CloudFront
-
Netlify / Vercel
-
GitHub Pages
While your backend API remains hosted separately.
This improves:
-
Load time
-
Global latency
-
Scalability
7. Rate Limiting and Abuse Protection
Since your API has login and refresh endpoints, protect them:
Add in Program.cs (Server):
builder.Services.AddRateLimiter(options =>
{
    options.AddFixedWindowLimiter("authLimiter", limiter =>
    {
        limiter.PermitLimit = 5;
        limiter.Window = TimeSpan.FromMinutes(1);
        limiter.QueueLimit = 0;
    });
});
And apply to auth endpoints:
app.MapControllers().RequireRateLimiting("authLimiter");This prevents brute-force login attempts.
8. Error Handling in Production
Enable a friendly error page for production:
if (!app.Environment.IsDevelopment())
{
    app.UseExceptionHandler("/error");
}
9. Disable Detailed Errors and Logging in Production
In production, configure:
"Logging": {
  "LogLevel": {
    "Default": "Warning",
    "Microsoft": "Warning",
    "Microsoft.Hosting.Lifetime": "Information"
  }
}
Avoid logging:
-
Passwords
-
JWT tokens
-
Refresh tokens
-
User personal data
10. Client-Side Token Storage Hardening
Recommended approach:
| Token Type | Storage | Reason |
|---|---|---|
| Access Token | In-memory only | Prevents XSS theft |
| Refresh Token | localStorage OR secure cookie |
Needed across reloads |
Additional steps you can take:
-
Clear tokens on logout
-
Clear tokens on tab close (optional via JS interop)
-
Avoid storing the access token in LocalStorage ever
In our tutorial, access tokens were stored in memory, which is ideal.
11. Deployment Options
Your Server (Web API) can be deployed on:
✔ Azure App Service
Easy SSL + managed identity + scaling.
✔ Docker + VPS
Using Nginx reverse proxy for HTTPS.
✔ Azure Container Apps
Serverless, inexpensive, scalable.
✔ AWS ECS / EKS / DigitalOcean
Any container environment works.
The Client (Blazor WebAssembly) can be deployed on:
-
Any static hosting service
-
CDNs
-
Cloud Storage buckets
Blazor WASM requires only simple hosting — no server render needed.
12. Final Production Checklist
Before going live:
🔐 Authentication & Tokens
-
Short access token lifetime
-
Refresh token rotation enabled
-
Secure key from environment variables
-
HTTPS enforced
-
Auth endpoints are rate-limited
🌐 CORS & Networking
-
CORS restricted to your domain
-
HTTPS redirect + HSTS enabled
-
Reverse proxy forwards X-Forwarded headers
🧱 App Hardening
-
Exceptions hidden in production
-
Logging restricted
-
No secrets in appsettings.json
-
Updated runtime and patches installed
🚀 Deployment
-
Client hosted on a static server or CDN
-
Server deployed behind SSL
-
Correct environment variables configured
✔ Section 10 Summary
You learned how to:
-
Protect JWT signing keys
-
Harden token storage
-
Secure refresh token workflows
-
Lock down CORS
-
Enforce HTTPS
-
Apply rate limiting
-
Deploy Blazor WASM + ASP.NET Core 10 securely
Your app is now production-ready, stable, and secure.
Conclusion
In this tutorial, you built a fully secure Blazor WebAssembly application powered by an ASP.NET Core 10 Web API using JWT authentication and refresh tokens. You learned how to design a modern, production-ready security architecture that mirrors the best practices used in professional SPA frameworks like Angular, React, and Vue — but entirely in C#.
Here’s a quick recap of what you accomplished:
✔ Complete Authentication Pipeline
You created a robust login flow using short-lived access tokens and long-lived refresh tokens, ensuring both security and great user experience.
✔ Secure Token Generation & Validation
The server now issues cryptographically signed JWT tokens, validates them, enforces expiration, and protects API endpoints with [Authorize] and role-based rules.
✔ Automatic Token Refresh
You implemented silent token refresh on the client, allowing users to stay logged in without interruptions while keeping access tokens short-lived.
✔ Blazor-Specific Authentication State
Using a custom AuthenticationStateProvider, you integrated JWT claims directly into Blazor’s built-in authorization system, enabling secure pages, role-based views, and dynamic UI behavior.
✔ Protected Pages, Routes, and UI
Blazor pages such as /secure and /admin are now protected and accessible only to authenticated or authorized roles. Your navigation and layout adapt to the user's login status.
✔ Production-Ready Security Practices
You learned how to:
-
Protect signing keys
-
Enforce HTTPS and HSTS
-
Lock down CORS
-
Implement refresh token rotation
-
Apply rate limiting
-
Avoid insecure token storage
-
Deploy the client and server properly
These steps turn your Blazor application into a trusted, secure, and scalable system ready for real-world use.
Where to Go Next
With this foundation in place, you can enhance your project further by exploring:
🔧 1. Adding ASP.NET Core Identity
Replace in-memory users with a real identity system, hashed passwords, roles, claims, lockouts, etc.
🗄️ 2. Using EF Core for Persistent User Store
Save users, tokens, and sessions in a database such as SQLite, SQL Server, or PostgreSQL.
🔐 3. Adding Two-Factor Authentication
Increase security through email/SMS verification or authenticator apps.
🧪 4. End-to-End Testing
Use tools like Playwright to test login flows, route protection, and admin-only pages.
📦 5. Deploying with Docker
Containerize your API and serve Blazor WASM via Nginx or a CDN for maximum performance.
This tutorial gives you a battle-tested starting point: a secure SPA with modern authentication. From here, you can adapt, scale, and refine depending on your project’s needs.
You can find the full source code on our GitHub.
That's just the basics. If you need more deep learning about ASP.Net Core, you can take the following cheap course:
- Asp.Net Core 10 (.NET 10) | True Ultimate Guide
- .NET Core MVC - The Complete Guide 2025 [E-commerce]
- Learn C# Full Stack Development with Angular and ASP.NET
- Complete ASP.NET Core and Entity Framework Development
- Full Stack Web Development with C# OOP, MS SQL & ASP.NET MVC
- Build a complete distributed app using .Net Aspire
- .NET Microservices with Azure DevOps & AKS | Basic to Master
- ASP.NET Core - SOLID and Clean Architecture
- ANGULAR 20 and ASP.NET Core Web API - Real World Application
- .NET/C# Interview Masterclass- Top 500 Questions (PDF)(2025)
Thanks!