
In this tutorial, you’ll learn how to build a full authentication system using the latest Spring Boot 3.5.0, MongoDB, and Angular 20. We’ll implement JWT-based login and registration with a modern security configuration using SecurityFilterChain, as well as protect Angular frontend routes using HttpInterceptor and route guards. This full-stack solution ensures your application stays secure, scalable, and up-to-date with the latest frameworks.
The flow of the web application looks like below Sequence Diagram.

The Angular application starts with a secure and route-guarded page list of products without authorization headers. The Angular redirects to the Login page. After logging in with the valid credentials, Angular got the JWT token that validates with the Route guard also sent together with the Authorization headers bearer. In the products list page, the Angular application requests the products API from Spring Boot Security API, including authorization headers. Finally, the Angular page displays the list of products.
The following tools, frameworks, libraries, and modules are required for this tutorial:
- Java Development Kit (JDK) 17
- Gradle
- Spring Boot 3.5.0
- Spring Data MongoDB
- MongoDB
- Spring Security
- Spring Initializer
- Angular 20
- IDE or Text Editor (We are using VSCode)
- Terminal or cmd
We assume that you have already installed all required software, tools, and frameworks. So, we will not cover how to install the software, tools, and frameworks. Notes: We are using Spring Boot 3.5.0 (Stable version), JDK 17, and Angular 20.
Generate a New Spring Boot Gradle Project
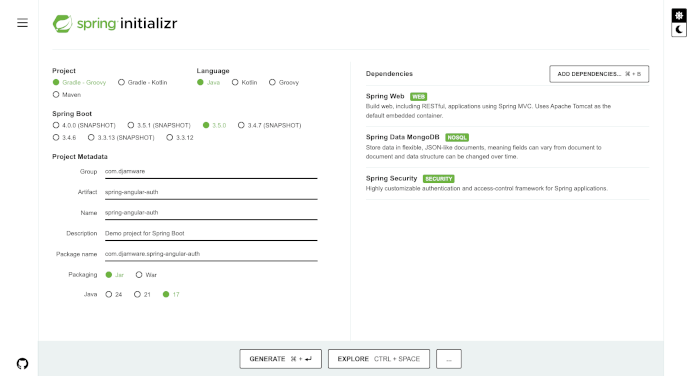
To create or generate a new Spring Boot Application or Project, simply go to Spring Initializer. Fill in all required fields as below, then click on the Generate Project button.
The project will automatically be downloaded as a Zip file. Next, extract the zipped project to your Java projects folder. In the project folder root, you will find `build.gradle` file for registering dependencies, initially it looks like this.
plugins {
	id 'java'
	id 'org.springframework.boot' version '3.5.0'
	id 'io.spring.dependency-management' version '1.1.7'
}

group = 'com.djamware'
version = '0.0.1-SNAPSHOT'

java {
	toolchain {
		languageVersion = JavaLanguageVersion.of(17)
	}
}

repositories {
	mavenCentral()
}

dependencies {
	implementation 'org.springframework.boot:spring-boot-starter-data-mongodb'
	implementation 'org.springframework.boot:spring-boot-starter-security'
	implementation 'org.springframework.boot:spring-boot-starter-web'
	testImplementation 'org.springframework.boot:spring-boot-starter-test'
	testImplementation 'org.springframework.security:spring-security-test'
	testRuntimeOnly 'org.junit.platform:junit-platform-launcher'
}

tasks.named('test') {
	useJUnitPlatform()
}
Now, you can work with the source code of this Spring Boot Project using your own IDE or Text Editor. We are using Visual Studio Code (VSCode). In the terminal or command line, go to the extracted project folder, then run the command to open VSCode.
cd spring-angular-auth
code .
Next, we have to add the JWT library to the `build.gradle` as a dependency. Open and edit `build.gradle`, then add this line to dependencies after other implementations.
implementation 'io.jsonwebtoken:jjwt:0.12.6'Next, compile the Gradle Project by typing this command from the Terminal or CMD.
gradle compileJavaNext, open and edit `src/main/resources/application.properties`, then add these lines.
spring.data.mongodb.database=springmongodb
spring.data.mongodb.host=localhost
spring.data.mongodb.port=27017
Create Product, User, and Role Model or Entity Classes
We will be creating all required models or entities for products, users, and roles for Spring Boot login. Create a new folder and files inside that new folder.
mkdir src/main/java/com/djamware/spring_angular_auth/models
touch src/main/java/com/djamware/spring_angular_auth/models/Products.java
touch src/main/java/com/djamware/spring_angular_auth/models/User.java
touch src/main/java/com/djamware/spring_angular_auth/models/Role.java
Next, open and edit `src/main/java/com/djamware/spring_angular_auth/models/Products.java`, then add these packages and imports of the Spring Framework ID and Document.
package com.djamware.spring_angular_auth.models;

import org.springframework.data.annotation.Id;
import org.springframework.data.mongodb.core.mapping.Document;
Next, add these lines of code for class, fields, document annotation that map to a MongoDB collection, constructors, and getter/setter for each field.
@Document(collection = "products")
public class Products {

    @Id
    String id;
    String prodName;
    String prodDesc;
    Double prodPrice;
    String prodImage;

    public Products() {
    }

    public Products(String prodName, String prodDesc, Double prodPrice, String prodImage) {
        super();
        this.prodName = prodName;
        this.prodDesc = prodDesc;
        this.prodPrice = prodPrice;
        this.prodImage = prodImage;
    }

    // getter and setter

}
Next, open and edit `src/main/java/com/djamware/spring_angular_auth/models/User.java`, then add these packages and imports of Spring Framework ID, IndexDirection, Indexed, DBRef, and Document.
package com.djamware.spring_angular_auth.models;

import java.util.Set;

import org.springframework.data.annotation.Id;
import org.springframework.data.mongodb.core.index.IndexDirection;
import org.springframework.data.mongodb.core.index.Indexed;
import org.springframework.data.mongodb.core.mapping.DBRef;
import org.springframework.data.mongodb.core.mapping.Document;
Add these lines of Java code that contain document annotation that map to the MongoDB collection, class name, fields, constructors, and getter/setter of the fields.
@Document(collection = "users")
public class User {

    @Id
    private String id;
    @Indexed(unique = true, direction = IndexDirection.DESCENDING)
    private String email;
    private String password;
    private String fullname;
    private boolean enabled;
    @DBRef
    private Set<Role> roles;

    // getter and setter

}
Next, open and edit `src/main/java/com/djamware/spring_angular_auth/models/Role.java` then add these package names and imports of Spring Framework ID, IndexDirection, Indexed, DBRef, and Document.
package com.djamware.spring_angular_auth.models;

import org.springframework.data.annotation.Id;
import org.springframework.data.mongodb.core.index.IndexDirection;
import org.springframework.data.mongodb.core.index.Indexed;
import org.springframework.data.mongodb.core.mapping.Document;
Add these lines of code that contain document annotation that map to MongoDB collection, class name, fields/variables, constructors, and getter/setter for each field/variable.
@Document(collection = "roles")
public class Role {

    @Id
    private String id;
    @Indexed(unique = true, direction = IndexDirection.DESCENDING)

    private String role;

    // getter and setter

}
If you want easier Java class creation, auto import organization, generate a constructor, and generate getter/setter, then you can use an IDE like Eclipse, Netbeans, Spring Tool-Suite, or IntelliJ IDEA. So, you don't have to type all the codes manually.
Create Product, User, and Role Repository Interfaces
Next steps to create Product, User, and Role Repository Interfaces. Create a new folder and files for the repositories.
mkdir src/main/java/com/djamware/spring_angular_auth/repositories
touch src/main/java/com/djamware/spring_angular_auth/repositories/ProductRepository.java
touch src/main/java/com/djamware/spring_angular_auth/repositories/UserRepository.java
touch src/main/java/com/djamware/spring_angular_auth/repositories/RoleRepository.java
Next, open and edit `src/main/java/com/djamware/spring_angular_auth/repositories/ProductRepository.java`, then add these package names and imports of the Products model and Spring Framework MongoRepository.
package com.djamware.spring_angular_auth.repositories;

import org.springframework.data.mongodb.repository.MongoRepository;
import org.springframework.lang.NonNull;

import com.djamware.spring_angular_auth.models.Products;
Add these lines of code that contain a Java interface name that extends `MongoRepository` and a delete method.
public interface ProductRepository extends MongoRepository<Products, String> {

    @Override
    void delete(@NonNull Products deleted);
}
Next, open and edit `src/main/java/com/djamware/spring_angular_auth/repositories/UserRepository.java` then add these package names and imports of Repositories, User model, and Spring Framework MongoRepository.
package com.djamware.spring_angular_auth.repositories;

import org.springframework.data.mongodb.repository.MongoRepository;

import com.djamware.spring_angular_auth.models.User;
Add these lines of code that contain a Java interface name that extends `MongoRepository` and a find by email method.
public interface UserRepository extends MongoRepository<User, String> {

    User findByEmail(String email);
}
Next, open and edit `src/main/java/com/djamware/spring_angular_auth/repositories/RoleRepository.java`, then add these package names and imports of Spring Framework, MongoRepository, and Role model.
package com.djamware.spring_angular_auth.repositories;

import org.springframework.data.mongodb.repository.MongoRepository;

import com.djamware.spring_angular_auth.models.Role;
Add these lines of code that contain a Java interface name that extends `MongoRepository` and a find by role method.
public interface RoleRepository extends MongoRepository<Role, String> {

    Role findByRole(String role);
}
Create a Custom User Details Service
To implement authentication using existing User and Role from MongoDB, we have to create a custom user details service. Create a new folder and Java file for the service.
mkdir src/main/java/com/djamware/spring_angular_auth/services
touch src/main/java/com/djamware/spring_angular_auth/services/CustomUserDetailsService.java
Next, open and edit `src/main/java/com/djamware/spring_angular_auth/services/CustomUserDetailsService.java`, then add these package names and imports of the required Spring Framework authorization libraries.
package com.djamware.spring_angular_auth.services;

import java.util.ArrayList;
import java.util.Arrays;
import java.util.HashSet;
import java.util.List;
import java.util.Set;

import org.springframework.beans.factory.annotation.Autowired;
import org.springframework.security.core.GrantedAuthority;
import org.springframework.security.core.authority.SimpleGrantedAuthority;
import org.springframework.security.core.userdetails.UserDetails;
import org.springframework.security.core.userdetails.UserDetailsService;
import org.springframework.security.core.userdetails.UsernameNotFoundException;
import org.springframework.security.crypto.password.PasswordEncoder;
import org.springframework.stereotype.Service;

import com.djamware.spring_angular_auth.models.Role;
import com.djamware.spring_angular_auth.models.User;
import com.djamware.spring_angular_auth.repositories.RoleRepository;
import com.djamware.spring_angular_auth.repositories.UserRepository;
Add these lines of code that contain service annotation, the class name that implements `UserDetailsService`, required variables, constructors, and methods for the authentication process.
@Service
public class CustomUserDetailsService implements UserDetailsService {

    @Autowired
    private UserRepository userRepository;

    @Autowired
    private RoleRepository roleRepository;

    @Autowired
    private PasswordEncoder bCryptPasswordEncoder;

    public User findUserByEmail(String email) {
        return userRepository.findByEmail(email);
    }

    public void saveUser(User user) {
        user.setPassword(bCryptPasswordEncoder.encode(user.getPassword()));
        user.setEnabled(true);
        Role userRole = roleRepository.findByRole("ADMIN");
        user.setRoles(new HashSet<>(Arrays.asList(userRole)));
        userRepository.save(user);
    }

    @Override
    public UserDetails loadUserByUsername(String email) throws UsernameNotFoundException {

        User user = userRepository.findByEmail(email);
        if (user != null) {
            List<GrantedAuthority> authorities = getUserAuthority(user.getRoles());
            return buildUserForAuthentication(user, authorities);
        } else {
            throw new UsernameNotFoundException("username not found");
        }
    }

    private List<GrantedAuthority> getUserAuthority(Set<Role> userRoles) {
        Set<GrantedAuthority> roles = new HashSet<>();
        userRoles.forEach((role) -> {
            roles.add(new SimpleGrantedAuthority(role.getRole()));
        });

        List<GrantedAuthority> grantedAuthorities = new ArrayList<>(roles);
        return grantedAuthorities;
    }

    private UserDetails buildUserForAuthentication(User user, List<GrantedAuthority> authorities) {
        return new org.springframework.security.core.userdetails.User(user.getEmail(), user.getPassword(), authorities);
    }
}
Configure Spring Boot Security Rest
Now, the main purpose of this tutorial is to configure Spring Security Rest. First, we have to create a bean for JWT token generation and validation. Create a new folder and file for the configuration.
mkdir src/main/java/com/djamware/spring_angular_auth/configs
touch src/main/java/com/djamware/spring_angular_auth/configs/JwtTokenProvider.java
touch src/main/java/com/djamware/spring_angular_auth/configs/JwtConfigurer.java
touch src/main/java/com/djamware/spring_angular_auth/configs/JwtTokenFilter.java
touch src/main/java/com/djamware/spring_angular_auth/configs/WebSecurityConfig.java
Next, open and edit `src/main/java/com/djamware/spring_angular_auth/configs/JwtTokenProvider.java`, then add these package names and imports of the required Spring Framework authentication, algorithm, and JWT.
package com.djamware.spring_angular_auth.configs;

import java.security.Key;
import java.util.Base64;
import java.util.Date;
import java.util.Set;

import javax.crypto.SecretKey;

import org.springframework.beans.factory.annotation.Autowired;
import org.springframework.beans.factory.annotation.Value;
import org.springframework.security.authentication.UsernamePasswordAuthenticationToken;
import org.springframework.security.core.Authentication;
import org.springframework.security.core.userdetails.UserDetails;
import org.springframework.stereotype.Component;

import com.djamware.spring_angular_auth.models.Role;
import com.djamware.spring_angular_auth.services.CustomUserDetailsService;

import io.jsonwebtoken.Claims;
import io.jsonwebtoken.JwtException;
import io.jsonwebtoken.JwtParser;
import io.jsonwebtoken.JwtParserBuilder;
import io.jsonwebtoken.Jwts;
import io.jsonwebtoken.security.Keys;
import jakarta.annotation.PostConstruct;
import jakarta.servlet.http.HttpServletRequest;
Next, add these lines of code that contain component annotation, class name, variables, and methods.
@Component
public class JwtTokenProvider {

    @Value("${security.jwt.token.secret-key:secret}")
    private String secret;

    @Value("${security.jwt.token.expire-length:3600000}")
    private long validityInMilliseconds;

    private SecretKey secretKey;

    private JwtParser jwtParser;

    @Autowired
    private CustomUserDetailsService userDetailsService;

    @PostConstruct
    protected void init() {
        // Encode and build a proper HMAC SecretKey
        byte[] keyBytes = Base64.getEncoder().encode(secret.getBytes());
        secretKey = Keys.hmacShaKeyFor(keyBytes);

        // Create a thread-safe JwtParser that uses verifyWith(...)
        jwtParser = Jwts.parser()
                .verifyWith(secretKey)
                .build();
    }

    public String createToken(String username, Set<Role> roles) {
        Date now = new Date();
        Date expiry = new Date(now.getTime() + validityInMilliseconds);

        Claims claims = (Claims) Jwts.claims().subject(username);
        claims.put("roles", roles);

        // signWith(Key) is now preferred and auto-selects algorithm
        return Jwts.builder()
                .claims(claims)
                .issuedAt(now)
                .expiration(expiry)
                .signWith(secretKey)
                .compact();
    }

    public Authentication getAuthentication(String token) {
        UserDetails userDetails = userDetailsService.loadUserByUsername(getUsername(token));
        return new UsernamePasswordAuthenticationToken(userDetails, "", userDetails.getAuthorities());
    }

    public String getUsername(String token) {
        Key key = Keys.hmacShaKeyFor(secretKey.getEncoded());
        Claims claims = ((JwtParserBuilder) Jwts.builder()
                .signWith(key))
                .build()
                .parseSignedClaims(token)
                .getPayload();

        return claims.getSubject(); // Returns username
    }

    public String resolveToken(HttpServletRequest req) {
        String auth = req.getHeader("Authorization");
        return (auth != null && auth.startsWith("Bearer ")) ? auth.substring(7) : null;
    }

    public boolean validateToken(String token) {
        try {
            Key key = Keys.hmacShaKeyFor(secretKey.getEncoded());

            var claims = ((JwtParserBuilder) Jwts
                    .builder()
                    .signWith(key))
                    .build()
                    .parseSignedClaims(token)
                    .getPayload();

            return !claims.getExpiration().before(new Date());

        } catch (JwtException | IllegalArgumentException e) {
            throw new JwtException("Expired or invalid JWT token", e);
        }
    }
}
Next, open and edit `src/main/java/com/djamware/spring_angular_auth/configs/JwtTokenFilter.java`, then add these package names and imports of the required Spring Framework Servlet and Filters.
package com.djamware.spring_angular_auth.configs;

import java.io.IOException;

import org.springframework.lang.NonNull;
import org.springframework.security.core.Authentication;
import org.springframework.security.core.context.SecurityContextHolder;
import org.springframework.web.filter.OncePerRequestFilter;

import jakarta.servlet.FilterChain;
import jakarta.servlet.ServletException;
import jakarta.servlet.http.HttpServletRequest;
import jakarta.servlet.http.HttpServletResponse;
Next, add these lines of code that contain component annotation, class name, variables, and methods.
public class JwtTokenFilter extends OncePerRequestFilter {

    private final JwtTokenProvider jwtTokenProvider;

    public JwtTokenFilter(JwtTokenProvider jwtTokenProvider) {
        this.jwtTokenProvider = jwtTokenProvider;
    }

    @Override
    protected void doFilterInternal(@NonNull HttpServletRequest request,
            @NonNull HttpServletResponse response,
            @NonNull FilterChain filterChain)
            throws ServletException, IOException {

        String token = jwtTokenProvider.resolveToken(request);
        if (token != null && jwtTokenProvider.validateToken(token)) {
            Authentication auth = jwtTokenProvider.getAuthentication(token);
            SecurityContextHolder.getContext().setAuthentication(auth);
        }

        filterChain.doFilter(request, response);
    }
}
Finally, we have to configure Spring Security by opening and editing `src/main/java/com/djamware/spring_angular_auth/configs/WebSecurityConfig.java`, then add these package names and imports of Spring Framework servlet, security, and web configurations.
package com.djamware.spring_angular_auth.configs;

import org.springframework.context.annotation.Bean;
import org.springframework.context.annotation.Configuration;
import org.springframework.security.authentication.AuthenticationManager;
import org.springframework.security.config.annotation.authentication.configuration.AuthenticationConfiguration;
import org.springframework.security.config.annotation.web.builders.HttpSecurity;
import org.springframework.security.config.annotation.web.configurers.AbstractHttpConfigurer;
import org.springframework.security.config.http.SessionCreationPolicy;
import org.springframework.security.core.userdetails.UserDetailsService;
import org.springframework.security.crypto.bcrypt.BCryptPasswordEncoder;
import org.springframework.security.crypto.password.PasswordEncoder;
import org.springframework.security.web.AuthenticationEntryPoint;
import org.springframework.security.web.SecurityFilterChain;
import org.springframework.security.web.authentication.UsernamePasswordAuthenticationFilter;

import com.djamware.spring_angular_auth.services.CustomUserDetailsService;

import jakarta.servlet.http.HttpServletResponse;
Add these lines of code that contain Configuration and `EnableWebSecurity` annotation, class name that extends `WebSecurityConfigurerAdapter`, required variables, constructors, and methods.
@Configuration
public class WebSecurityConfig {

    private final JwtTokenProvider jwtTokenProvider;

    public WebSecurityConfig(JwtTokenProvider jwtTokenProvider) {
        this.jwtTokenProvider = jwtTokenProvider;
    }

    @Bean
    public SecurityFilterChain securityFilterChain(HttpSecurity http) throws Exception {
        http
                .csrf(AbstractHttpConfigurer::disable)
                .sessionManagement(session -> session.sessionCreationPolicy(SessionCreationPolicy.STATELESS))
                .authorizeHttpRequests(auth -> auth
                        .requestMatchers("/api/auth/login", "/api/auth/register").permitAll()
                        .requestMatchers("/api/products/**").hasAuthority("ADMIN")
                        .anyRequest().authenticated())
                .exceptionHandling(ex -> ex
                        .authenticationEntryPoint(unauthorizedEntryPoint()))
                .addFilterBefore(new JwtTokenFilter(jwtTokenProvider), UsernamePasswordAuthenticationFilter.class);

        return http.build();
    }

    @Bean
    public PasswordEncoder passwordEncoder() {
        return new BCryptPasswordEncoder();
    }

    @Bean
    public AuthenticationManager authenticationManager(AuthenticationConfiguration configuration) throws Exception {
        return configuration.getAuthenticationManager();
    }

    @Bean
    public AuthenticationEntryPoint unauthorizedEntryPoint() {
        return (request, response, authException) -> response.sendError(HttpServletResponse.SC_UNAUTHORIZED,
                "Unauthorized");
    }

    @Bean
    public UserDetailsService userDetailsService() {
        return new CustomUserDetailsService();
    }
}
Create Product and Authentication Controllers
Now it's time for the REST API endpoint. All REST API will be created from each controller. The product controller will handle the CRUD endpoint of the product, and the Authentication controller will handle the login and register endpoints. Create a new folder and files for the controllers.
mkdir src/main/java/com/djamware/spring_angular_auth/controllers
touch src/main/java/com/djamware/spring_angular_auth/controllers/ProductController.java
touch src/main/java/com/djamware/spring_angular_auth/controllers/AuthController.java
touch src/main/java/com/djamware/spring_angular_auth/controllers/AuthBody.java
Next, open and edit `src/main/java/com/djamware/spring_angular_auth/controllers/ProductController.java`, then add these package names and imports.
package com.djamware.spring_angular_auth.controllers;

import org.springframework.beans.factory.annotation.Autowired;
import org.springframework.web.bind.annotation.CrossOrigin;
import org.springframework.web.bind.annotation.RequestMapping;
import org.springframework.web.bind.annotation.RequestMethod;
import org.springframework.web.bind.annotation.RestController;

import com.djamware.spring_angular_auth.models.Products;
import com.djamware.spring_angular_auth.repositories.ProductRepository;
Add these lines of code that contain the `RestController` annotation, class name, required variables, constructors, and methods.
@CrossOrigin(origins = "*")
@RequestMapping("/api")
@RestController
public class ProductController {

    @Autowired
    ProductRepository productRepository;

    @RequestMapping(method = RequestMethod.GET, value = "/products")
    public Iterable<Products> product() {
        return productRepository.findAll();
    }
}
Next, open and edit `src/main/java/com/djamware/spring_angular_auth/controllers/AuthController.java`, then add these package names and imports of the required Spring Framework REST API builder.
package com.djamware.spring_angular_auth.controllers;

import java.util.HashMap;
import java.util.Map;

import org.springframework.beans.factory.annotation.Autowired;
import org.springframework.http.ResponseEntity;
import org.springframework.security.authentication.AuthenticationManager;
import org.springframework.security.authentication.BadCredentialsException;
import org.springframework.security.authentication.UsernamePasswordAuthenticationToken;
import org.springframework.security.core.AuthenticationException;
import org.springframework.web.bind.annotation.CrossOrigin;
import org.springframework.web.bind.annotation.PostMapping;
import org.springframework.web.bind.annotation.RequestBody;
import org.springframework.web.bind.annotation.RequestMapping;
import org.springframework.web.bind.annotation.RestController;

import com.djamware.spring_angular_auth.configs.JwtTokenProvider;
import com.djamware.spring_angular_auth.models.User;
import com.djamware.spring_angular_auth.repositories.UserRepository;
import com.djamware.spring_angular_auth.services.CustomUserDetailsService;
Add these lines of code that contain `RestController` and `RequestMapping` annotations, class name, required variables, constructors, and methods.
@CrossOrigin(origins = "*")
@RestController
@RequestMapping("/api/auth")
public class AuthController {

    @Autowired
    AuthenticationManager authenticationManager;

    @Autowired
    JwtTokenProvider jwtTokenProvider;

    @Autowired
    UserRepository users;

    @Autowired
    private CustomUserDetailsService userService;

    @PostMapping("/login")
    public ResponseEntity<?> login(@RequestBody AuthBody data) {
        try {
            String username = data.getEmail();
            authenticationManager.authenticate(new UsernamePasswordAuthenticationToken(username, data.getPassword()));
            String token = jwtTokenProvider.createToken(username, this.users.findByEmail(username).getRoles());
            Map<Object, Object> model = new HashMap<>();
            model.put("username", username);
            model.put("token", token);
            return ResponseEntity.ok(model);
        } catch (AuthenticationException e) {
            throw new BadCredentialsException("Invalid email/password supplied");
        }
    }

    @PostMapping("/register")
    public ResponseEntity<?> register(@RequestBody User user) {
        User userExists = userService.findUserByEmail(user.getEmail());
        if (userExists != null) {
            throw new BadCredentialsException("User with username: " + user.getEmail() + " already exists");
        }
        userService.saveUser(user);
        Map<Object, Object> model = new HashMap<>();
        model.put("message", "User registered successfully");
        return ResponseEntity.ok(model);
    }
}
Next, open and edit `src/main/java/com/djamware/spring_angular_auth/controllers/AuthBody.java`, then add these package names.
package com.djamware.spring_angular_auth.controllers;Add these lines of codes that contains the class name, fields or variables, and getter/setter for those variables.
public class AuthBody {

    private String email;
    private String password;

    // getter and setter

}
Install or Update Angular CLI and Create Application
Before installing the Angular CLI, make sure you have installed Node.js https://nodejs.org and can open a Node.js command prompt. Next, open the Node.js command prompt, then type this command to install Angular CLI.
sudo npm install -g @angular/cliNext, create an Angular application by typing this command in the root of the Spring Boot application/project directory.
ng new clientWhere `client` is the name of the Angular application. You can specify your name, we like to name it `client` because it's put inside the Spring Boot Project directory. If there's a question, we fill them with `Y` and `SCSS`. Next, go to the newly created Angular application.
cd clientRun the Angular application for the first time.
ng serveNow, go to `localhost:4200` and you should see this page.

Add Routes for Navigation between Angular Pages/Components
In the previous steps, we have to add Angular Routes when answering the questions. Now, we just added the required pages for CRUD (Create, Read, Update, Delete) Supplier data. Type these commands to add the Angular components or pages.
ng g component products
ng g component auth/login
ng g component auth/register
Open `src/app/app.routes.ts`, then add these imports of products, login, and register components.
import { Products } from './products/products';
import { Login } from './auth/login/login';
import { Register } from './auth/register/register';
Add these arrays to the existing routes constant.
export const routes: Routes = [
    {
        path: '',
        redirectTo: 'products',
        pathMatch: 'full'
    },
    {
        path: 'products',
        component: Products,
        data: { title: 'List of Products' }
    },
    {
        path: 'login',
        component: Login,
        data: { title: 'Login' }
    },
    {
        path: 'register',
        component: Register,
        data: { title: 'Register' }
    }
];
Open and edit `src/app/app.html` and you will see the existing router outlet. Next, modify this HTML page to fit the CRUD page wrapped by <router-outlet>.
<div class="container">
  <router-outlet />
</div>
Open and edit `src/app/app.scss`, then replace all SCSS codes with this.
.container {
    padding: 20px;
}
Create a custom Angular HttpInterceptor
Before creating a custom Angular HttpInterceptor, create a folder with the name `client/src/app/interceptors`. Next, create a file for the custom Angular HttpInterceptor with the name `client/src/app/interceptors/token.interceptor.ts`. Open and edit that file, the add these imports of the required HTTP handler and RxJS.
import { HttpErrorResponse, HttpEvent, HttpHandler, HttpInterceptor, HttpRequest, HttpResponse } from "@angular/common/http";
import { Injectable } from "@angular/core";
import { Router } from "@angular/router";
import { catchError, map, Observable, throwError } from "rxjs";
Create a class that implements the HttpInterceptor method.
@Injectable()
export class TokenInterceptor implements HttpInterceptor {

}
Inject the required module into the constructor inside the class.
constructor(private router: Router) {}Implement a custom Interceptor function.
intercept(request: HttpRequest<any>, next: HttpHandler): Observable<HttpEvent<any>> {

    const token = localStorage.getItem('token');
    if (token) {
      request = request.clone({
        setHeaders: {
          'Authorization': 'Bearer ' + token
        }
      });
    }
    if (!request.headers.has('Content-Type')) {
      request = request.clone({
        setHeaders: {
          'content-type': 'application/json'
        }
      });
    }
    request = request.clone({
      headers: request.headers.set('Accept', 'application/json')
    });
    return next.handle(request).pipe(
      map((event: HttpEvent<any>) => {
        if (event instanceof HttpResponse) {
          console.log('event--->>>', event);
        }
        return event;
      }),
      catchError((error: HttpErrorResponse) => {
        console.log(error);
        if (error.status === 401) {
          this.router.navigate(['login']);
        }
        if (error.status === 400) {
          alert(error.error);
        }
        return throwError(error);
      }));
}
Next, create a src/app/interceptors/index.ts, then add this code.
import { HTTP_INTERCEPTORS } from "@angular/common/http";
import { Provider } from "@angular/core";
import { TokenInterceptor } from "./token.interceptor";

export const httpInterceptorProvider: Provider =
    { provide: HTTP_INTERCEPTORS, useClass: TokenInterceptor, multi: true };
Next, we have to register this custom HttpInterceptor in `client/src/app.config.ts`.
import { ApplicationConfig, provideBrowserGlobalErrorListeners, provideZoneChangeDetection } from '@angular/core';
import { provideRouter } from '@angular/router';

import { routes } from './app.routes';
import { httpInterceptorProvider } from './interceptors';

export const appConfig: ApplicationConfig = {
  providers: [
    provideBrowserGlobalErrorListeners(),
    provideZoneChangeDetection({ eventCoalescing: true }),
    provideRouter(routes),
    httpInterceptorProvider,
  ]
};
Now, the HTTP interceptor is ready to intercept any request to the API.
Create Services for Accessing Product and Authentication API
To access the Spring Boot RESTful API from an Angular application, we have to create services for that. Type these commands to generate the Angular services from the client folder.
ng g service auth
ng g service product
Next, open and edit `client/src/app/auth.ts`, then add these imports of HttpClient, RxJS Observable, of, catchError, and tap.
import { HttpClient } from '@angular/common/http';
import { Injectable } from '@angular/core';
import { catchError, Observable, of, tap } from 'rxjs';
Declare a constant variable as the Spring Boot REST API URL after the imports.
const apiUrl = 'http://192.168.0.7:8080/api/auth/';Declare the variables before the constructor that will be used by the Angular Route Guard.
  isLoggedIn = false;
  redirectUrl: string | undefined;
Inject the `HttpClient` module inside the constructor.
constructor(private http: HttpClient) { }Create all required functions for Login, Logout, Register, and helper functions.
login(data: any): Observable<any> {
  return this.http.post<any>(apiUrl + 'login', data)
    .pipe(
      tap(_ => this.isLoggedIn = true),
      catchError(this.handleError('login', []))
    );
}

logout(): Observable<any> {
  return this.http.get<any>(apiUrl + 'signout')
    .pipe(
      tap(_ => this.isLoggedIn = false),
      catchError(this.handleError('logout', []))
    );
}

register(data: any): Observable<any> {
  return this.http.post<any>(apiUrl + 'register', data)
    .pipe(
      tap(_ => this.log('login')),
      catchError(this.handleError('login', []))
    );
}

private handleError<T>(operation = 'operation', result?: T) {
  return (error: any): Observable<T> => {

    console.error(error); // log to console instead
    this.log(`${operation} failed: ${error.message}`);

    return of(result as T);
  };
}

private log(message: string) {
  console.log(message);
}
Next, create an object class that represents Product data `client/src/app/products/product.ts`, then replace all file contents with these.
export class Product {
    productId: number | undefined;
    isbn: string | undefined;
    title: string | undefined;
    author: string | undefined;
    description: string | undefined;
    publisher: string | undefined;
    publishedYear: number | undefined;
    price: number | undefined;
}
Next, open and edit `client/src/app/services/product.ts`, then replace all code with this.
import { HttpClient } from '@angular/common/http';
import { Injectable } from '@angular/core';
import { catchError, Observable, of, tap } from 'rxjs';

const apiUrl = 'http://192.168.0.7:8080/api/products';

@Injectable({
  providedIn: 'root'
})
export class Product {

  constructor(private http: HttpClient) { }

  getProducts(): Observable<Product[]> {
    return this.http.get<Product[]>(apiUrl + 'Product')
      .pipe(
        tap(_ => this.log('fetched Products')),
        catchError(this.handleError('getProducts', []))
      );
  }

  private handleError<T>(operation = 'operation', result?: T) {
    return (error: any): Observable<T> => {

      console.error(error); // log to console instead
      this.log(`${operation} failed: ${error.message}`);

      return of(result as T);
    };
  }

  private log(message: string) {
    console.log(message);
  }
}
Display a List of Products using Angular Material
To display a list of products in the Angular template. First, open and edit `client/src/app/products/products.ts`, then add these imports.
import { Component } from '@angular/core';
import { Product } from '../product';
import { Auth } from '../auth';
import { Router } from '@angular/router';
Next, inject the Product and Auth Services into the constructor.
constructor(private productService: Product, private authService: Auth, private router: Router) { }Declare these variables before the constructor.
data: Product[] = [];
displayedColumns: string[] = ['prodName', 'prodDesc', 'prodPrice'];
isLoadingResults = true;
Create a function for consuming or getting a product list from the producing service.
  getProducts(): void {
    this.productService.getProducts()
      .subscribe({
        next: (products) => {
          this.data = products;
          console.log(this.data);
          this.isLoadingResults = false;
        },
        error: (err) => {
          console.log(err);
          this.isLoadingResults = false;
        }
      });
  }
Call this function from `ngOnInit`.
ngOnInit() {
  this.getProducts();
}
Add a function to log out the current session.
logout() {
  localStorage.removeItem('token');
  this.router.navigate(['login']);
}
Next, for the user interface (UI), we will use Angular Material and CDK. There's a CLI for generating a Material component like Table as a component, but we will create or add the Table component from scratch to the existing component. Type this command to install Angular Material.
ng add @angular/materialIf there are some questions, answer them as below.
? Choose a prebuilt theme name, or "custom" for a custom theme: Purple/Green       [ Preview: https://material.angular.i
o?theme=purple-green ]
? Set up global Angular Material typography styles? No
Next, we have to register all required Angular Material components or modules to `client/src/app/products/products.ts`. Open and edit that file, then add these imports.
import { MatInputModule } from '@angular/material/input';
import { MatPaginatorModule } from '@angular/material/paginator';
import { MatProgressSpinnerModule } from '@angular/material/progress-spinner';
import { MatSortModule } from '@angular/material/sort';
import { MatTableModule } from '@angular/material/table';
import { MatIconModule } from '@angular/material/icon';
import { MatButtonModule } from '@angular/material/button';
import { MatCardModule } from '@angular/material/card';
import { MatFormFieldModule } from '@angular/material/form-field';
import { CommonModule } from '@angular/common';

@Component({
  selector: 'app-products',
  imports: [
    CommonModule,
    MatInputModule,
    MatPaginatorModule,
    MatProgressSpinnerModule,
    MatSortModule,
    MatTableModule,
    MatIconModule,
    MatButtonModule,
    MatCardModule,
    MatFormFieldModule
  ],
  templateUrl: './products.html',
  styleUrl: './products.scss'
})
Next, open and edit `client/src/app/products/products.html`, then replace all HTML tags with these Angular Material tags.
<div class="example-container mat-elevation-z8">
  <div class="example-loading-shade"
       *ngIf="isLoadingResults">
    <mat-spinner *ngIf="isLoadingResults"></mat-spinner>
  </div>
  <div class="button-row">
    <a mat-flat-button color="primary" (click)="logout()">Logout</a>
  </div>
  <div class="mat-elevation-z8">
    <table mat-table [dataSource]="data" class="example-table">

      <!-- Product ID Column -->
      <ng-container matColumnDef="prodName">
        <th mat-header-cell *matHeaderCellDef>Product Name</th>
        <td mat-cell *matCellDef="let row">{{row.prodName}}</td>
      </ng-container>

      <!-- ISBN Column -->
      <ng-container matColumnDef="prodDesc">
        <th mat-header-cell *matHeaderCellDef>Product Description</th>
        <td mat-cell *matCellDef="let row">{{row.prodDesc}}</td>
      </ng-container>

      <!-- Title Column -->
      <ng-container matColumnDef="prodPrice">
        <th mat-header-cell *matHeaderCellDef>Product Price</th>
        <td mat-cell *matCellDef="let row">{{row.prodPrice}}</td>
      </ng-container>

      <tr mat-header-row *matHeaderRowDef="displayedColumns"></tr>
      <tr mat-row *matRowDef="let row; columns: displayedColumns;"></tr>
    </table>
  </div>
</div>
Finally, we have to align the style for this page. Open and edit `client/src/app/products/products.scss`, then replace all SCSS codes with these.
/* Structure */
.example-container {
    position: relative;
    padding: 5px;
}

.example-table-container {
    position: relative;
    max-height: 400px;
    overflow: auto;
}

table {
    width: 100%;
}

.example-loading-shade {
    position: absolute;
    top: 0;
    left: 0;
    bottom: 56px;
    right: 0;
    background: rgba(0, 0, 0, 0.15);
    z-index: 1;
    display: flex;
    align-items: center;
    justify-content: center;
}

.example-rate-limit-reached {
    color: #980000;
    max-width: 360px;
    text-align: center;
}

/* Column Widths */
.mat-column-number,
.mat-column-state {
    max-width: 64px;
}

.mat-column-created {
    max-width: 124px;
}

.mat-flat-button {
    margin: 5px;
}
Create the Angular Login and Register Page
This time for the authentication part. Open and edit `client/src/app/auth/login/login.ts` then add these imports.
import { CommonModule } from '@angular/common';
import { Component } from '@angular/core';
import { FormBuilder, FormControl, FormGroup, FormGroupDirective, FormsModule, NgForm, ReactiveFormsModule, Validators } from '@angular/forms';
import { Router } from '@angular/router';
import { Auth } from '../../auth';
import { ErrorStateMatcher } from '@angular/material/core';
import { MatProgressSpinnerModule } from '@angular/material/progress-spinner';
import { MatCardModule } from '@angular/material/card';
import { MatFormFieldModule } from '@angular/material/form-field';
import { MatInputModule } from '@angular/material/input';

@Component({
  selector: 'app-login',
  imports: [
    FormsModule,
    ReactiveFormsModule,
    CommonModule,
    MatProgressSpinnerModule,
    MatCardModule,
    MatFormFieldModule,
    MatInputModule
  ],
  templateUrl: './login.html',
  styleUrl: './login.scss'
})
Declare these variables before the constructor.
  loginForm = new FormGroup({
    'email': new FormControl(null, Validators.required),
    'password': new FormControl(null, Validators.required)
  });
  email = '';
  password = '';
  matcher = new MyErrorStateMatcher();
  isLoadingResults = false;
Inject the imported modules into the constructor.
constructor(private formBuilder: FormBuilder, private router: Router, private authService: Auth) { }Add a function to submit the login form.
  onFormSubmit() {
    const value = this.loginForm.value;
    this.authService.login(value)
      .subscribe({
        next: (res) => {
          console.log(res);
          if (res.token) {
            localStorage.setItem('token', res.token);
            this.router.navigate(['products']);
          }
        },
        error: (err) => {
          console.log(err);
        }
      });
  }
Add a function to go to the Register page.
register() {
  this.router.navigate(['register']);
}
Add a class that handles the form validation above this class.
/** Error when invalid control is dirty, touched, or submitted. */
export class MyErrorStateMatcher implements ErrorStateMatcher {
  isErrorState(control: FormControl | null, form: FormGroupDirective | NgForm | null): boolean {
    const isSubmitted = form && form.submitted;
    return !!(control && control.invalid && (control.dirty || control.touched || isSubmitted));
  }
}
Next, open and edit `client/src/app/auth/login/login.html`, then replace all HTML tags with these.
<div class="example-container mat-elevation-z8">
 <div class="example-loading-shade"
   *ngIf="isLoadingResults">
  <mat-spinner *ngIf="isLoadingResults"></mat-spinner>
 </div>
 <mat-card class="example-card">
  <form [formGroup]="loginForm" (ngSubmit)="onFormSubmit()">
   <mat-form-field class="example-full-width">
    <input matInput type="email" placeholder="Email" formControlName="email"
       [errorStateMatcher]="matcher">
    <mat-error>
     <span *ngIf="!loginForm.get('email')!.valid && loginForm.get('email')!.touched">Please enter your email</span>
    </mat-error>
   </mat-form-field>
   <mat-form-field class="example-full-width">
    <input matInput type="password" placeholder="Password" formControlName="password"
       [errorStateMatcher]="matcher">
    <mat-error>
     <span *ngIf="!loginForm.get('password')!.valid && loginForm.get('password')!.touched">Please enter your password</span>
    </mat-error>
   </mat-form-field>
   <div class="button-row">
    <button type="submit" [disabled]="!loginForm.valid" mat-flat-button color="primary">Login</button>
   </div>
   <div class="button-row">
    <button type="button" mat-flat-button color="primary" (click)="register()">Register</button>
   </div>
  </form>
 </mat-card>
</div>
Next, give this page a style by opening and editing `client/src/app/auth/login/login.scss`, then apply these style codes.
/* Structure */
.example-container {
  position: relative;
  padding: 5px;
}

.example-form {
  min-width: 150px;
  max-width: 500px;
  width: 100%;
}

.example-full-width {
  width: 100%;
}

.example-full-width:nth-last-child() {
  margin-bottom: 10px;
}

.button-row {
  margin: 10px 0;
}

.mat-flat-button {
  margin: 5px;
}
Next, for the register page, open and edit `client/src/app/auth/register/register.ts`, then replace all TypeScript code with this.
import { Component } from '@angular/core';
import { FormControl, FormGroup, FormGroupDirective, FormsModule, NgForm, ReactiveFormsModule, Validators } from '@angular/forms';
import { Router } from '@angular/router';
import { Auth } from '../../auth';
import { ErrorStateMatcher } from '@angular/material/core';
import { CommonModule } from '@angular/common';
import { MatProgressSpinnerModule } from '@angular/material/progress-spinner';
import { MatCardModule } from '@angular/material/card';
import { MatFormFieldModule } from '@angular/material/form-field';
import { MatInputModule } from '@angular/material/input';

@Component({
  selector: 'app-register',
  imports: [
    FormsModule,
    ReactiveFormsModule,
    CommonModule,
    MatProgressSpinnerModule,
    MatCardModule,
    MatFormFieldModule,
    MatInputModule
  ],
  templateUrl: './register.html',
  styleUrl: './register.scss'
})
export class Register {
  registerForm = new FormGroup({
    'email': new FormControl(null, Validators.required),
    'password': new FormControl(null, Validators.required),
    'fullName': new FormControl(null, Validators.required)
  });
  fullName = '';
  email = '';
  password = '';
  isLoadingResults = false;
  matcher = new MyErrorStateMatcher();

  constructor(private router: Router, private authService: Auth) { }

  onFormSubmit() {
    const value = this.registerForm.value;
    this.authService.register(value)
      .subscribe({
        next: (res) => {
          this.router.navigate(['login']);
        }, error: (err) => {
          console.log(err);
          alert(err.error);
        }
      });
  }

}

/** Error when invalid control is dirty, touched, or submitted. */
export class MyErrorStateMatcher implements ErrorStateMatcher {
  isErrorState(control: FormControl | null, form: FormGroupDirective | NgForm | null): boolean {
    const isSubmitted = form && form.submitted;
    return !!(control && control.invalid && (control.dirty || control.touched || isSubmitted));
  }
}
Next, open and edit `client/src/app/auth/register/register.html`, then replace all HTML tags with these.
<div class="example-container mat-elevation-z8">
 <div class="example-loading-shade"
   *ngIf="isLoadingResults">
  <mat-spinner *ngIf="isLoadingResults"></mat-spinner>
 </div>
 <mat-card class="example-card">
  <form [formGroup]="registerForm" (ngSubmit)="onFormSubmit()">
   <mat-form-field class="example-full-width">
    <input matInput type="fullName" placeholder="Full Name" formControlName="fullName"
        [errorStateMatcher]="matcher">
    <mat-error>
     <span *ngIf="!registerForm.get('fullName')!.valid && registerForm.get('fullName')!.touched">Please enter your Full Name</span>
    </mat-error>
   </mat-form-field>
   <mat-form-field class="example-full-width">
    <input matInput type="email" placeholder="Email" formControlName="email"
       [errorStateMatcher]="matcher">
    <mat-error>
     <span *ngIf="!registerForm.get('email')!.valid && registerForm.get('email')!.touched">Please enter your email</span>
    </mat-error>
   </mat-form-field>
   <mat-form-field class="example-full-width">
    <input matInput type="password" placeholder="Password" formControlName="password"
       [errorStateMatcher]="matcher">
    <mat-error>
     <span *ngIf="!registerForm.get('password')!.valid && registerForm.get('password')!.touched">Please enter your password</span>
    </mat-error>
   </mat-form-field>
   <div class="button-row">
    <button type="submit" [disabled]="!registerForm.valid" mat-flat-button color="primary">Register</button>
   </div>
  </form>
 </mat-card>
</div>
Finally, open and edit `client/src/app/auth/register/register.scss`, then replace all SCSS codes with these.
/* Structure */
.example-container {
  position: relative;
  padding: 5px;
}

.example-form {
  min-width: 150px;
  max-width: 500px;
  width: 100%;
}

.example-full-width {
  width: 100%;
}

.example-full-width:nth-last-child() {
  margin-bottom: 10px;
}

.button-row {
  margin: 10px 0;
}

.mat-flat-button {
  margin: 5px;
}
Secure the Guarded Products Page using Angular Route Guard
As we mentioned in the beginning that the Angular application will use Angular 8 Route Guard to secure the products page. So, we have both security for the Angular page and for the Spring Boot RESTful API. Type this command to generate a guard configuration file.
ng generate guard auth/authOpen and edit that file, then add these Angular or TypeScript codes.
import { ActivatedRouteSnapshot, CanActivate, Router, RouterStateSnapshot } from '@angular/router';
import { Auth } from '../auth';

export class AuthGuard implements CanActivate {
  constructor(private authService: Auth, private router: Router) { }

  canActivate(
    next: ActivatedRouteSnapshot,
    state: RouterStateSnapshot): boolean {
    const url: string = state.url;

    return this.checkLogin(url);
  }

  checkLogin(url: string): boolean {
    if (this.authService.isLoggedIn) { return true; }

    // Store the attempted URL for redirecting
    this.authService.redirectUrl = url;

    // Navigate to the login page with extras
    this.router.navigate(['/login']);
    return false;
  }
}
Next, open and edit `src/app/app.routes.ts`, then add this code.
import { Routes } from '@angular/router';
import { Products } from './products/products';
import { Login } from './auth/login/login';
import { Register } from './auth/register/register';
import { AuthGuard } from './auth/auth-guard';

export const routes: Routes = [
    {
        path: '',
        redirectTo: 'products',
        pathMatch: 'full'
    },
    {
        path: 'products',
        canActivate: [AuthGuard],
        component: Products,
        data: { title: 'List of Products' }
    },
    {
        path: 'login',
        component: Login,
        data: { title: 'Login' }
    },
    {
        path: 'register',
        component: Register,
        data: { title: 'Register' }
    }
];
Run and Test The Authentication of The Spring Boot, Security, MongoDB, and Angular Web Application
Before running the Spring Boot RESTful API, make sure the MongoDB server is running by typing this command in another terminal or command line tab.
mongodIn the different tab, run the Spring Boot REST API using this command.
gradle bootRunOpen a new terminal tab, then go to the client folder, and then run the Angular application.
ng serveNext, open the browser, then go to `http://localhost:4200` and you should see the login page because the landing page that points to the products page will redirect to the login if not logged in.


Conclusion
With the latest Spring Boot 3.5.0 and Angular 20, you’ve built a secure and scalable authentication system using JWT and MongoDB. By leveraging Spring Security’s new approach SecurityFilterChain and enhancing the frontend with Angular’s HttpInterceptor and route guards, you’ve modernized your full-stack application. You can now expand this setup with role-based access, refresh tokens, and protected API integrations to support production-ready use cases.
You can find the full source code on our GitHub.
If you don’t want to waste your time designing your front-end or your budget to spend by hiring a web designer, then Angular Templates is the best place to go. So, speed up your front-end web development with premium Angular templates. Choose your template for your front-end project here.
That's just the basics. If you need more deep learning about Spring Boot, you can take the following cheap course:
- [NEW] Spring Boot 3, Spring 6 & Hibernate for Beginners
- Java Spring Framework 6, Spring Boot 3, Spring AI Telusko
- [NEW] Master Microservices with SpringBoot,Docker,Kubernetes
- Spring Boot Microservices Professional eCommerce Masterclass
- Java Spring Boot: Professional eCommerce Project Masterclass
- Master Backend Development using Java & Spring Boot
- Spring Boot REST APIs: Building Modern APIs with Spring Boot
- [NEW] Spring Boot 3, Spring Framework 6: Beginner to Guru
- Spring 6 & Spring Boot 3: AI, Security, Docker, Cloud
- From Java Dev to AI Engineer: Spring AI Fast Track
Thanks!