
In this tutorial, you will learn how to build a simple yet powerful real-time chat application using Java WebSocket API and Spring Boot. Unlike traditional HTTP communication, WebSocket allows full-duplex communication between the client and server, making it ideal for chat systems, multiplayer games, or live notifications.
We’ll use Spring Boot for rapid application setup and dependency management, and leverage the Java WebSocket API provided by Spring to create a lightweight, scalable messaging backend. On the frontend, a basic HTML + JavaScript interface will connect to the WebSocket endpoint to send and receive messages in real-time.
By the end of this tutorial, you'll have a working chat application that demonstrates:
-
Setting up a Spring Boot project with WebSocket support
-
Handling WebSocket connections and message broadcasting
-
Building a minimal web-based chat UI with JavaScript
Let’s get started!
Step 1: Project Setup
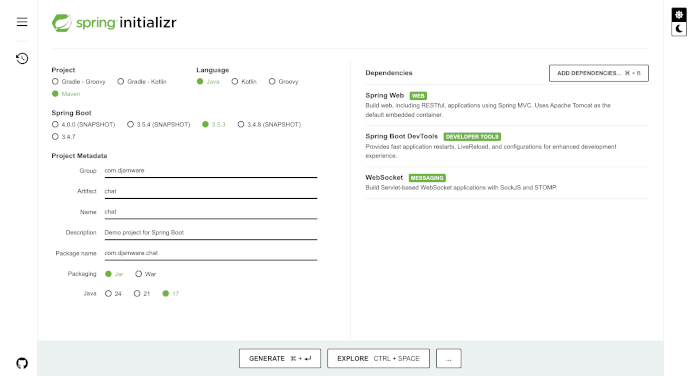
1. Create a Spring Boot project (you can use Spring Initializr):
-
Project: Maven
-
Language: Java
-
Spring Boot: 3.x
-
Dependencies:
-
Spring Web
-
Spring Boot DevTools
-
WebSocket
-
2. Project Structure
Once generated and opened in your IDE, your basic structure will look like this:
src/
├── main/
│   ├── java/
│   │   └── com.djamware.chat/
│   │       ├── ChatApplication.java
│   └── resources/
│       ├── application.properties
│       └── static/
│           └── index.html
Step 2: Configure WebSocket
Create a configuration class to enable WebSocket support after creating a new one config package.
package com.djamware.chat.config;

import org.springframework.web.socket.config.annotation.WebSocketConfigurer;
import org.springframework.web.socket.config.annotation.WebSocketHandlerRegistry;

import com.djamware.chat.handler.ChatWebSocketHandler;

public class WebSocketConfig implements WebSocketConfigurer {

    @Override
    public void registerWebSocketHandlers(WebSocketHandlerRegistry registry) {
        registry.addHandler(new ChatWebSocketHandler(), "/chat")
                .setAllowedOrigins("*");
    }
}
Then add the handler class after creating a new one handler package:
package com.djamware.chat.handler;

import java.util.ArrayList;
import java.util.List;

import org.springframework.web.socket.CloseStatus;
import org.springframework.web.socket.TextMessage;
import org.springframework.web.socket.WebSocketSession;
import org.springframework.web.socket.handler.TextWebSocketHandler;

public class ChatWebSocketHandler extends TextWebSocketHandler {

    private final List<WebSocketSession> sessions = new ArrayList<>();

    @Override
    public void afterConnectionEstablished(WebSocketSession session) throws Exception {
        sessions.add(session);
    }

    @Override
    protected void handleTextMessage(WebSocketSession session, TextMessage message) throws Exception {
        for (WebSocketSession s : sessions) {
            if (s.isOpen()) {
                s.sendMessage(message);
            }
        }
    }

    @Override
    public void afterConnectionClosed(WebSocketSession session, CloseStatus status) throws Exception {
        sessions.remove(session);
    }
}
Step 3: Create a Simple Chat Frontend (HTML + JavaScript)
We'll now build a basic UI to interact with our WebSocket backend. This simple chat page will:
-
Connect to the WebSocket server
-
Send messages from the user
-
Display incoming messages in real time
📝 src/main/resources/static/index.html
<!DOCTYPE html>
<html lang="en">
<head>
  <meta charset="UTF-8">
  <title>Realtime Chat App</title>
  <style>
    body { font-family: Arial, sans-serif; margin: 40px; }
    #chat { border: 1px solid #ccc; height: 300px; overflow-y: scroll; padding: 10px; }
    #message { width: 80%; padding: 10px; }
    #send { padding: 10px 20px; }
  </style>
</head>
<body>
  <h2>Realtime Chat</h2>
  <div id="chat"></div>
  <input type="text" id="message" placeholder="Type your message..." />
  <button id="send">Send</button>

  <script>
    const chatBox = document.getElementById('chat');
    const messageInput = document.getElementById('message');
    const sendBtn = document.getElementById('send');

    const socket = new WebSocket(`ws://${window.location.host}/chat`);

    socket.onmessage = (event) => {
      const msg = document.createElement('div');
      msg.textContent = event.data;
      chatBox.appendChild(msg);
      chatBox.scrollTop = chatBox.scrollHeight;
    };

    sendBtn.onclick = () => {
      const msg = messageInput.value.trim();
      if (msg) {
        socket.send(msg);
        messageInput.value = '';
      }
    };

    messageInput.addEventListener('keypress', (e) => {
      if (e.key === 'Enter') sendBtn.click();
    });
  </script>
</body>
</html>
This basic UI connects to the WebSocket /chat endpoint, enabling real-time messaging between all connected clients.
Step 4: Run and Test the Realtime Chat App
Now that we’ve built both the backend and frontend, it’s time to run the application and test it in action.
✅ 1. Run the Spring Boot App
In your terminal or IDE, run the main application:
./mvnw spring-boot:runOr if you're using an IDE like IntelliJ or Eclipse, run the ChatApplication.java file directly.
Once the app starts, you should see something like this in the console:
Tomcat started on port(s): 8080 (http) with context path ''
Started ChatApplication in X.XXX seconds
🌐 2. Open the Chat Page
Navigate to:
http://localhost:8080/You’ll see your chat UI. To test real-time communication:
-
Open the page in two or more browser tabs or different browsers.
-
Type a message in one tab and hit Send.
-
The message will appear in all open tabs instantly!
That’s the power of WebSocket—bidirectional, persistent communication with minimal overhead.
Optional: Test with WebSocket Client Tool
You can also test your WebSocket server using tools like:
-
WebSocket Echo Test
-
Browser DevTools → Console →
new WebSocket('ws://localhost:8080/chat')
Step 5: Conclusion and Optional Enhancements
✅ What We’ve Built
In this tutorial, you created a real-time chat application using Java WebSocket API and Spring Boot, backed by a lightweight frontend built with plain HTML and JavaScript. You learned how to:
-
Set up a Spring Boot project with WebSocket support
-
Implement a WebSocket handler to manage connections and broadcast messages
-
Create a simple frontend to send and receive real-time messages
This architecture can easily be extended to support more complex features such as:
🚀 Optional Enhancements
Here are some ideas to expand the project further:
-
Usernames: Add user identification with login and display names
-
Private Messaging: Implement logic for 1:1 direct messages using session management
-
Chat Rooms: Group users into different channels or rooms
-
Storing Messages: Save chat history in a database (e.g., PostgreSQL, MongoDB)
-
WebSocket Security: Add authentication using JWT and secure WebSocket endpoints
-
Frontend Frameworks: Upgrade the UI using React, Vue, or Angular
You can find the full source code on GitHub.
That's just the basics. If you need more deep learning about Spring Boot, you can take the following cheap course:
- [NEW] Spring Boot 3, Spring 6 & Hibernate for Beginners
- Java Spring Framework 6, Spring Boot 3, Spring AI Telusko
- [NEW] Master Microservices with SpringBoot,Docker,Kubernetes
- Spring Boot Microservices Professional eCommerce Masterclass
- Java Spring Boot: Professional eCommerce Project Masterclass
- Master Backend Development using Java & Spring Boot
- Spring Boot REST APIs: Building Modern APIs with Spring Boot
- [NEW] Spring Boot 3, Spring Framework 6: Beginner to Guru
- Spring 6 & Spring Boot 3: AI, Security, Docker, Cloud
- From Java Dev to AI Engineer: Spring AI Fast Track
Thanks!