
In this tutorial, you will learn how to build a modern full-stack web application using the latest versions of Angular 20, Node.js, Express, GraphQL, and MongoDB. We'll create a simple but fully functional CRUD (Create, Read, Update, Delete) app to manage a collection of books.
This updated stack leverages the power of:
-
Angular 20 with modern features like standalone components and improved change detection,
-
Apollo Client for GraphQL integration in Angular,
-
Node.js (v20+) and Express (v4.18+) for a scalable backend,
-
Apollo Server to handle GraphQL queries and mutations,
-
MongoDB with Mongoose for seamless database interactions.
Whether you're new to GraphQL or upgrading from older versions of Angular and Node, this guide will walk you through building and connecting both the backend and frontend from scratch.
Backend Setup: Node.js, Express, GraphQL, and MongoDB
Let’s start by creating the backend server using the latest versions of Node.js, Express, GraphQL, and MongoDB. This backend will expose a GraphQL API for managing a collection of books.
📁 Step 1: Initialize the Project
Create a new project folder and initialize a Node.js project:
mkdir graphql-crud
cd graphql-crud
mkdir server
cd server
npm init -y
📦 Step 2: Install Dependencies
Install the required dependencies for Express, Apollo Server, GraphQL, and MongoDB:
npm install express graphql @apollo/server mongoose cors @as-integrations/express5 graphql-tag
npm install nodemon --save-dev --legacy-peer-deps
To use ES Modules, add the following to your package.json:
"type": "module"🏗️ Step 3: Project Structure
Create the following folder structure:
server/
├── models/
│   └── Book.js
├── schema/
│   └── schema.js
├── index.js
Define the Book Model (Mongoose)
Create the Mongoose schema for your book data.
models/Book.js
import mongoose from 'mongoose';

const bookSchema = new mongoose.Schema({
  title: String,
  author: String,
  pages: Number
});

export default mongoose.model('Book', bookSchema);
Define the GraphQL Schema and Resolvers
Set up the GraphQL type definitions and resolvers in a separate file.
schema/schema.js
import Book from '../models/Book.js';
import { gql } from 'graphql-tag';

export const typeDefs = gql`
  type Book {
    id: ID!
    title: String
    author: String
    pages: Int
  }

  type Query {
    books: [Book]
    book(id: ID!): Book
  }

  type Mutation {
    addBook(title: String!, author: String!, pages: Int!): Book
    deleteBook(id: ID!): Book
  }
`;

export const resolvers = {
  Query: {
    books: () => Book.find(),
    book: (_, { id }) => Book.findById(id)
  },
  Mutation: {
    addBook: (_, { title, author, pages }) =>
      Book.create({ title, author, pages }),
    deleteBook: (_, { id }) => Book.findByIdAndDelete(id)
  }
};
Create the Express + Apollo Server
Now, create the main server file and integrate Express with Apollo Server.
index.js
import express from 'express';
import mongoose from 'mongoose';
import cors from 'cors';
import { ApolloServer } from '@apollo/server';
import { expressMiddleware } from '@as-integrations/express5';
import { typeDefs, resolvers } from './schema/schema.js';
import pkg from 'body-parser';
const { json } = pkg;

const app = express();
const PORT = process.env.PORT || 4000;

// Connect to MongoDB
await mongoose.connect('mongodb://localhost:27017/books', {
  useNewUrlParser: true,
  useUnifiedTopology: true
});
console.log('✅ Connected to MongoDB');

// Create Apollo Server
const server = new ApolloServer({
  typeDefs,
  resolvers
});
await server.start();

// Middleware
app.use(cors());
app.use(json()); // bodyParser is now built-in in modern Express
app.use('/graphql', expressMiddleware(server, {
  context: async ({ req }) => ({ token: req.headers.authorization })
}));

app.listen(PORT, () => {
  console.log(`🚀 Server ready at http://localhost:${PORT}/graphql`);
});
Test Your Backend
Run the server:
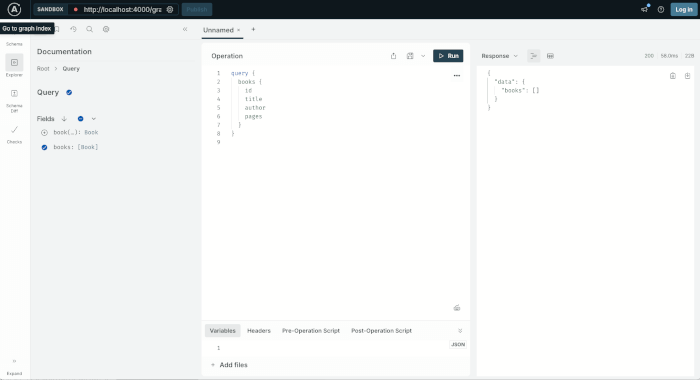
nodemon index.jsVisit http://localhost:4000/graphql and try the following GraphQL query:
query {
  books {
    id
    title
    author
    pages
  }
}
Angular 20 Frontend Setup with Apollo Client Integration
In this section, we’ll set up the frontend using Angular 20 and integrate it with the GraphQL backend using Apollo Angular.
✅ Step 1: Create a New Angular 20 App
Use Angular CLI to generate a new app:
cd ..
ng new client --routing --style=css
Choose "No" for standalone components if prompted (we’ll structure it manually).
Navigate into the project folder:
cd graphql-crud-client✅ Step 2: Install Apollo Angular and GraphQL Packages
Install all required GraphQL and Apollo packages:
npm install @apollo/client graphql apollo-angular✅ Step 3: Set Up Apollo Client in AppConfig
Edit src/app/app.config.ts:
import { ApplicationConfig, provideBrowserGlobalErrorListeners, provideZoneChangeDetection } from '@angular/core';
import { provideRouter } from '@angular/router';
import { APOLLO_OPTIONS } from 'apollo-angular';
import { routes } from './app.routes';
import { InMemoryCache } from '@apollo/client';
import { HttpLink } from 'apollo-angular/http';

export const appConfig: ApplicationConfig = {
  providers: [
    provideBrowserGlobalErrorListeners(),
    provideZoneChangeDetection({ eventCoalescing: true }),
    provideRouter(routes),
    {
      provide: APOLLO_OPTIONS,
      useFactory: (httpLink: HttpLink) => ({
        cache: new InMemoryCache(),
        link: httpLink.create({
          uri: 'http://localhost:4000/graphql',
        }),
      }),
      deps: [HttpLink],
    },
  ]
};
✅ Step 4: Create a Book Service
Generate a service:
ng generate service services/bookThen edit src/app/services/book.ts:
import { Injectable } from '@angular/core';
import { Apollo, gql } from 'apollo-angular';
import { Observable } from 'rxjs';

const GET_BOOKS = gql`
  query {
    books {
      id
      title
      author
      pages
    }
  }
`;

@Injectable({
  providedIn: 'root'
})
export class Book {
  constructor(private apollo: Apollo) { }

  getBooks(): Observable<any> {
    return this.apollo.watchQuery({ query: GET_BOOKS }).valueChanges;
  }
}
✅ Step 5: Display Books in a Component
Generate the component:
ng generate component components/book-listEdit src/app/components/book-list/book-list.ts:
import { Component, OnInit } from '@angular/core';
import { Book } from '../../services/book';
import { CommonModule } from '@angular/common';

@Component({
  selector: 'app-book-list',
  imports: [CommonModule],
  templateUrl: './book-list.html',
  styleUrl: './book-list.css'
})
export class BookList implements OnInit {
  books: any[] = [];

  constructor(private bookService: Book) { }

  ngOnInit(): void {
    this.bookService.getBooks().subscribe((result: any) => {
      this.books = result.data.books;
    });
  }
}
Then create the template book-list.html:
<h2>Book List</h2>
<ul>
  <li *ngFor="let book of books">
    <strong>{{ book.title }}</strong> by {{ book.author }} ({{
      book.pages
    }}
    pages)
  </li>
</ul>
✅ Step 6: Use the BookListComponent in AppComponent
Update src/app/app.html:
<app-book-list></app-book-list>Update src/app/app.ts:
import { Component, signal } from '@angular/core';
import { BookList } from "./components/book-list/book-list";

@Component({
  selector: 'app-root',
  imports: [BookList],
  templateUrl: './app.html',
  styleUrl: './app.css'
})
export class App {
  protected readonly title = signal('client');
}
✅ You now have a functional Angular 20 frontend integrated with Apollo Client that fetches books from your GraphQL backend!
Add and Delete Book Mutations with Apollo Angular
We’ll build forms and buttons to:
-
Add a new book
-
Delete a book from the list
✅ Step 1: Update the BookService with Mutations
Open src/app/services/book.ts and update it with ADD_BOOK and DELETE_BOOK GraphQL mutations.
import { Injectable } from '@angular/core';
import { Apollo, gql } from 'apollo-angular';
import { Observable } from 'rxjs';

const GET_BOOKS = gql`
  query {
    books {
      id
      title
      author
      pages
    }
  }
`;

const ADD_BOOK = gql`
  mutation AddBook($title: String!, $author: String!, $pages: Int!) {
    addBook(title: $title, author: $author, pages: $pages) {
      id
      title
      author
      pages
    }
  }
`;

const DELETE_BOOK = gql`
  mutation DeleteBook($id: ID!) {
    deleteBook(id: $id) {
      id
    }
  }
`;

@Injectable({
  providedIn: 'root'
})
export class Book {
  constructor(private apollo: Apollo) { }

  getBooks(): Observable<any> {
    return this.apollo.watchQuery({ query: GET_BOOKS }).valueChanges;
  }

  addBook(title: string, author: string, pages: number): Observable<any> {
    return this.apollo.mutate({
      mutation: ADD_BOOK,
      variables: { title, author, pages },
      refetchQueries: [{ query: GET_BOOKS }],
    });
  }

  deleteBook(id: string): Observable<any> {
    return this.apollo.mutate({
      mutation: DELETE_BOOK,
      variables: { id },
      refetchQueries: [{ query: GET_BOOKS }],
    });
  }
}
✅ Step 2: Add Form and Delete Buttons in BookListComponent
Open src/app/components/book-list/book-list.ts:
import { Component, OnInit } from '@angular/core';
import { Book } from '../../services/book';
import { CommonModule } from '@angular/common';
import { FormsModule } from '@angular/forms';

@Component({
  selector: 'app-book-list',
  imports: [CommonModule, FormsModule],
  templateUrl: './book-list.html',
  styleUrl: './book-list.css'
})
export class BookList implements OnInit {
  books: any[] = [];

  // Form input bindings
  title = '';
  author = '';
  pages: number | null = null;

  constructor(private bookService: Book) { }

  ngOnInit(): void {
    this.loadBooks();
  }

  loadBooks(): void {
    this.bookService.getBooks().subscribe((result: any) => {
      this.books = result.data.books;
    });
  }

  addBook(): void {
    if (!this.title || !this.author || this.pages === null) return;
    this.bookService.addBook(this.title, this.author, this.pages).subscribe(() => {
      this.title = '';
      this.author = '';
      this.pages = null;
    });
  }

  deleteBook(id: string): void {
    this.bookService.deleteBook(id).subscribe();
  }
}
Now update the component's HTML: book-list.html
<h2>📚 Book List</h2>

<ul>
  <li *ngFor="let book of books">
    <strong>{{ book.title }}</strong> by {{ book.author }} ({{
      book.pages
    }}
    pages)
    <button (click)="deleteBook(book.id)">❌ Delete</button>
  </li>
</ul>

<h3>Add New Book</h3>
<form (ngSubmit)="addBook()">
  <label
    >Title:
    <input type="text" [(ngModel)]="title" name="title" required /> </label
  ><br />
  <label
    >Author:
    <input type="text" [(ngModel)]="author" name="author" required /> </label
  ><br />
  <label
    >Pages:
    <input type="number" [(ngModel)]="pages" name="pages" required /> </label
  ><br />
  <button type="submit">➕ Add Book</button>
</form>
✅ You Can Now:
-
See the list of books loaded from GraphQL
-
Add new books via the form
-
Delete books via the delete button
Angular 20 Routing & Component Splitting
Well:
-
Set up routing
-
Split the list and form into separate components
-
Create navigation between them
✅ Step 1: Enable Routing in app.routes.ts
Define routes in app.routes.ts:
import { Routes } from '@angular/router';
import { BookList } from './components/book-list/book-list';
import { BookAdd } from './components/book-add/book-add';

const routes: Routes = [
  { path: '', redirectTo: '/books', pathMatch: 'full' },
  { path: 'books', component: BookList },
  { path: 'add-book', component: BookAdd },
];
✅ Step 2: Create BookAddComponent
Split the form into a new component:
ng generate component components/book-addThen put this in book-add.ts:
import { Component } from '@angular/core';
import { Book } from '../../services/book';
import { Router } from '@angular/router';
import { FormsModule } from '@angular/forms';

@Component({
  selector: 'app-book-add',
  imports: [FormsModule],
  templateUrl: './book-add.html',
  styleUrl: './book-add.css'
})
export class BookAdd {
  title = '';
  author = '';
  pages: number | null = null;

  constructor(private bookService: Book, private router: Router) { }

  addBook(): void {
    if (!this.title || !this.author || this.pages === null) return;
    this.bookService.addBook(this.title, this.author, this.pages).subscribe(() => {
      this.router.navigate(['/books']);
    });
  }
}
And in book-add.html:
<h2>➕ Add New Book</h2>
<form (ngSubmit)="addBook()">
  <label
    >Title:
    <input type="text" [(ngModel)]="title" name="title" required /> </label
  ><br />
  <label
    >Author:
    <input type="text" [(ngModel)]="author" name="author" required /> </label
  ><br />
  <label
    >Pages:
    <input type="number" [(ngModel)]="pages" name="pages" required /> </label
  ><br />
  <button type="submit">Add Book</button>
</form>
✅ Step 3: Update BookListComponent with Link to Add Book
Modify book-list.html:
<h2>📚 Book List</h2>

<a routerLink="/add-book">➕ Add New Book</a>

<ul>
  <li *ngFor="let book of books">
    <strong>{{ book.title }}</strong> by {{ book.author }} ({{ book.pages }} pages)
    <button (click)="deleteBook(book.id)">❌ Delete</button>
  </li>
</ul>
✅ Step 4: Add <router-outlet> in App Component
In app.html, replace everything with:
<h1>📖 Angular 20 GraphQL Book Manager</h1>
<nav>
  <a routerLink="/books" routerLinkActive="active">📚 Book List</a> |
  <a routerLink="/add-book" routerLinkActive="active">➕ Add Book</a>
</nav>
<hr />
<router-outlet></router-outlet>
✅ Styling (Optional)
You can add simple CSS in styles.css:
nav a {
  margin-right: 10px;
  text-decoration: none;
}
nav a.active {
  font-weight: bold;
  color: #007acc;
} /* You can add global styles to this file, and also import other style files */
🎉 Result
-
/books: Shows the book list with delete buttons -
/add-book: Add a new book via form -
Navigation between routes using Angular Router
Conclusion
In this tutorial, we built a full-stack CRUD web application using the latest versions of Node.js, Express, Angular 20, Apollo Server, and MongoDB with GraphQL. We covered:
-
Setting up a Node.js + Express backend with
@apollo/serverand Mongoose -
Defining GraphQL schemas, queries, and mutations
-
Building a modern Angular 20 frontend with
apollo-angular -
Performing GraphQL queries and mutations to fetch, add, and delete data
-
Integrating routing and component-based architecture using Angular Router
This stack offers a clean and scalable architecture for modern applications with real-time GraphQL communication between frontend and backend.
You can continue expanding this project by adding:
-
Authentication with JWT
-
Update (edit) functionality
-
Pagination and filtering
-
Error handling and form validation
-
GraphQL subscriptions for real-time updates
You can get the full source code on our GitHub.
If you don’t want to waste your time designing your front-end or your budget to spend by hiring a web designer, then Angular Templates is the best place to go. So, speed up your front-end web development with premium Angular templates. Choose your template for your front-end project here.
That's just the basics. If you need more deep learning about Angular, you can take the following cheap course:
- Angular Crash Course - Learn Angular And Google Firebase
- Real-time Communication using Socket. IO 3.x and Angular 11.x
- Angular Progressive Web Apps (PWA) MasterClass & FREE E-Book
- Enterprise-Scale Web Apps with Angular
- Angular Forms In Depth (Angular 20)
- Microservicios Spring Boot y Angular MySql Postgres
-
Angular Developer Interview Questions Practice Test Quiz
Thanks!