
With help of Netbeans, web development getting easier. In this how to create Java web application using Netbeans 8.2, we will cover all step by step tutorial from creating the new project to run the web application on the browser. If you need more advance tutorial you can skip this tutorial and head to Spring Boot, MVC, Data and MongoDB CRUD Java Web Application tutorial.
1. Create New Java Web Application Project
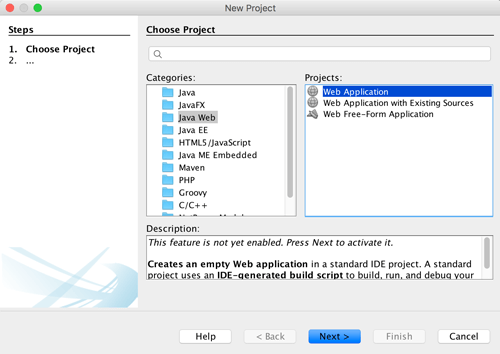
To create new Java web application project simply open your Netbeans 8.2 IDE then open File -> New Project. Then choose Java Web in Categories column and Web Application in Projects column. Then click next.
Give a name your project, mine is "SimpleWebApp". Leave another field as default. Then click next.

Leave default for all fields in Server and Settings then click next.

In the framework, choose Spring Web MVC and leave default in spring library then click finish.
This creates new java web application wizard generated src folder and web folder which contains core element for building java web application.
2. Simple Spring Web MVC
Now, I will explain a little bit about generated element when creating new java web application. First, open web.xml file, this file contains below code.
<?xml version="1.0" encoding="UTF-8"?>
<web-app version="3.1" xmlns="http://xmlns.jcp.org/xml/ns/javaee" xmlns:xsi="http://www.w3.org/2001/XMLSchema-instance" xsi:schemaLocation="http://xmlns.jcp.org/xml/ns/javaee http://xmlns.jcp.org/xml/ns/javaee/web-app_3_1.xsd">
    <context-param>
        <param-name>contextConfigLocation</param-name>
        <param-value>/WEB-INF/applicationContext.xml</param-value>
    </context-param>
    <listener>
        <listener-class>org.springframework.web.context.ContextLoaderListener</listener-class>
    </listener>
    <servlet>
        <servlet-name>dispatcher</servlet-name>
        <servlet-class>org.springframework.web.servlet.DispatcherServlet</servlet-class>
        <load-on-startup>2</load-on-startup>
    </servlet>
    <servlet-mapping>
        <servlet-name>dispatcher</servlet-name>
        <url-pattern>*.htm</url-pattern>
    </servlet-mapping>
    <session-config>
        <session-timeout>
            30
        </session-timeout>
    </session-config>
    <welcome-file-list>
        <welcome-file>redirect.jsp</welcome-file>
    </welcome-file-list>
</web-app>
This web.xml is the core of java web application which defines deployment descriptor element. There's are a lot of components that used in this web.xml, but here we just use context-params, listener, servlet, servlet-mapping, session-config, and welcome-file-list. Those tags are enough for running simple java web application that uses spring web MVC framework (we will not cover Spring Web MVC right now).
Landing page describes in welcome-file-list which this file point to redirect.jsp file contains this codes.
<%--
Views should be stored under the WEB-INF folder so that
they are not accessible except through controller process.

This JSP is here to provide a redirect to the dispatcher
servlet but should be the only JSP outside of WEB-INF.
--%>
<%@page contentType="text/html" pageEncoding="UTF-8"%>
<% response.sendRedirect("index.htm"); %>
This file just redirect request from root web application to index.html, but actually it's redirect to controller which have default page index.jsp. You can see this in dispatcher servlet.
<?xml version='1.0' encoding='UTF-8' ?>
<!-- was: <?xml version="1.0" encoding="UTF-8"?> -->
<beans xmlns="http://www.springframework.org/schema/beans"
       xmlns:xsi="http://www.w3.org/2001/XMLSchema-instance"
       xmlns:p="http://www.springframework.org/schema/p"
       xmlns:aop="http://www.springframework.org/schema/aop"
       xmlns:tx="http://www.springframework.org/schema/tx"
       xsi:schemaLocation="http://www.springframework.org/schema/beans http://www.springframework.org/schema/beans/spring-beans-4.0.xsd
       http://www.springframework.org/schema/aop http://www.springframework.org/schema/aop/spring-aop-4.0.xsd
       http://www.springframework.org/schema/tx http://www.springframework.org/schema/tx/spring-tx-4.0.xsd">

    <bean class="org.springframework.web.servlet.mvc.support.ControllerClassNameHandlerMapping"/>

    <!--
    Most controllers will use the ControllerClassNameHandlerMapping above, but
    for the index controller we are using ParameterizableViewController, so we must
    define an explicit mapping for it.
    -->
    <bean id="urlMapping" class="org.springframework.web.servlet.handler.SimpleUrlHandlerMapping">
        <property name="mappings">
            <props>
                <prop key="index.htm">indexController</prop>
            </props>
        </property>
    </bean>

    <bean id="viewResolver"
          class="org.springframework.web.servlet.view.InternalResourceViewResolver"
          p:prefix="/WEB-INF/jsp/"
          p:suffix=".jsp" />

    <!--
    The index controller.
    -->
    <bean name="indexController"
          class="org.springframework.web.servlet.mvc.ParameterizableViewController"
          p:viewName="index" />

</beans>
And this is the content of index.jsp.
<%@page contentType="text/html" pageEncoding="UTF-8"%>
<!DOCTYPE HTML PUBLIC "-//W3C//DTD HTML 4.01 Transitional//EN"
    "http://www.w3.org/TR/html4/loose.dtd">

<html>
    <head>
        <meta http-equiv="Content-Type" content="text/html; charset=UTF-8">
        <title>Welcome to Spring Web MVC project</title>
    </head>

    <body>
        <p>Hello! This is the default welcome page for a Spring Web MVC project.</p>
        <p><i>To display a different welcome page for this project, modify</i>
            <tt>index.jsp</tt> <i>, or create your own welcome page then change
                the redirection in</i> <tt>redirect.jsp</tt> <i>to point to the new
                welcome page and also update the welcome-file setting in</i>
            <tt>web.xml</tt>.</p>
    </body>
</html>
Now, just run your app by choose menu Run -> Run Project or simply click F6 button. It will take long because it's starting Glassfish and Java DB. Now, your web page will look like this.

That it's the very simple web application with Java and Netbeans 8.2.
Thanks.