A search bar is one of the most common and useful features on any website or web application. From filtering product lists in e-commerce stores to quickly finding relevant articles in blogs, a well-implemented search bar helps users save time and improves overall user experience.
In this tutorial, we’ll walk through how to build a dynamic search bar with JavaScript step by step. You’ll learn not only how to create a functional search box but also how to make it update results in real time as users type — without needing to reload the page.
By the end of this guide, you’ll be able to:
-
Create a simple, responsive search bar with HTML and CSS.
-
Use JavaScript to capture user input and filter data dynamically.
-
Implement a real-time search that updates results instantly.
-
Enhance your search bar with features like highlighting matches and handling edge cases.
Whether you’re building a small personal project or adding search functionality to a larger web app, this tutorial will give you the foundation to create a smooth and user-friendly search experience.
1. Setting Up the HTML Structure
We’ll begin with a simple HTML layout that includes:
-
A search input field.
-
A list of items that users can search through.
<!DOCTYPE html>
<html lang="en">
<head>
  <meta charset="UTF-8">
  <meta name="viewport" content="width=device-width, initial-scale=1.0">
  <title>Dynamic Search Bar</title>
  <link rel="stylesheet" href="style.css">
</head>
<body>
  <div class="container">
    <h1>Dynamic Search Bar with JavaScript</h1>
    <input
      type="text"
      id="searchInput"
      placeholder="Search items..."
    />
    <ul id="itemList">
      <li>Apple</li>
      <li>Banana</li>
      <li>Orange</li>
      <li>Mango</li>
      <li>Pineapple</li>
      <li>Grapes</li>
      <li>Strawberry</li>
    </ul>
  </div>
  <script src="script.js"></script>
</body>
</html>
Here’s what’s happening:
-
The
<input>field will capture the user’s search query. -
The
<ul>list contains items that we’ll filter dynamically with JavaScript.
2. Styling the Search Bar with CSS
We’ll add some basic styling in a style.css file to make the search bar stand out and the list more readable.
/* Reset some default styles */
* {
  margin: 0;
  padding: 0;
  box-sizing: border-box;
  font-family: Arial, sans-serif;
}

body {
  background: #f4f6f9;
  display: flex;
  justify-content: center;
  align-items: center;
  min-height: 100vh;
}

.container {
  background: #fff;
  padding: 2rem;
  border-radius: 12px;
  box-shadow: 0 4px 12px rgba(0, 0, 0, 0.1);
  width: 400px;
}

h1 {
  font-size: 1.5rem;
  margin-bottom: 1rem;
  text-align: center;
  color: #333;
}

#searchInput {
  width: 100%;
  padding: 0.75rem 1rem;
  margin-bottom: 1.5rem;
  border: 1px solid #ddd;
  border-radius: 8px;
  font-size: 1rem;
  outline: none;
  transition: border-color 0.3s ease;
}

#searchInput:focus {
  border-color: #0077ff;
}

#itemList {
  list-style: none;
}

#itemList li {
  padding: 0.75rem 1rem;
  border-bottom: 1px solid #eee;
  cursor: pointer;
  transition: background 0.2s;
}

#itemList li:hover {
  background: #f0f8ff;
}
✨ With this CSS:
-
The search bar looks clean with rounded corners.
-
The list items are neatly separated and highlighted when hovered.
-
The container is centered, featuring a card-like appearance.
3. Adding JavaScript to Filter the List Dynamically
We’ll write a script that listens for user input and filters the list items in real time.
Create a script.js file and add the following code:
// Get references to the input field and list
const searchInput = document.getElementById('searchInput');
const itemList = document.getElementById('itemList');
const items = itemList.getElementsByTagName('li');

// Add event listener for input
searchInput.addEventListener('keyup', function() {
  const filter = searchInput.value.toLowerCase();

  // Loop through list items
  for (let i = 0; i < items.length; i++) {
    const itemText = items[i].textContent.toLowerCase();

    // Check if input matches item text
    if (itemText.indexOf(filter) > -1) {
      items[i].style.display = '';
    } else {
      items[i].style.display = 'none';
    }
  }
});
How it works:
-
We grab the search input field and list items.
-
On every key press (
keyup), we capture the input and convert it to lowercase. -
We loop through each
<li>item:-
If it contains the typed text → show it.
-
If not → hide it.
-

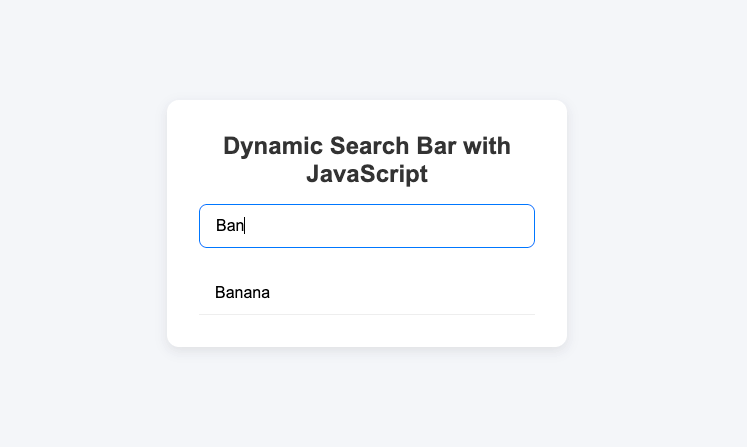
✅ Now, when you type into the search bar, the list will update instantly without refreshing the page.
4. Enhancing the Search (Highlight Matches + No Results Message)
Currently, our search function works, but it feels basic. Let’s improve it with two features:
-
Highlight matched text inside the list items.
-
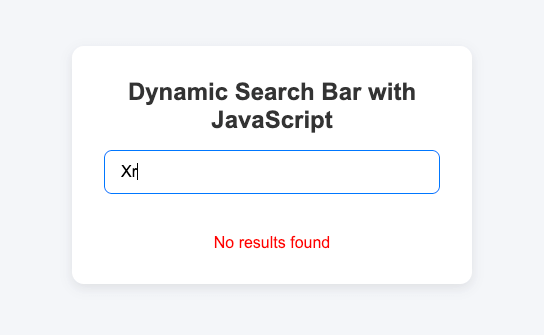
Show a “No results found” message when nothing matches.
Update your index.html by adding a placeholder for the message:
<p id="noResults" style="display: none; color: red; text-align: center; margin-top: 1rem;">
  No results found
</p>
Now, update script.js:
const searchInput = document.getElementById('searchInput');
const itemList = document.getElementById('itemList');
const items = itemList.getElementsByTagName('li');
const noResults = document.getElementById('noResults');

searchInput.addEventListener('keyup', function() {
  const filter = searchInput.value.toLowerCase();
  let found = false;

  for (let i = 0; i < items.length; i++) {
    const itemText = items[i].textContent.toLowerCase();

    if (itemText.indexOf(filter) > -1 && filter !== "") {
      items[i].style.display = "";
      found = true;

      // Highlight matched text
      const regex = new RegExp(`(${filter})`, 'gi');
      items[i].innerHTML = items[i].textContent.replace(
        regex,
        "<span class='highlight'>$1</span>"
      );
    } else if (filter === "") {
      items[i].style.display = "";
      items[i].innerHTML = items[i].textContent; // reset
    } else {
      items[i].style.display = "none";
    }
  }

  // Toggle "No results" message
  noResults.style.display = found || filter === "" ? "none" : "block";
});
And add a style for highlights in style.css:
.highlight {
  background: yellow;
  font-weight: bold;
}
Now the improvements:
-
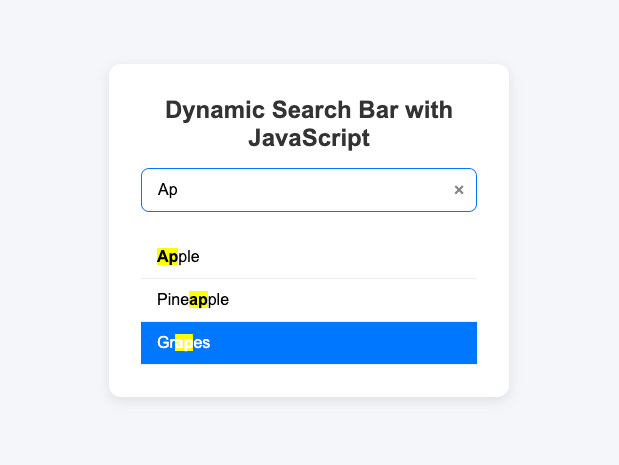
Matching text is highlighted for better visibility.
-
If nothing matches, a clear red “No results found” message appears.
-
Reset behavior ensures the highlight disappears when the search input is cleared.

5. Making the Search Case-Insensitive and More Flexible
Our search already works in a case-insensitive way (thanks to .toLowerCase()), but we can improve it further:
-
Trim extra spaces so
" apple "works the same as"apple". -
Allow partial matches across words, so
"pine app"still finds"Pineapple". -
Preserve highlighting properly when filtering.
Update your script.js like this:
const searchInput = document.getElementById('searchInput');
const itemList = document.getElementById('itemList');
const items = itemList.getElementsByTagName('li');
const noResults = document.getElementById('noResults');

searchInput.addEventListener('keyup', function() {
  // Normalize input: trim spaces + lowercase
  const filter = searchInput.value.trim().toLowerCase();
  let found = false;

  for (let i = 0; i < items.length; i++) {
    const itemText = items[i].textContent.toLowerCase();

    // Check flexible matching: all words in input must exist in item text
    const terms = filter.split(/\s+/); // split by spaces
    const matches = terms.every(term => itemText.includes(term));

    if (matches && filter !== "") {
      items[i].style.display = "";
      found = true;

      // Highlight all matched terms
      let highlightedText = items[i].textContent;
      terms.forEach(term => {
        if (term) {
          const regex = new RegExp(`(${term})`, "gi");
          highlightedText = highlightedText.replace(
            regex,
            "<span class='highlight'>$1</span>"
          );
        }
      });
      items[i].innerHTML = highlightedText;
    } else if (filter === "") {
      items[i].style.display = "";
      items[i].innerHTML = items[i].textContent; // reset
    } else {
      items[i].style.display = "none";
    }
  }

  // Toggle "No results" message
  noResults.style.display = found || filter === "" ? "none" : "block";
});
Improvements in this version:
-
Trims spaces: accidental spaces won’t break search.
-
Multi-word partial search: typing
"app man"will show both"Apple"and"Mango". -
Highlights multiple words correctly.
6. Adding Extra UX Features (Clear Button & Keyboard Navigation)
To make our search bar even more user-friendly, we’ll add:
-
A clear button inside the search bar to reset the input quickly.
-
Keyboard navigation so users can move up and down the list with the arrow keys and select with Enter.
6.1 Add the Clear Button
Update the HTML input field in index.html:
<div class="search-wrapper">
<input
type="text"
id="searchInput"
placeholder="Search items..."
/>
<button id="clearBtn">×</button>
</div>Update style.css for the new wrapper:
.search-wrapper {
  position: relative;
  width: 100%;
}

#searchInput {
  width: 100%;
  padding: 0.75rem 2.5rem 0.75rem 1rem; /* space for clear button */
  border: 1px solid #ddd;
  border-radius: 8px;
  font-size: 1rem;
  outline: none;
  transition: border-color 0.3s ease;
}

#clearBtn {
  position: absolute;
  right: 0.75rem;
  top: 50%;
  transform: translateY(-50%);
  border: none;
  background: transparent;
  font-size: 1.25rem;
  cursor: pointer;
  color: #888;
  display: none; /* hidden until input has text */
}

#clearBtn:hover {
  color: #333;
}
Update script.js to show/hide and clear input:
const clearBtn = document.getElementById('clearBtn');

searchInput.addEventListener('input', function() {
  clearBtn.style.display = searchInput.value ? "block" : "none";
});

clearBtn.addEventListener('click', function() {
  searchInput.value = "";
  clearBtn.style.display = "none";
  searchInput.dispatchEvent(new Event('keyup')); // reset list
  searchInput.focus();
});
6.2 Add Keyboard Navigation
Still in script.js, extend functionality:
let currentFocus = -1;

searchInput.addEventListener('keydown', function(e) {
  const visibleItems = Array.from(items).filter(
    item => item.style.display !== "none"
  );

  if (e.key === "ArrowDown") {
    currentFocus = (currentFocus + 1) % visibleItems.length;
    setActive(visibleItems);
    e.preventDefault();
  } else if (e.key === "ArrowUp") {
    currentFocus = (currentFocus - 1 + visibleItems.length) % visibleItems.length;
    setActive(visibleItems);
    e.preventDefault();
  } else if (e.key === "Enter") {
    if (currentFocus > -1 && visibleItems[currentFocus]) {
      alert("You selected: " + visibleItems[currentFocus].textContent);
      searchInput.value = visibleItems[currentFocus].textContent;
      searchInput.dispatchEvent(new Event('keyup'));
      currentFocus = -1;
    }
    e.preventDefault();
  }
});

function setActive(list) {
  list.forEach(item => item.classList.remove("active"));
  if (currentFocus >= 0 && list[currentFocus]) {
    list[currentFocus].classList.add("active");
  }
}
And add styles for the active item in style.css:
#itemList li.active {
  background: #0077ff;
  color: white;
}
Now your search bar has:
✔ A clear button for quick reset.
✔ Keyboard navigation for accessibility and faster searching.
✔ Enter key selection with instant feedback.

7. Conclusion + Final Thoughts
In this step-by-step guide, we built a fully functional dynamic search bar with JavaScript. Starting from a simple HTML structure, we styled it with CSS, then progressively enhanced its functionality using JavaScript. Along the way, we added useful UX improvements like highlighting matches, showing a “No results” message, a clear button, and even keyboard navigation for accessibility.
Here’s a quick recap of what you’ve learned:
-
How to set up a basic search bar and item list with HTML.
-
Styling a clean, modern search bar with CSS.
-
Filtering list items dynamically with JavaScript in real time.
-
Enhancing usability with highlights, no-results feedback, and smart input handling.
-
Adding UX extras like a clear button and keyboard navigation for a smoother experience.
With these techniques, you now have a solid foundation for implementing search features in your own projects. From product catalogs to blog archives or even admin dashboards, this dynamic search pattern is highly reusable and adaptable.
👉 As a next step, you could extend this tutorial by:
-
Fetching search data dynamically from an API instead of a static list.
-
Implementing debounce to optimize performance for large datasets.
-
Turning the search bar into a reusable component in a framework like React, Vue, or Angular.
You can find the full source code on our GitHub.
That's just the basics. If you need more deep learning about JavaScript, you can take the following cheap course:
- The Complete JavaScript Course 2025: From Zero to Expert!
- The Complete Full-Stack Web Development Bootcamp
- JavaScript - The Complete Guide 2025 (Beginner + Advanced)
- JavaScript Basics for Beginners
- The Complete JavaScript Course | Zero to Hero in 2025
- JavaScript Pro: Mastering Advanced Concepts and Techniques
- The Modern Javascript Bootcamp Course
- JavaScript: Understanding the Weird Parts
- JavaScript Essentials for Beginners: Learn Modern JS
- JavaScript Algorithms and Data Structures Masterclass
Thanks!
