
If you're new to web development, the best way to sharpen your HTML skills is through hands-on projects. This collection of 25+ beginner-friendly HTML projects will help you practice everything from basic page structure to forms, multimedia, and layouts.
Each project comes with a brief explanation and source code you can copy, modify, and learn from. Whether you're a student, aspiring developer, or coding hobbyist, these projects are perfect stepping stones on your learning journey.
1. Personal Profile Page
Description
A simple webpage to introduce yourself. This project helps beginners learn how to structure content with HTML elements such as headings, paragraphs, images, and links.
Features
- Profile photo
- Name and short bio
- List of hobbies or interests
- Links to social media profiles
Source Code
<!DOCTYPE html>
<html lang="en">

<head>
    <meta charset="UTF-8">
    <meta name="viewport" content="width=device-width, initial-scale=1.0">
    <title>My Profile</title>
</head>

<body>
    <h1>John Doe</h1>
    <img src="https://placehold.co/150" alt="Profile">
    <p>Hello! I'm John, a web development enthusiast. I love building websites, writing blogs, and learning new
        technologies.</p>

    <h2>My Hobbies</h2>
    <ul>
        <li>Coding</li>
        <li>Photography</li>
        <li>Traveling</li>
    </ul>

    <h2>Connect with me</h2>
    <p>
        <a href="https://twitter.com">Twitter</a> |
        <a href="https://linkedin.com">LinkedIn</a> |
        <a href="https://github.com">GitHub</a>
    </p>
</body>

</html>
Explanation
This profile page uses only basic HTML tags:
- <h1> and <h2> for headings
- <img> for the profile photo
- <p> for text paragraphs
- <ul> and <li> for listing hobbies
- <a> for social media links

2. Simple Resume Page
Description
Build a clean, static resume using just HTML. This project introduces semantic HTML elements like <section>, <header>, and <footer> to organize content logically.
Features
- Name and job title
- Contact information
- Summary or objective
- Education and work experience
- Skills list
Source Code
<!DOCTYPE html>
<html lang="en">
<head>
<meta charset="UTF-8" />
<meta name="viewport" content="width=device-width, initial-scale=1.0" />
<title>My Resume</title>
</head>
<body>
<header>
<h1>Jane Smith</h1>
<p>Web Developer</p>
<p>Email: [email protected] | Phone: (123) 456-7890</p>
</header>
<section>
<h2>Summary</h2>
<p>Passionate web developer with experience in building responsive and user-friendly websites using HTML, CSS,
and JavaScript.</p>
</section>
<section>
<h2>Education</h2>
<p><strong>BS in Computer Science</strong>, University of Example - 2020</p>
</section>
<section>
<h2>Work Experience</h2>
<p><strong>Frontend Developer</strong>, ABC Web Agency (2021 - Present)</p>
<ul>
<li>Developed landing pages for marketing campaigns</li>
<li>Collaborated with designers and backend developers</li>
</ul>
</section>
<section>
<h2>Skills</h2>
<ul>
<li>HTML & CSS</li>
<li>JavaScript</li>
<li>Git & GitHub</li>
</ul>
</section>
<footer>
<p>© 2025 Jane Smith</p>
</footer>
</body>
</html>Explanation
This project showcases how to structure a professional resume layout using only HTML:
- <header> for the name and contact info
- <section> for grouping different resume parts
- <ul> for listing skills and job responsibilities
- <footer> for a closing note or copyright

3. Favorite Books or Movies List
Description
This project displays a simple list of your favorite books or movies. It's perfect for learning how to use HTML elements like headings, paragraphs, and unordered/ordered lists to organize content.
Features
- Page title and short intro
- Unordered list of books or movies
- Optional description or author/director info
Source Code
<!DOCTYPE html>
<html lang="en">

<head>
    <meta charset="UTF-8" />
    <meta name="viewport" content="width=device-width, initial-scale=1.0" />
    <title>My Favorite Movies</title>
</head>

<body>
    <h1>My Top 5 Favorite Movies</h1>
    <p>I love watching movies! Here are five of my all-time favorites:</p>

    <ul>
        <li><strong>Inception</strong> – Directed by Christopher Nolan</li>
        <li><strong>The Matrix</strong> – Directed by The Wachowskis</li>
        <li><strong>Interstellar</strong> – Directed by Christopher Nolan</li>
        <li><strong>The Shawshank Redemption</strong> – Directed by Frank Darabont</li>
        <li><strong>Pulp Fiction</strong> – Directed by Quentin Tarantino</li>
    </ul>
</body>

</html>
Explanation
This project uses basic HTML elements:
- <h1> for the main heading
- <p> for a short introduction
- <ul> and <li> to list your favorites
- <strong> to highlight titles
You can easily switch this to a book list by changing the heading and list content.

4. Basic Contact Info Page
Description
Create a static contact page that displays your basic information. This project teaches how to structure content using HTML elements like address, links, and line breaks.
Features
- Full name
- Email and phone number
- Physical address
- Social media or personal website link
Source Code
<!DOCTYPE html>
<html lang="en">

<head>
    <meta charset="UTF-8" />
    <meta name="viewport" content="width=device-width, initial-scale=1.0" />
    <title>Contact Me</title>
</head>

<body>
    <h1>Contact Information</h1>
    <p><strong>Name:</strong> Alex Johnson</p>
    <p><strong>Email:</strong> <a href="mailto:[email protected]">[email protected]</a></p>
    <p><strong>Phone:</strong> (987) 654-3210</p>
    <p><strong>Address:</strong><br>
        123 Main Street<br>
        Springfield, IL 62704
    </p>
    <p><strong>Website:</strong> <a href="https://alexjohnson.dev" target="_blank">alexjohnson.dev</a></p>
</body>

</html>
Explanation
This contact page uses:
- <p> for separating content blocks
- <a href="mailto:"> for email links
- <br> for line breaks in addresses
- target="_blank" to open external links in a new tab
It’s a great introduction to HTML linking and formatting practices.

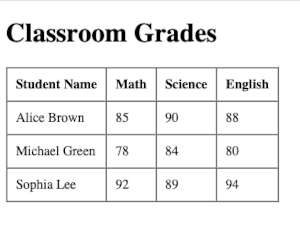
5. HTML Table with Student Grades
Description
This project helps you learn how to structure tabular data using HTML <table> elements. You’ll build a simple student grades report with rows and columns.
Features
- Table header row
- Student names and subjects
- Grades for each student
- Basic table layout using <table>, <tr>, <th>, and <td>
Source Code
<!DOCTYPE html>
<html lang="en">

<head>
    <meta charset="UTF-8" />
    <meta name="viewport" content="width=device-width, initial-scale=1.0" />
    <title>Student Grades</title>
</head>

<body>
    <h1>Classroom Grades</h1>

    <table border="1" cellpadding="10" cellspacing="0">
        <thead>
            <tr>
                <th>Student Name</th>
                <th>Math</th>
                <th>Science</th>
                <th>English</th>
            </tr>
        </thead>
        <tbody>
            <tr>
                <td>Alice Brown</td>
                <td>85</td>
                <td>90</td>
                <td>88</td>
            </tr>
            <tr>
                <td>Michael Green</td>
                <td>78</td>
                <td>84</td>
                <td>80</td>
            </tr>
            <tr>
                <td>Sophia Lee</td>
                <td>92</td>
                <td>89</td>
                <td>94</td>
            </tr>
        </tbody>
    </table>
</body>

</html>
Explanation
This project introduces the basic HTML table structure:
- <table> creates the table
- <thead> contains the header row with <th> cells
- <tbody> contains the data rows with <td> cells
- border, cellpadding, and cellspacing add basic styling without CSS
- Later, you can enhance it with CSS for cleaner visuals or interactivity.
6. Simple Blog Post Page
Description
This project simulates a basic blog post layout. It teaches how to use semantic HTML tags to structure content like titles, author, date, and article body.
Features
- Blog post title
- Author name and publication date
- Main article content with paragraphs
- Optional image and categories/tags section
Source Code
<!DOCTYPE html>
<html lang="en">

<head>
    <meta charset="UTF-8" />
    <meta name="viewport" content="width=device-width, initial-scale=1.0" />
    <title>My First Blog Post</title>
</head>

<body>
    <article>
        <header>
            <h1>Why I Started Learning Web Development</h1>
            <p><em>By Sarah Mitchell | March 1, 2025</em></p>
        </header>

        <img src="https://placehold.co/600x200" alt="Coding Banner">

        <section>
            <p>Like many beginners, I was always fascinated by how websites work. In 2025, I finally decided to dive
                into the world of web development and start building things on my own.</p>
            <p>I began with HTML, the basic structure of the web. It was exciting to see how simple tags could create
                headings, paragraphs, images, and links.</p>
            <p>This is just the beginning of my journey, and I’m looking forward to sharing what I learn along the way!
            </p>
        </section>

        <footer>
            <p><strong>Tags:</strong> HTML, Web Development, Learning</p>
        </footer>
    </article>
</body>

</html>
Explanation
This blog post page introduces:
- <article> for wrapping the blog content
- <header> for title and author/date info
- <section> for the main body of the post
- <footer> for metadata like tags
- <img> to include a featured image
You can easily expand this layout into a multi-post blog in future projects.

7. Product Landing Page
Description
A simple landing page to showcase a product. This project helps beginners understand how to use HTML to present product information clearly and attractively.
Features
- Product name and headline
- Product image
- Description and features
- Price and call-to-action button
Source Code
<!DOCTYPE html>
<html lang="en">

<head>
    <meta charset="UTF-8" />
    <meta name="viewport" content="width=device-width, initial-scale=1.0" />
    <title>SuperGadget Pro</title>
</head>

<body>
    <h1>SuperGadget Pro</h1>
    <p><em>The ultimate gadget for tech lovers</em></p>

    <img src="https://placehold.co/600x250" alt="SuperGadget">

    <h2>Why Choose SuperGadget Pro?</h2>
    <ul>
        <li>Fast and lightweight</li>
        <li>Long-lasting battery</li>
        <li>Modern, sleek design</li>
        <li>Affordable and reliable</li>
    </ul>

    <h3>Only $199</h3>
    <button onclick="alert('Thank you for your interest!')">Buy Now</button>
</body>

</html>
Explanation
This landing page uses:
- Headings (<h1>, <h2>, <h3>) for visual hierarchy
- <p> for tagline or promo message
- <ul> for listing product features
- <img> for product visual
- <button> with simple JavaScript to simulate interactivity
You can extend this page later with CSS styling, more layout structure (like <section>), or real eCommerce features.

8. Tribute Page
Description
A tribute page is a great beginner project to honor someone you admire. It helps you practice HTML structure and formatting, including headings, images, paragraphs, and lists.
Features
- Name of the person
- Photo or image
- Short biography or tribute message
- List of achievements or key facts
- Link to more information (e.g., Wikipedia)
Source Code
<!DOCTYPE html>
<html lang="en">

<head>
    <meta charset="UTF-8" />
    <meta name="viewport" content="width=device-width, initial-scale=1.0" />
    <title>Tribute to Nikola Tesla</title>
</head>

<body>
    <h1>Nikola Tesla</h1>
    <p><em>1856 – 1943</em></p>
    <img src="https://placehold.co/300x200" alt="Nikola Tesla Portrait">

    <p>Nikola Tesla was a brilliant inventor and electrical engineer known for his revolutionary contributions to the
        development of alternating current (AC) electricity.</p>

    <h2>Key Achievements</h2>
    <ul>
        <li>Invented the Tesla coil</li>
        <li>Pioneered AC power systems</li>
        <li>Developed wireless communication concepts</li>
        <li>Held over 300 patents worldwide</li>
    </ul>

    <p>Learn more about Nikola Tesla on
        <a href="https://en.wikipedia.org/wiki/Nikola_Tesla" target="_blank">Wikipedia</a>.
    </p>
</body>

</html>
Explanation
This project demonstrates:
- Basic semantic elements for structure and clarity
- <img> and <a> for multimedia and external resources
- <ul> and <li> for achievements or milestones
- target="_blank" to open external links in a new tab
It’s simple to personalize this for any historical figure, mentor, or icon.

9. Photo Gallery Page
Description
A photo gallery page showcases a collection of images in a simple, organized layout. This project helps you practice using <img> elements, alt text, and visual grouping using basic HTML.
Features
- Page title and optional description
- Multiple images in a grid-like layout
- Alt text for accessibility
- Optional image captions
Source Code
<!DOCTYPE html>
<html lang="en">

<head>
    <meta charset="UTF-8" />
    <meta name="viewport" content="width=device-width, initial-scale=1.0" />
    <title>My Photo Gallery</title>
</head>

<body>
    <h1>Vacation Photo Gallery</h1>
    <p>Here are some of my favorite snapshots from recent travels:</p>

    <div>
        <img src="https://placehold.co/200" alt="Beach View">
        <img src="https://placehold.co/200" alt="Mountain Sunset">
        <img src="https://placehold.co/200" alt="City Skyline">
        <img src="https://placehold.co/200" alt="Forest Trail">
        <img src="https://placehold.co/200" alt="Desert Landscape">
        <img src="https://placehold.co/200" alt="River Bridge">
    </div>
</body>

</html>
Explanation
This gallery:
- Uses <img> elements for each photo
- Includes alt attributes for accessibility and SEO
- Group images in a <div> for future layout enhancements (like CSS grids or flexbox)
- You can later expand this by adding titles, captions, or even lightbox functionality with JavaScript.

10. Personal Portfolio Page
Description
A personal portfolio page highlights your skills, projects, and background. It’s ideal for practicing semantic HTML and organizing content for real-world use.
Features
- Introduction or bio
- List of skills or technologies
- Showcase of personal projects (with links)
- Contact section or social media links
Source Code
<!DOCTYPE html>
<html lang="en">

<head>
    <meta charset="UTF-8" />
    <meta name="viewport" content="width=device-width, initial-scale=1.0" />
    <title>John Doe - Web Developer</title>
</head>

<body>
    <header>
        <h1>John Doe</h1>
        <p>Frontend Web Developer</p>
    </header>

    <section>
        <h2>About Me</h2>
        <p>I’m a passionate web developer with a focus on building responsive and user-friendly websites using HTML,
            CSS, and JavaScript.</p>
    </section>

    <section>
        <h2>Skills</h2>
        <ul>
            <li>HTML & CSS</li>
            <li>JavaScript</li>
            <li>React</li>
            <li>Git & GitHub</li>
        </ul>
    </section>

    <section>
        <h2>Projects</h2>
        <ul>
            <li><a href="#">Portfolio Website</a> – A personal portfolio built with HTML, CSS, and JS</li>
            <li><a href="#">To-Do List App</a> – A simple task tracker using local storage</li>
            <li><a href="#">Weather Dashboard</a> – Displays weather data using a public API</li>
        </ul>
    </section>

    <footer>
        <h2>Contact</h2>
        <p>Email: <a href="mailto:[email protected]">[email protected]</a></p>
        <p>GitHub: <a href="https://github.com/johndoe" target="_blank">github.com/johndoe</a></p>
    </footer>
</body>

</html>
Explanation
This personal portfolio page uses:
- <header>, <section>, and <footer> for clear structure
- <ul> and <li> to list skills and projects
- <a> tags for external links
- Semantic tags to organize different content blocks
It’s a great foundation for building a professional online presence and can later be styled and made interactive with CSS and JavaScript.

11. Survey or Feedback Form
Description
This project helps you learn how to build HTML forms to collect user input. You'll create a simple survey or feedback form with different types of input fields.
Features
- Text input fields (name, email)
- Radio buttons and checkboxes
- Dropdown menu
- Textarea for open feedback
- Submit button
Source Code
<!DOCTYPE html>
<html lang="en">

<head>
    <meta charset="UTF-8" />
    <meta name="viewport" content="width=device-width, initial-scale=1.0" />
    <title>Feedback Form</title>
</head>

<body>
    <h1>Website Feedback Form</h1>
    <form>
        <label for="name">Name:</label><br>
        <input type="text" id="name" name="name" required><br><br>

        <label for="email">Email:</label><br>
        <input type="email" id="email" name="email" required><br><br>

        <p>How would you rate your experience?</p>
        <input type="radio" id="excellent" name="rating" value="Excellent">
        <label for="excellent">Excellent</label><br>
        <input type="radio" id="good" name="rating" value="Good">
        <label for="good">Good</label><br>
        <input type="radio" id="poor" name="rating" value="Poor">
        <label for="poor">Poor</label><br><br>

        <label for="features">Which features did you use?</label><br>
        <input type="checkbox" id="blog" name="features" value="Blog">
        <label for="blog">Blog</label><br>
        <input type="checkbox" id="forum" name="features" value="Forum">
        <label for="forum">Forum</label><br>
        <input type="checkbox" id="docs" name="features" value="Documentation">
        <label for="docs">Documentation</label><br><br>

        <label for="suggestion">What would you like us to improve?</label><br>
        <select id="suggestion" name="suggestion">
            <option value="design">Design</option>
            <option value="content">Content</option>
            <option value="navigation">Navigation</option>
            <option value="performance">Performance</option>
        </select><br><br>

        <label for="comments">Additional Comments:</label><br>
        <textarea id="comments" name="comments" rows="5" cols="30"></textarea><br><br>

        <button type="submit">Submit Feedback</button>
    </form>
</body>

</html>
Explanation
This project introduces various form controls:
- <input> for text, email, radio, and checkbox inputs
- <select> and <option> for dropdowns
- <textarea> for multi-line text input
- <form> with proper labels for accessibility
It’s a practical foundation for building interactive forms on websites.

12. Newsletter Signup Form
Description
This project focuses on creating a simple email subscription form for a newsletter. It’s a great exercise in collecting user input and structuring small, focused forms.
Features
- Email input field
- Name input (optional)
- Submit button
- Placeholder for confirmation or success message (to enhance later with JavaScript)
Source Code
<!DOCTYPE html>
<html lang="en">

<head>
    <meta charset="UTF-8" />
    <meta name="viewport" content="width=device-width, initial-scale=1.0" />
    <title>Subscribe to Our Newsletter</title>
</head>

<body>
    <h1>Join Our Newsletter</h1>
    <p>Stay updated with the latest news and articles straight to your inbox.</p>

    <form>
        <label for="fullName">Full Name:</label><br>
        <input type="text" id="fullName" name="fullName" placeholder="Your Name"><br><br>

        <label for="email">Email Address:</label><br>
        <input type="email" id="email" name="email" placeholder="[email protected]" required><br><br>

        <button type="submit">Subscribe</button>
    </form>
</body>

</html>
Explanation
This newsletter signup form includes:
- <input type="email"> for proper email validation
- Placeholder text to guide the user
- A submit button for sending the form
- Structure that can easily be styled and enhanced later
You can connect this form to a backend or email service provider later using tools like Mailchimp, Formspree, or custom backend code.

13. Simple Event Invitation Page
Description
Create a clean and informative event invitation page. This project helps you practice organizing content like dates, times, locations, and event details using basic HTML.
Features
- Event title and description
- Date and time
- Location details
- RSVP button or link
Source Code
<!DOCTYPE html>
<html lang="en">

<head>
    <meta charset="UTF-8" />
    <meta name="viewport" content="width=device-width, initial-scale=1.0" />
    <title>You're Invited!</title>
</head>

<body>
    <h1>John & Emily's Engagement Party</h1>
    <p><strong>Date:</strong> Saturday, July 20, 2025</p>
    <p><strong>Time:</strong> 6:00 PM – 10:00 PM</p>
    <p><strong>Location:</strong> Sunset Garden Hall, 123 Celebration Ave, Los Angeles, CA</p>

    <h2>Join us for an evening of food, fun, and celebration!</h2>
    <p>Please let us know if you'll be attending.</p>

    <button onclick="alert('Thanks for your RSVP!')">RSVP Now</button>
</body>

</html>
Explanation
This project uses:
- Headings and paragraphs to structure information clearly
- <strong> for emphasis on key event details
- A button with a simple onclick event for instant feedback (can be replaced later with a form or link)
It’s a good way to practice presenting concise information and preparing HTML for printable or digital invitations.


14. Recipe Page
Description
A recipe page is a great HTML project to practice using headings, lists, and semantic structure. It displays ingredients and step-by-step cooking instructions in a readable format.
Features
- Recipe name and short intro
- List of ingredients
- Step-by-step cooking directions
- Optional image of the dish
Source Code
<!DOCTYPE html>
<html lang="en">

<head>
    <meta charset="UTF-8" />
    <meta name="viewport" content="width=device-width, initial-scale=1.0" />
    <title>Chocolate Chip Cookies Recipe</title>
</head>

<body>
    <h1>Chocolate Chip Cookies</h1>
    <p>These homemade cookies are soft, chewy, and loaded with chocolate chips. Perfect for any occasion!</p>

    <img src="https://placehold.co/300x200" alt="Chocolate Chip Cookies">

    <h2>Ingredients</h2>
    <ul>
        <li>1 cup unsalted butter, softened</li>
        <li>1 cup white sugar</li>
        <li>1 cup brown sugar</li>
        <li>2 eggs</li>
        <li>2 tsp vanilla extract</li>
        <li>3 cups all-purpose flour</li>
        <li>1 tsp baking soda</li>
        <li>1/2 tsp salt</li>
        <li>2 cups chocolate chips</li>
    </ul>

    <h2>Instructions</h2>
    <ol>
        <li>Preheat oven to 350°F (175°C).</li>
        <li>In a large bowl, cream together butter and sugars until smooth.</li>
        <li>Beat in eggs and vanilla.</li>
        <li>In a separate bowl, mix flour, baking soda, and salt.</li>
        <li>Gradually add dry ingredients to wet ingredients and mix well.</li>
        <li>Stir in chocolate chips.</li>
        <li>Drop spoonfuls of dough onto a baking sheet.</li>
        <li>Bake for 10–12 minutes or until edges are golden brown.</li>
        <li>Let cool before serving.</li>
    </ol>
</body>

</html>
Explanation
This recipe page teaches you how to:
- Use <ul> and <ol> for different kinds of lists
- Format structured content with <h1>, <h2>, and <p>
- Add images and descriptive alt text
This layout can be reused and styled for different recipes or even as part of a full cooking blog.

15. Event Schedule Page
Description
An event schedule page displays the agenda or timeline of an event. This project helps you practice creating structured layouts using HTML tables or lists.
Features
- Event name and date
- List or table of sessions/talks/workshops
- Time, title, and speaker (if any) for each session
Source Code
<!DOCTYPE html>
<html lang="en">

<head>
    <meta charset="UTF-8" />
    <meta name="viewport" content="width=device-width, initial-scale=1.0" />
    <title>Tech Conference 2025 Schedule</title>
    <style>
        table {
            border-collapse: collapse;
            width: 100%;
        }

        th,
        td {
            border: 1px solid #333;
            padding: 10px;
            text-align: left;
        }

        thead {
            background-color: #f2f2f2;
        }
    </style>
</head>

<body>
    <h1>Tech Conference 2025</h1>
    <p><strong>Date:</strong> September 14, 2025</p>
    <p><strong>Location:</strong> Downtown Convention Center, Hall B</p>

    <h2>Event Schedule</h2>
    <table>
        <thead>
            <tr>
                <th>Time</th>
                <th>Session</th>
                <th>Speaker</th>
            </tr>
        </thead>
        <tbody>
            <tr>
                <td>09:00 AM</td>
                <td>Opening Keynote</td>
                <td>Jane Smith</td>
            </tr>
            <tr>
                <td>10:30 AM</td>
                <td>Future of Web Development</td>
                <td>John Doe</td>
            </tr>
            <tr>
                <td>12:00 PM</td>
                <td>Lunch Break</td>
                <td>—</td>
            </tr>
            <tr>
                <td>01:00 PM</td>
                <td>AI & Ethics Panel</td>
                <td>Various Speakers</td>
            </tr>
            <tr>
                <td>03:00 PM</td>
                <td>Closing Remarks</td>
                <td>Emily Nguyen</td>
            </tr>
        </tbody>
    </table>
</body>

</html>
Explanation
This page uses:
- A <table> with headers and rows to clearly show session details
- <thead> and <tbody> for better table semantics
- Simple layout that can be styled into a full agenda or printed program
You can enhance this with CSS for better styling, or even JavaScript to filter sessions by track or category.

16. Simple Login Page (Front-End Only)
Description
This project focuses on building a basic login page using HTML. While it doesn’t include backend logic, it’s a useful exercise in form structure and input types — a common UI element in many web apps.
Features
- Username/email and password fields
- Submit button
- Optional “remember me” checkbox
- Clear structure for later backend integration
Source Code
<!DOCTYPE html>
<html lang="en">

<head>
    <meta charset="UTF-8" />
    <meta name="viewport" content="width=device-width, initial-scale=1.0" />
    <title>Login Page</title>
    <style>
        body {
            font-family: Arial, sans-serif;
            padding: 20px;
            max-width: 400px;
            margin: auto;
        }

        h1 {
            text-align: center;
        }

        form {
            display: flex;
            flex-direction: column;
            gap: 10px;
        }

        label {
            font-weight: bold;
        }

        input[type="text"],
        input[type="password"] {
            padding: 10px;
            font-size: 16px;
        }

        button {
            padding: 10px;
            background-color: #4CAF50;
            color: white;
            font-size: 16px;
            border: none;
            cursor: pointer;
        }

        button:hover {
            background-color: #45a049;
        }
    </style>
</head>

<body>
    <h1>Login</h1>
    <form>
        <label for="username">Username or Email</label>
        <input type="text" id="username" name="username" required />

        <label for="password">Password</label>
        <input type="password" id="password" name="password" required />

        <label>
            <input type="checkbox" name="remember" /> Remember me
        </label>

        <button type="submit">Login</button>
    </form>
</body>

</html>
Explanation
This login page includes:
- A form with input fields for username and password
- Required validation for both inputs
- A checkbox for “Remember me”
- Basic styling to make it user-friendly and ready for backend integration
You can later connect this form to a real authentication service using JavaScript, Node.js, PHP, Firebase, or any backend tech.

17. Basic Registration Form
Description
A registration form allows users to create an account by entering personal details. This project helps you practice form inputs, validation requirements, and organizing content using HTML.
Features
- Fields for full name, email, password, and confirm password
- Required input validation
- Basic form structure ready for backend integration
Source Code
<!DOCTYPE html>
<html lang="en">

<head>
    <meta charset="UTF-8" />
    <meta name="viewport" content="width=device-width, initial-scale=1.0" />
    <title>Register</title>
    <style>
        body {
            font-family: Arial, sans-serif;
            padding: 20px;
            max-width: 500px;
            margin: auto;
        }

        h1 {
            text-align: center;
        }

        form {
            display: flex;
            flex-direction: column;
            gap: 15px;
        }

        label {
            font-weight: bold;
        }

        input {
            padding: 10px;
            font-size: 16px;
        }

        button {
            padding: 10px;
            background-color: #007BFF;
            color: white;
            border: none;
            font-size: 16px;
            cursor: pointer;
        }

        button:hover {
            background-color: #0056b3;
        }
    </style>
</head>

<body>
    <h1>Register</h1>
    <form>
        <label for="fullname">Full Name</label>
        <input type="text" id="fullname" name="fullname" required />

        <label for="email">Email Address</label>
        <input type="email" id="email" name="email" required />

        <label for="password">Password</label>
        <input type="password" id="password" name="password" required />

        <label for="confirm-password">Confirm Password</label>
        <input type="password" id="confirm-password" name="confirm-password" required />

        <button type="submit">Register</button>
    </form>
</body>

</html>
Explanation
This project includes:
- Multiple form fields with appropriate types (text, email, password)
- Required validation using the required attribute
- A clean layout using flexbox and spacing for readability
- A submit button is ready to connect with the backend logic
This form is a solid foundation for real-world applications that require user account creation.

18. HTML Page with Embedded YouTube Video
Description
This project shows how to embed a YouTube video using HTML. It’s simple yet useful when creating blogs, tutorials, or landing pages that feature multimedia content.
Features
- A descriptive title and introduction
- An embedded responsive YouTube video
- Clean layout using semantic HTML
Source Code
<!DOCTYPE html>
<html lang="en">

<head>
    <meta charset="UTF-8" />
    <meta name="viewport" content="width=device-width, initial-scale=1.0" />
    <title>Learn HTML Basics</title>
    <style>
        body {
            font-family: Arial, sans-serif;
            padding: 20px;
            max-width: 700px;
            margin: auto;
        }

        h1 {
            text-align: center;
        }

        .video-container {
            position: relative;
            padding-bottom: 56.25%;
            /* 16:9 aspect ratio */
            height: 0;
            overflow: hidden;
            margin-top: 20px;
        }

        .video-container iframe {
            position: absolute;
            top: 0;
            left: 0;
            width: 100%;
            height: 100%;
            border: 0;
        }
    </style>
</head>

<body>
    <h1>Learn HTML Basics</h1>
    <p>Watch this beginner-friendly video tutorial to get started with HTML. It covers the essential tags, structure,
        and concepts you need to begin building web pages.</p>

    <div class="video-container">
        <iframe width="560" height="315" src="https://www.youtube.com/embed/UZXvRsMsCb0?si=coTP4y6uL3574uK8"
            title="YouTube video player"
            allow="accelerometer; autoplay; clipboard-write; encrypted-media; gyroscope; picture-in-picture; web-share"
            referrerpolicy="strict-origin-when-cross-origin" allowfullscreen></iframe>
    </div>
</body>

</html>
Explanation
This project demonstrates:
- How to embed a YouTube video using <iframe>
- Making the video responsive using a wrapper with a padding-bottom trick
- Structuring content with <div>, <h1>, and <p>
- You can use this method to embed any video — just replace the src URL with the desired YouTube embed link.

19. Coming Soon Landing Page
Description
A "Coming Soon" page is a placeholder for an upcoming website, product, or feature. It’s a good HTML project to practice layout, headings, and call-to-action elements.
Features
- Eye-catching headline
- Brief description or teaser
- Email subscription input (optional)
- Launch countdown (optional with JavaScript, not included here)
Source Code
<!DOCTYPE html>
<html lang="en">

<head>
    <meta charset="UTF-8" />
    <meta name="viewport" content="width=device-width, initial-scale=1.0" />
    <title>Coming Soon</title>
    <style>
        body {
            font-family: 'Segoe UI', Tahoma, Geneva, Verdana, sans-serif;
            background-color: #f9f9f9;
            text-align: center;
            padding: 50px;
        }

        h1 {
            font-size: 3em;
            margin-bottom: 10px;
        }

        p {
            font-size: 1.2em;
            color: #555;
        }

        input[type="email"] {
            padding: 10px;
            font-size: 1em;
            width: 250px;
            margin-top: 20px;
        }

        button {
            padding: 10px 20px;
            font-size: 1em;
            margin-left: 10px;
            background-color: #007BFF;
            color: white;
            border: none;
            cursor: pointer;
        }

        button:hover {
            background-color: #0056b3;
        }
    </style>
</head>

<body>
    <h1>Coming Soon</h1>
    <p>Our amazing new website is on its way. Stay tuned for the big launch!</p>

    <form>
        <input type="email" placeholder="Enter your email" required />
        <button type="submit">Notify Me</button>
    </form>
</body>

</html>
Explanation
This simple landing page includes:
- A large headline to grab attention
- A brief message to build anticipation
- An optional email input for collecting interested users
- Modern styling with centered layout and responsive elements
Later, you can enhance it by adding:
- A countdown timer using JavaScript
- CSS animations
- A backend or service like Mailchimp to handle email collection

20. HTML FAQ Page
Description
An FAQ (Frequently Asked Questions) page provides answers to common questions about a product, service, or website. This project helps you practice organizing text content using semantic HTML elements like <details> and <summary> for collapsible sections.
Features
- Collapsible question-and-answer format
- Semantic, accessible HTML
- Easy to style and expand
Source Code
<!DOCTYPE html>
<html lang="en">

<head>
    <meta charset="UTF-8" />
    <meta name="viewport" content="width=device-width, initial-scale=1.0" />
    <title>FAQ - Frequently Asked Questions</title>
    <style>
        body {
            font-family: Arial, sans-serif;
            max-width: 800px;
            margin: auto;
            padding: 20px;
        }

        h1 {
            text-align: center;
            margin-bottom: 30px;
        }

        details {
            margin-bottom: 15px;
            border: 1px solid #ccc;
            border-radius: 5px;
            padding: 10px;
        }

        summary {
            font-weight: bold;
            cursor: pointer;
        }

        summary:hover {
            color: #007BFF;
        }
    </style>
</head>

<body>
    <h1>Frequently Asked Questions</h1>

    <details>
        <summary>What is this website about?</summary>
        <p>This website provides tutorials, tips, and resources for web development beginners.</p>
    </details>

    <details>
        <summary>Do I need to pay to access the content?</summary>
        <p>No, all content on this site is completely free to access and use.</p>
    </details>

    <details>
        <summary>Can I suggest a tutorial topic?</summary>
        <p>Yes! We welcome suggestions. Please use our contact form to send your ideas.</p>
    </details>

    <details>
        <summary>Do you offer certificates?</summary>
        <p>Currently, we do not offer certificates, but we may add this feature in the future.</p>
    </details>
</body>

</html>
Explanation
This project uses:
- <details> and <summary> elements for interactive collapsible questions
- CSS for spacing and hover effects
- A clean and readable layout suitable for any type of FAQ section
You can expand this design with:
- Icons or animations
- Grouping questions into categories
- JavaScript enhancements if needed

21. Basic HTML Page with Audio Player
Description
This project demonstrates how to embed and play audio files in a web page using the HTML <audio> element. It’s perfect for learning how to work with multimedia in web development.
Features
- Embedded audio player with controls
- Simple and clean layout
- Supports multiple audio formats for compatibility
Source Code
<!DOCTYPE html>
<html lang="en">

<head>
    <meta charset="UTF-8" />
    <meta name="viewport" content="width=device-width, initial-scale=1.0" />
    <title>Audio Player Example</title>
    <style>
        body {
            font-family: Arial, sans-serif;
            max-width: 600px;
            margin: auto;
            padding: 20px;
            text-align: center;
        }

        h1 {
            margin-bottom: 20px;
        }

        audio {
            width: 100%;
            margin-top: 20px;
        }
    </style>
</head>

<body>
    <h1>Listen to Our Podcast</h1>
    <p>Enjoy this sample audio clip from our latest episode.</p>

    <audio controls>
        <source src="sample-audio.mp3" type="audio/mpeg">
        <source src="sample-audio.ogg" type="audio/ogg">
        Your browser does not support the audio element.
    </audio>
</body>

</html>
Explanation
This project includes:
- The <audio> element with the controls attribute to display play/pause buttons
- Multiple <source> tags for better browser support
- Responsive layout and basic styling for a clean presentation
To test it, you'll need to replace sample-audio.mp3 and sample-audio.ogg with real audio file URLs or local paths.

22. Simple HTML Page with Google Maps Embed
Description
This project shows how to embed a Google Map on your webpage. It's a common feature for contact pages, business locations, event directions, and more.
Features
- Embedded responsive Google Map
- Clean and centered layout
- Customizable location
Source Code
<!DOCTYPE html>
<html lang="en">

<head>
    <meta charset="UTF-8" />
    <meta name="viewport" content="width=device-width, initial-scale=1.0" />
    <title>Our Location</title>
    <style>
        body {
            font-family: Arial, sans-serif;
            text-align: center;
            padding: 20px;
        }

        h1 {
            margin-bottom: 20px;
        }

        .map-container {
            position: relative;
            padding-bottom: 56.25%;
            /* 16:9 aspect ratio */
            height: 0;
            overflow: hidden;
            max-width: 100%;
        }

        .map-container iframe {
            position: absolute;
            top: 0;
            left: 0;
            width: 100%;
            height: 100%;
            border: 0;
        }
    </style>
</head>

<body>
    <h1>Visit Our Office</h1>
    <p>We are located at the heart of the city. Find us on the map below:</p>

    <div class="map-container">
        <iframe
            src="https://www.google.com/maps/embed?pb=!1m18!1m12!1m3!1d3153.0863851465313!2d-122.41941528467959!3d37.77492927975978!2m3!1f0!2f0!3f0!3m2!1i1024!2i768!4f13.1!3m3!1m2!1s0x8085809c9d1d5a99%3A0x9b78f5c3a8d5e44b!2sSan%20Francisco%2C%20CA!5e0!3m2!1sen!2sus!4v1615311021873!5m2!1sen!2sus"
            allowfullscreen="" loading="lazy" referrerpolicy="no-referrer-when-downgrade" title="google maps embed">
        </iframe>
    </div>
</body>

</html>
Explanation
This project features:
- A responsive embedded Google Map using an <iframe>
- A .map-container wrapper for maintaining aspect ratio
- Easy customization by changing the map URL to your desired location
To update the location, go to Google Maps, find your place, click "Share" → "Embed a map", and copy the <iframe> code.

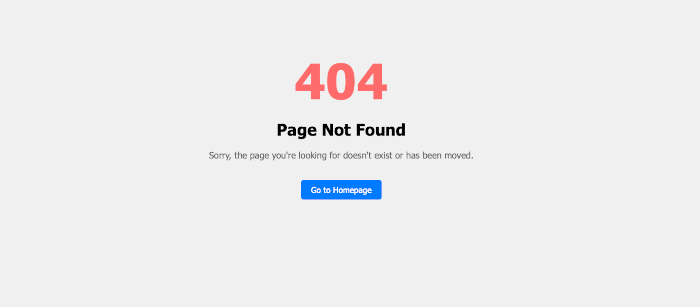
23. 404 Error Page
Description
A custom 404 error page improves user experience by guiding visitors when they land on a non-existent or broken link. This project helps you build a user-friendly and stylish fallback page using only HTML and CSS.
Features
- Clear "Page Not Found" message
- Custom styling and layout
- A link to return to the homepage
Source Code
<!DOCTYPE html>
<html lang="en">

<head>
    <meta charset="UTF-8" />
    <meta name="viewport" content="width=device-width, initial-scale=1.0" />
    <title>404 Not Found</title>
    <style>
        body {
            background-color: #f0f0f0;
            font-family: 'Segoe UI', Tahoma, Geneva, Verdana, sans-serif;
            text-align: center;
            padding: 100px 20px;
        }

        h1 {
            font-size: 6em;
            margin: 0;
            color: #ff6b6b;
        }

        h2 {
            font-size: 2em;
            margin: 20px 0;
        }

        p {
            font-size: 1.1em;
            color: #666;
        }

        a {
            display: inline-block;
            margin-top: 20px;
            padding: 10px 20px;
            background-color: #007BFF;
            color: #fff;
            text-decoration: none;
            border-radius: 5px;
        }

        a:hover {
            background-color: #0056b3;
        }
    </style>
</head>

<body>
    <h1>404</h1>
    <h2>Page Not Found</h2>
    <p>Sorry, the page you're looking for doesn't exist or has been moved.</p>
    <a href="/">Go to Homepage</a>
</body>

</html>
Explanation
This simple yet effective design includes:
- A bold error code and message to inform users
- Friendly language to reduce frustration
- A styled button linking back to the homepage
You can enhance it further by:
- Adding an image or illustration
- Using animations or SVGs
- Including a search box
24. HTML Page with Table of Contents
Description
This project demonstrates how to create a table of contents (TOC) that links to sections within the same HTML page. It’s useful for documentation, guides, long articles, or tutorials.
Features
- Clickable internal links (anchor links)
- Organized sections with corresponding IDs
- Semantic headings for structure and accessibility
Source Code
<!DOCTYPE html>
<html lang="en">

<head>
    <meta charset="UTF-8" />
    <meta name="viewport" content="width=device-width, initial-scale=1.0" />
    <title>HTML Table of Contents</title>
    <style>
        body {
            font-family: Arial, sans-serif;
            line-height: 1.6;
            margin: 40px;
        }

        h1,
        h2 {
            color: #333;
        }

        ul {
            list-style-type: none;
            padding: 0;
        }

        ul li {
            margin-bottom: 8px;
        }

        a {
            color: #007BFF;
            text-decoration: none;
        }

        a:hover {
            text-decoration: underline;
        }

        section {
            margin-top: 40px;
        }
    </style>
</head>

<body>

    <h1>Guide to Web Development</h1>
    <h2>Table of Contents</h2>
    <ul>
        <li><a href="#introduction">1. Introduction</a></li>
        <li><a href="#html-basics">2. HTML Basics</a></li>
        <li><a href="#css-basics">3. CSS Basics</a></li>
        <li><a href="#javascript-intro">4. JavaScript Introduction</a></li>
        <li><a href="#conclusion">5. Conclusion</a></li>
    </ul>

    <section id="introduction">
        <h2>1. Introduction</h2>
        <p>This guide will walk you through the basics of web development.</p>
    </section>

    <section id="html-basics">
        <h2>2. HTML Basics</h2>
        <p>HTML is the foundation of web pages. It structures content using elements like headings, paragraphs, and
            links.</p>
    </section>

    <section id="css-basics">
        <h2>3. CSS Basics</h2>
        <p>CSS is used to style and layout HTML content. You can change colors, fonts, spacing, and much more.</p>
    </section>

    <section id="javascript-intro">
        <h2>4. JavaScript Introduction</h2>
        <p>JavaScript adds interactivity to websites, such as dynamic content updates, animations, and user input
            handling.</p>
    </section>

    <section id="conclusion">
        <h2>5. Conclusion</h2>
        <p>Web development is a valuable skill. Start small and build your knowledge step by step.</p>
    </section>

</body>

</html>
Explanation
This TOC layout includes:
- A list of anchor links that navigate to sections marked with id attributes
- Structured headings for each content block
- Clean and minimal styling
You can further enhance this with:
- Scroll animations using CSS or JavaScript
- Sticky TOC sidebar
- Highlighted active sections

25. Simple Image Slider (Manual HTML Version)
Description
This project demonstrates a basic image slider built with pure HTML and a touch of CSS. It’s a great way to showcase photos or banners without using JavaScript.
Features
- Manual slide navigation using radio buttons
- Clean layout with smooth transitions
- Lightweight and JavaScript-free
Source Code
<!DOCTYPE html>
<html lang="en">

<head>
    <meta charset="UTF-8" />
    <meta name="viewport" content="width=device-width, initial-scale=1.0" />
    <title>Simple Image Slider</title>
    <style>
        * {
            box-sizing: border-box;
        }

        body {
            font-family: Arial, sans-serif;
            display: flex;
            flex-direction: column;
            align-items: center;
            padding: 20px;
        }

        .slider {
            width: 90%;
            max-width: 600px;
            position: relative;
            overflow: hidden;
            border-radius: 10px;
        }

        .slides {
            display: flex;
            width: 400%;
            transition: transform 0.5s ease-in-out;
        }

        .slides img {
            width: 100%;
            flex: 1 0 100%;
        }

        input[type="radio"] {
            display: none;
        }

        .navigation-manual {
            text-align: center;
            margin-top: 10px;
        }

        .manual-btn {
            border: 2px solid #333;
            padding: 5px;
            border-radius: 50%;
            cursor: pointer;
            display: inline-block;
            margin: 5px;
        }

        #slide1:checked~.slider .slides {
            transform: translateX(0%);
        }

        #slide2:checked~.slider .slides {
            transform: translateX(-100%);
        }

        #slide3:checked~.slider .slides {
            transform: translateX(-200%);
        }

        #slide4:checked~.slider .slides {
            transform: translateX(-300%);
        }
    </style>
</head>

<body>

    <h1>Image Slider</h1>

    <input type="radio" name="slider" id="slide1" checked>
    <input type="radio" name="slider" id="slide2">
    <input type="radio" name="slider" id="slide3">
    <input type="radio" name="slider" id="slide4">

    <div class="slider">
        <div class="slides">
            <img src="https://placehold.co/600x300?text=Slide+1&font=roboto" alt="Slide 1">
            <img src="https://placehold.co/600x300?text=Slide+2&font=roboto" alt="Slide 2">
            <img src="https://placehold.co/600x300?text=Slide+3&font=roboto" alt="Slide 3">
            <img src="https://placehold.co/600x300?text=Slide+4&font=roboto" alt="Slide 4">
        </div>
    </div>

    <div class="navigation-manual">
        <label for="slide1" class="manual-btn"></label>
        <label for="slide2" class="manual-btn"></label>
        <label for="slide3" class="manual-btn"></label>
        <label for="slide4" class="manual-btn"></label>
    </div>

</body>

</html>
Explanation
This slider works by:
- Using radio inputs to control which image is shown
- Shifting the .slides container with transform: translateX(...)
- Using labels as buttons for manual control
To improve it later, you could add:
- Auto-play with JavaScript
- Thumbnail navigation
- Touch/swipe support

Conclusion
By building these 25+ beginner HTML projects, you’ll gain real experience with key HTML concepts like tags, structure, links, forms, and multimedia elements.
These small projects may seem simple, but they form the essential foundation of all web development. Once you're comfortable with HTML, you’ll be ready to add CSS and JavaScript to bring your projects to life.
Keep practicing, keep building, and you’ll be amazed at how fast your skills grow!
Looking for the next step? Try your hand at 25 CSS Projects for Beginners or 25 JavaScript Projects for Beginners
Don't worry, the source code can be found on our GitHub.
That's just the basics. If you need more deep learning about HTML, you can take the following cheap course:
- The Complete Full-Stack Web Development Bootcamp
- Build Responsive Real-World Websites with HTML and CSS
- The HTML & CSS Bootcamp 2025 Edition
- The Complete Guide to HTML
- Learn HTML and CSS in 7 Days | Web Developer Bootcamp
- HTML, CSS, & JavaScript - Certification Course for Beginners
- 50 Projects In 50 Days - HTML, CSS & JavaScript
- Modern HTML & CSS From The Beginning 2.0 (2024 Revamp)
- HTML - Introduction to HTML Web Development
- HTML & CSS Masterclass 2025 — From Beginner to Pro
Thanks!