
In this first Flutter tutorial, we will start building native Android and iOS apps with some useful features. It means not just creating a basic Hello World or basic elements. The feature that will be covered is accessing local data and displaying it to a Grid or List element, displaying data details, showing Google Maps, and navigating through required screens.
The following tools, frameworks, and libraries are required for this tutorial:
- Flutter SDK
- Android SDK
- google_maps_flutter dependency
- XCode
- Terminal (on Mac/Linux) or CMD (on Windows)
- IDE (Android Studio/IntelliJ/Visual Studio Code)
Also, you can watch this tutorial on our YouTube channel here. Please give it a like, comment, share, and subscribe.
Let's get started with the main steps!
Step #1: Preparation
Install Flutter SDK
To install Flutter SDK, first, we have to download flutter_macos_v1.12.13+hotfix.5-stable.zip.
Extract the file to your desired location.
cd ~/development
unzip ~/Downloads/flutter_macos_v1.12.13+hotfix.5-stable.zip
Next, add Flutter tools to the path.
export PATH="$PATH:~/development/flutter/bin"Next, to make iOS and Android binaries that can be downloaded ahead of time, type this Flutter command.
flutter precacheCheck the Required Dependencies
To check the environment and display a report to the terminal window to find dependencies that require installation, type this command.
flutter doctorWe have this summary in the Terminal.
Doctor summary (to see all details, run flutter doctor -v):
[✓] Flutter (Channel stable, v1.12.13+hotfix.5, on Mac OS X 10.14.6 18G2022,
    locale en-ID)

[!] Android toolchain - develop for Android devices (Android SDK version
    29.0.0-rc1)
    ! Some Android licenses not accepted.  To resolve this, run: flutter doctor
      --android-licenses
[✓] Xcode - develop for iOS and macOS (Xcode 10.3)
[✓] Android Studio (version 3.4)
[✓] VS Code (version 1.37.1)
[!] Connected device
    ! No devices available

! Doctor found issues in 2 categories.
To fixes the issues like this, just connect the Android device and update the Android license by typing this command.
flutter doctor --android-licensesType y for every question that is displayed in the terminal. Next, check the connected Android device by typing this command.
adb devices
List of devices attached
FUZDON75YLOVVC5S    device
Setup IDE
We need to set up the IDE to make it work with the Flutter app easily and compatibly. Start Android Studio (we will use this IDE), then open Android Studio Menu -> Preferences.

Choose plugins in the left pane.

Type Flutter in the plugins marketplace, then press Enter. Next, click the Install button on Flutter. If there's a prompt to install Dart, click Yes. Restart the IDE when prompted to restart.
Now, Flutter is ready to develop Android and iOS mobile apps.
Step #2: Create a Flutter Application
After the IDE setup is complete, it will go back to the Android starting dialog.

Choose `Start a New Flutter Project`, then choose `Flutter Application`.

Click the Next Button, then fill the required fields and choose the previously installed Flutter SDK path.

Click the next button, then fill in the package name with your domain.

Click the Finish button, and the Flutter application creation in progress. Next, run the Flutter application for the first time. In the Android Studio toolbar, choose the device and main.dart, then click the play button.

Here they are what the Flutter application looks like on an Android device or iOS simulator.

Step #3: Create a JSON File
We will display local data in JSON format. For that, create the assets, data, and logos folder first at the root of the project folder.
mkdir assets
mkdir assets/data
mkdir assets/logos
You can add or create directories from the IDE as well. Next, add or create a JSON file in the assets/data folder.
touch assets/data/team.jsonNext, open and edit that file using your IDE, then add these lines of JSON data.
[
  {
    "id": 1,
    "name": "Arsenal",
    "image": "arsenal.png",
    "location": "London (Holloway)",
    "stadium": "Emirates Stadium",
    "capacity": 60704,
    "manager": "Mikel Arteta",
    "captain": "Pierre-Emerick Aubameyang",
    "lat": 51.554928,
    "lng": -0.108449
  },
  {
    "id": 2,
    "name": "Aston Villa",
    "image": "aston-villa.png",
    "location": "Birmingham",
    "stadium": "Villa Park",
    "capacity": 42785,
    "manager": "Dean Smith",
    "captain": "Jack Grealish",
    "lat": 52.509132,
    "lng": -1.884767
  },
  {
    "id": 3,
    "name": "Bournemouth",
    "image": "bornemouth.png",
    "location": "Bournemouth",
    "stadium": "Dean Court",
    "capacity": 11364,
    "manager": "Eddie Howe",
    "captain": "Simon Francis",
    "lat": 50.73528,
    "lng": -1.83829
  },
  {
    "id": 4,
    "name": "Brighton & Hove Albion",
    "image": "brighton.png",
    "location": "Brighton",
    "stadium": "Falmer Stadium",
    "capacity": 30666,
    "manager": "Graham Potter",
    "captain": "Lewis Dunk",
    "lat": 50.861607,
    "lng": -0.083716
  },
  {
    "id": 5,
    "name": "Burnley",
    "image": "burnley.png",
    "location": "Burnley",
    "stadium": "Turf Moor",
    "capacity": 21944,
    "manager": "Sean Dyche",
    "captain": "Ben Mee",
    "lat": 53.789017,
    "lng": -2.230187
  },
  {
    "id": 6,
    "name": "Chelsea",
    "image": "chelsea.png",
    "location": "London (Fulham)",
    "stadium": "Stamford Bridge",
    "capacity": 41631,
    "manager": "Frank Lampard",
    "captain": "César Azpilicueta",
    "lat": 51.481697,
    "lng": -0.190957
  },
  {
    "id": 7,
    "name": "Crystal Palace",
    "image": "crystal-palace.png",
    "location": "London (Selhurst)",
    "stadium": "Selhurst Park",
    "capacity": 26047,
    "manager": "Roy Hodgson",
    "captain": "Luka Milivojević",
    "lat": 51.39828,
    "lng": -0.085489
  },
  {
    "id": 8,
    "name": "Everton",
    "image": "everton.png",
    "location": "Liverpool (Walton)",
    "stadium": "Goodison Park",
    "capacity": 39221,
    "manager": "Marco Silva",
    "captain": "Séamus Coleman",
    "lat": 53.438812,
    "lng": -2.966331
  },
  {
    "id": 9,
    "name": "Leicester City",
    "image": "leicester.png",
    "location": "Leicester",
    "stadium": "King Power Stadium",
    "capacity": 32312,
    "manager": "Brendan Rodgers",
    "captain": "Wes Morgan",
    "lat": 52.6204,
    "lng": -1.142147
  },
  {
    "id": 10,
    "name": "Liverpool",
    "image": "liverpool.png",
    "location": "Liverpool (Anfield)",
    "stadium": "Anfield",
    "capacity": 54074,
    "manager": "Jürgen Klopp",
    "captain": "Jordan Henderson",
    "lat": 53.430847,
    "lng": -2.960844
  },
  {
    "id": 11,
    "name": "Manchester City",
    "image": "manchester-city.png",
    "location": "Manchester",
    "stadium": "City of Manchester Stadium",
    "capacity": 55017,
    "manager": "Pep Guardiola",
    "captain": "David Silva",
    "lat": 53.483177,
    "lng": -2.200427
  },
  {
    "id": 12,
    "name": "Manchester United",
    "image": "manchester-united.png",
    "location": "Manchester",
    "stadium": "Old Trafford",
    "capacity": 74879,
    "manager": "Ole Gunnar Solskjær",
    "captain": "Ashley Young",
    "lat": 53.463078,
    "lng": -2.291334
  },
  {
    "id": 13,
    "name": "Newcastle United",
    "image": "newcastle-united.png",
    "location": "Newcastle",
    "stadium": "St James Park",
    "capacity": 52354,
    "manager": "Steve Bruce",
    "captain": "Jamaal Lascelles",
    "lat": 54.975582,
    "lng": -1.621661
  },
  {
    "id": 14,
    "name": "Norwich City",
    "image": "norwich-city.png",
    "location": "Norwich",
    "stadium": "Carrow Road",
    "capacity": 27244,
    "manager": "Daniel Farke",
    "captain": "Grant Hanley",
    "lat": 52.62222,
    "lng": 1.309328
  },
  {
    "id": 15,
    "name": "Sheffield United",
    "image": "sheffield-united.png",
    "location": "Sheffield",
    "stadium": "Bramall Lane",
    "capacity": 32702,
    "manager": "Chris Wilder",
    "captain": "Billy Sharp",
    "lat": 53.370373,
    "lng": -1.47088
  },
  {
    "id": 16,
    "name": "Southampton",
    "image": "southampton.png",
    "location": "Southampton",
    "stadium": "St Marys Stadium",
    "capacity": 32384,
    "manager": "Ralph Hasenhüttl",
    "captain": "Pierre-Emile Højbjerg",
    "lat": 50.90586,
    "lng": -1.390941
  },
  {
    "id": 17,
    "name": "Tottenham Hotspur",
    "image": "tottenham-hotspur.png",
    "location": "London (Tottenham)",
    "stadium": "Tottenham Hotspur Stadium",
    "capacity": 62214,
    "manager": "José Mourinho",
    "captain": "Hugo Lloris",
    "lat": 51.60432,
    "lng": -0.066381
  },
  {
    "id": 18,
    "name": "Watford",
    "image": "watford.png",
    "location": "Watford",
    "stadium": "Vicarage Road",
    "capacity": 20400,
    "manager": "Quique Sánchez Flores",
    "captain": "Troy Deeney",
    "lat": 51.64996,
    "lng": -0.401525
  },
  {
    "id": 19,
    "name": "West Ham United",
    "image": "westham-united.png",
    "location": "London (Stratford)",
    "stadium": "London Stadium",
    "capacity": 60000,
    "manager": "Manuel Pellegrini",
    "captain": "Mark Noble",
    "lat": 51.53875,
    "lng": -0.016625
  },
  {
    "id": 20,
    "name": "Wolverhampton Wanderers",
    "image": "wolverhampton.png",
    "location": "Wolverhampton",
    "stadium": "Molineux Stadium",
    "capacity": 32050,
    "manager": "Nuno Espírito Santo",
    "captain": "Conor Coady",
    "lat": 52.5903,
    "lng": -2.130418
  }
]
As you can see, there are image fields in each JSON data. So, we need to add the image files to the assets/logos folder. You can get those files from our GitHub https://github.com/didinj/flutter-android-ios-tutorial.git, or you can get your image files. Next, we need to register those assets in the pubspec.yaml file. Open and edit pubspec.yaml file, then adds these lines of YAML code after the uses-material-design line.
# The following section is specific to Flutter.
flutter:
  uses-material-design: true
  assets:
    - assets/logos/
    - assets/data/team.json
Next, to access data easily, we need to convert the JSON file to a Dart object. For that, create a Dart object file as a reference for the converted JSON data.
touch lib/team.dartOpen and edit that file, then add these lines of Dart class that contain the class name, fields with the final keyword and data type, a constructor, and a mapping from JSON string.
class Team {
  final int id;
  final String name;
  final String image;
  final String location;
  final String stadium;
  final int capacity;
  final String manager;
  final String captain;
  final double lat;
  final double lng;

  Team(this.id, this.name, this.image, this.location, this.stadium,
      this.capacity, this.manager, this.captain, this.lat, this.lng);

  factory Team.fromJson(Map<String, dynamic> json) {
    return new Team(
        json['id'] as int,
        json['name'] as String,
        json['image'] as String,
        json['location'] as String,
        json['stadium'] as String,
        json['capacity'] as int,
        json['manager'] as String,
        json['captain'] as String,
        json['lat'] as double,
        json['lng'] as double);
  }
}
Step #4: Display a List of Data
We will display the list of data in a separate Dart file that will be called from the main.dart home page body. So, the whole structure of widgets that display a list of data, at least like this mockup.

Next, add a Dart file for building the ListView widget.
touch lib/teamlist.dartOpen and edit that file, then add these imports of Flutter material, detail page, and object file.
import 'package:flutter/material.dart';
import 'package:flutter_tutorial_app/detailwidget.dart';
import 'package:flutter_tutorial_app/team.dart';
Add TeamList class.
class TeamList extends StatelessWidget {

}
On the first line of the class body, declare a List of Team variables with the final keyword and TeamList constructor with Key and object fields.
final List<Team> team;
TeamList({Key key, this.team}) : super(key: key);
Add an overridden widget to build a ListView.
@override
Widget build(BuildContext context) {
  return ListView.builder(
    itemCount: team == null ? 0 : team.length,
    itemBuilder: (BuildContext context, int index) {
      return
        Card(
          child: InkWell(
            onTap: () {
              Navigator.push(
                context,
                MaterialPageRoute(builder: (context) => DetailWidget(team[index])),
              );
            },
            child: Row(
              children: <Widget>[
                Container(
                  padding: const EdgeInsets.all(8.0),
                  alignment: Alignment.topLeft,
                  child: Image(
                    image: AssetImage('assets/logos/' + team[index].image),
                    height: 60,
                    width: 60,
                  ),
                ),
                Expanded(
                  child: Column(
                    mainAxisAlignment: MainAxisAlignment.spaceEvenly,
                    crossAxisAlignment: CrossAxisAlignment.start,
                    children: <Widget>[
                      Text(team[index].name, style: Theme.of(context).textTheme.title),
                      Text(team[index].location, style: TextStyle(color: Colors.black.withOpacity(0.8)))
                    ],
                  ),
                )
              ],
            ),
          )
        );
    });
That ListView widget has an item that contains a Card widget. The card widget has a tappable InkWell widget as its child. The InkWell widget has a Row widget as its child. Row widget has a Container and Expanded widget as its children. The container widget has an Image widget as its child. Expanded widgets have Text widgets as their children.
The InkWell widget has an onTap event with an action to navigate to the details page. Container, Column, Image, and Text have their properties to adjust the style or layout.
Notes: Keep in mind, every widget that uses the child only has one widget as its child. If you need to put more than one widget in the parent widget, use the children: <Widget> property.
Next, open and edit lib/main.dart then replace all Dart codes with these lines of code to display the ListView in the main home page.
import 'package:flutter/cupertino.dart';
import 'package:flutter/material.dart';
import 'dart:convert';
import 'package:flutter_tutorial_app/team.dart';
import 'package:flutter_tutorial_app/teamlist.dart';

void main() => runApp(MyApp());

class MyApp extends StatelessWidget {
  // This widget is the root of your application.
  @override
  Widget build(BuildContext context) {
    return MaterialApp(
      theme: ThemeData(
        // This is the theme of your application.
        //
        // Try running your application with "flutter run". You'll see the
        // application has a blue toolbar. Then, without quitting the app, try
        // changing the primarySwatch below to Colors.green and then invoke
        // "hot reload" (press "r" in the console where you ran "flutter run",
        // or simply save your changes to "hot reload" in a Flutter IDE).
        // Notice that the counter didn't reset back to zero; the application
        // is not restarted.
        primarySwatch: Colors.blue,
      ),
      home: MyHomePage(),
    );
  }
}

class MyHomePage extends StatefulWidget {
  MyHomePage({Key key}) : super(key: key);

  @override
  _MyHomePageState createState() => _MyHomePageState();
}

class _MyHomePageState extends State<MyHomePage> {

  final String title = 'Premier League Team';
  List data;

  @override
  Widget build(BuildContext context) {
    // This method is rerun every time setState is called, for instance as done
    // by the _incrementCounter method above.
    //
    // The Flutter framework has been optimized to make rerunning build methods
    // fast, so that you can just rebuild anything that needs updating rather
    // than having to individually change instances of widgets.
    return MaterialApp(
      title: title,
      home: Scaffold(
        appBar: AppBar(
          title: Text(title),
        ),
        body: new Container(
          child: new Center(
            child: new FutureBuilder(
              future: DefaultAssetBundle.of(context).loadString('assets/data/team.json'),
              builder: (context, snapshot) {
                List<Team> teams = parseJosn(snapshot.data.toString());
                return teams.length > 0? new TeamList(team: teams): new Center(child: new CircularProgressIndicator());
              },
            )
          ),
        ),
      ),
    );
  }

  List<Team> parseJosn(String response) {
    if(response==null){
      return [];
    }
    final parsed = json.decode(response.toString()).cast<Map<String, dynamic>>();
    return parsed.map<Team>((json) => new Team.fromJson(json)).toList();
  }
}
Step #5: Display Data Details
We will display data details on another page that opens when tapping on a list item in the list page. For that, create a Dart file in the lib folder first.
touch lib/detailwidget.dartWe will use a scrollable Card widget to display a detail to prevent overflow if the Card content is longer. So, the layout structure of the widgets combination is at least like this mockup.

Next, open and edit lib/detailwidget.dart, then add these imports of Flutter material, mapswidget page, and team object.
import 'package:flutter/material.dart';
import 'package:flutter_tutorial_app/mapswidget.dart';
import 'package:flutter_tutorial_app/team.dart';
Add a DetailWidget class that extends StatefulWidget. This class has a constructor with an object field, a field of Team object, and _DetailWidgetState that builds the view for data detail.
class DetailWidget extends StatefulWidget {
  DetailWidget(this.team);

  final Team team;

  @override
  _DetailWidgetState createState() => _DetailWidgetState();
}
Add a _DetailWidgetState class that implements all required widgets to display data details.
class _DetailWidgetState extends State<DetailWidget> {
  _DetailWidgetState();

  @override
  Widget build(BuildContext context) {
    return Scaffold(
      appBar: AppBar(
        title: Text(widget.team.name),
      ),
      body: SingleChildScrollView(
        child: Container(
          padding: EdgeInsets.all(20.0),
          child: Card(
            child: Container(
                padding: EdgeInsets.all(10.0),
                width: 440,
                child: Column(
                  children: <Widget>[
                    Container(
                      margin: EdgeInsets.fromLTRB(0, 0, 0, 10),
                      child: Image(image: AssetImage('assets/logos/' + widget.team.image))
                    ),
                    Container(
                      margin: EdgeInsets.fromLTRB(0, 0, 0, 10),
                      child: Column(
                        children: <Widget>[
                          Text('City:', style: TextStyle(color: Colors.black.withOpacity(0.8))),
                          Text(widget.team.location, style: Theme.of(context).textTheme.title)
                        ],
                      ),
                    ),
                    Container(
                      margin: EdgeInsets.fromLTRB(0, 0, 0, 10),
                      child: Column(
                        children: <Widget>[
                          Text('Stadium:', style: TextStyle(color: Colors.black.withOpacity(0.8))),
                          Text(widget.team.stadium, style: Theme.of(context).textTheme.title)
                        ],
                      ),
                    ),
                    Container(
                      margin: EdgeInsets.fromLTRB(0, 0, 0, 10),
                      child: Column(
                        children: <Widget>[
                          Text('Stadium Capacity:', style: TextStyle(color: Colors.black.withOpacity(0.8))),
                          Text(widget.team.capacity.toString(), style: Theme.of(context).textTheme.title)
                        ],
                      ),
                    ),
                    Container(
                      margin: EdgeInsets.fromLTRB(0, 0, 0, 10),
                      child: Column(
                        children: <Widget>[
                          Text('Manager:', style: TextStyle(color: Colors.black.withOpacity(0.8))),
                          Text(widget.team.manager, style: Theme.of(context).textTheme.title)
                        ],
                      ),
                    ),
                    Container(
                      margin: EdgeInsets.fromLTRB(0, 0, 0, 10),
                      child: Column(
                        children: <Widget>[
                          Text('Captain:', style: TextStyle(color: Colors.black.withOpacity(0.8))),
                          Text(widget.team.captain, style: Theme.of(context).textTheme.title)
                        ],
                      ),
                    ),
                    Container(
                      margin: EdgeInsets.fromLTRB(0, 20, 0, 10),
                      child: RaisedButton(
                        onPressed: () {
                          Navigator.push(context, MaterialPageRoute(builder: (context) => MapsWidget(widget.team)));
                        },
                        color: Colors.blue,
                        textColor: Colors.white,
                        padding: EdgeInsets.all(10.0),
                        child: Column( // Replace with a Row for horizontal icon + text
                          children: <Widget>[
                            Icon(Icons.map),
                            Text("Show Maps")
                          ],
                        ),
                        shape: new RoundedRectangleBorder(
                          borderRadius: new BorderRadius.circular(15.0),
                        ),
                      ),
                    )
                  ],
                )
            )
          ),
        ),
      ),
    );
  }
}
That codes build a widget combination of Container, Card, Column, Image, Text, and RaisedButton. The RaisedButton has an onPressed event that action to navigates to the MapsWidget page.
Step #6: Display Google Maps
To display Google Maps in the Flutter app, we need to set up Google Maps iOS and Android in the Google Developer Console to get the Google Maps API KEY. We will not cover how to set up Google Maps, you can refer to our other tutorial. To implement Google Maps in a Flutter application, we will use the google_maps_flutter dependency.
We assume you have already got a Google Maps API KEY. Next, open and edit pubspec.yml then add this dependency under Flutter dependencies.
dependencies:
  flutter:
    sdk: flutter
  google_maps_flutter: ^0.5.11
In Android Studio, click Packages get in Flutter commands to download the package.

Or you can type this command in the Terminal to download the package.
flutter packages getNext, open and edit android/app/src/main/AndroidManifest.xml, then add this metadata under the application line.
<application
    android:name="io.flutter.app.FlutterApplication"
    android:label="flutter_tutorial_app"
    android:icon="@mipmap/ic_launcher">
    <meta-data android:name="com.google.android.geo.API_KEY"
        android:value="YOUR_GOOGLE_MAPS_API_KEY"/>
    ...
</application>
Replace YOUR_GOOGLE_MAPS_API_KEY with your valid Google Maps API KEY. Next, open and edit ios/Runner/AppDelegate.m, then add this import of GoogleMaps.
#import "GoogleMaps/GoogleMaps.h"Add GMSService in the didFinishLaunchingWithOptions method.
@implementation AppDelegate

- (BOOL)application:(UIApplication *)application
    didFinishLaunchingWithOptions:(NSDictionary *)launchOptions {
  [GeneratedPluginRegistrant registerWithRegistry:self];
  // Add the following line, with your API key
  [GMSServices provideAPIKey: @"YOUR-API-KEY"];
  return [super application:application didFinishLaunchingWithOptions:launchOptions];
}

@end
If you are using Swift, open and edit ios/Runner/AppDelegate.swift, then add this import.
import GoogleMapsAdd GMSService in the didFinishLaunchingWithOptions method.
@UIApplicationMain
@objc class AppDelegate: FlutterAppDelegate {
  override func application(
    _ application: UIApplication,
    didFinishLaunchingWithOptions launchOptions: [UIApplication.LaunchOptionsKey: Any]?
  ) -> Bool {
    GMSServices.provideAPIKey("YOUR-API-KEY")
    GeneratedPluginRegistrant.register(with: self)
    return super.application(application, didFinishLaunchingWithOptions: launchOptions)
  }
}
Next, open and edit ios/Runner/Info.plist, then add these lines under the <dict> line.
<?xml version="1.0" encoding="UTF-8"?>
<!DOCTYPE plist PUBLIC "-//Apple//DTD PLIST 1.0//EN" "http://www.apple.com/DTDs/PropertyList-1.0.dtd">
<plist version="1.0">
<dict>
    <!-- Add the following entry, from here, -->
    <key>io.flutter.embedded_views_preview</key>
    <true/>
    <!-- to here. -->
    ...
</dict>
</plist>
Now, we can implement Google Maps in the Flutter widget page. Create a new Dart file to display Google Maps.
touch lib/mapswidget.dartOpen and edit that file, then add these imports of Flutter material, team object, and google_maps_flutter.
import 'package:flutter/material.dart';
import 'package:flutter_tutorial_app/team.dart';
import 'package:google_maps_flutter/google_maps_flutter.dart';
Next, add the MapsWidget class that extends StatefulWidget and contains a constructor with a team object field,a Team object variable, and an overridden _MapsWidgetState method.
class MapsWidget extends StatefulWidget {
  MapsWidget(this.team);

  final Team team;

  @override
  _MapsWidgetState createState() => _MapsWidgetState();
}
Add _MapsWidgetState class that implements widget building to display Google Maps.
class _MapsWidgetState extends State<MapsWidget> {
  _MapsWidgetState();

  GoogleMapController mapController;

  void _onMapCreated(GoogleMapController controller) {
    mapController = controller;
  }

  @override
  Widget build(BuildContext context) {
    return Scaffold(
      appBar: AppBar(
        title: Text(widget.team.name),
      ),
      body: GoogleMap(
        onMapCreated: _onMapCreated,
        initialCameraPosition: CameraPosition(
          target: LatLng(widget.team.lat, widget.team.lng),
          zoom: 11.0,
        ),
      ),
    );
  }
}
As you can see, Google Maps LatLng uses data from the team object.
Step #7: Run and Test Flutter Apps on Android and iOS
To run these Flutter apps on Android, simply click the play button in the Android Studio toolbar. Make sure your Android device is connected to your computer and appears in the Android Studio Toolbar.

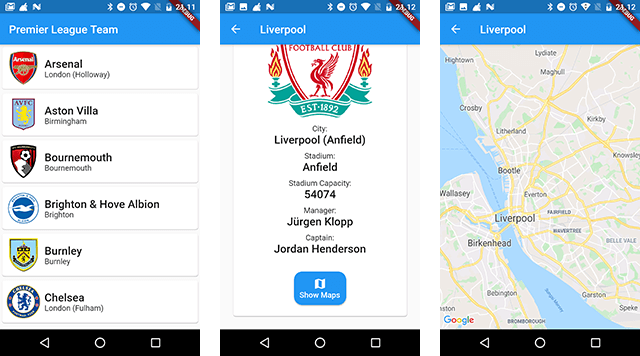
Here the working Flutter apps on an Android device look like.
To run this Flutter app on an iOS device, at least you must have Apple Developer personal account with your own domain (our example: com.djamware) as a bundle or package. Next, open the ios/Runner.xcworkspace in XCode, then click Runner in the Project Navigator.

In Runner.xcodeproj click the Build Settings tab.

Scroll down and find Signing, then choose Development Team for your Apple Developer personal account. Now, you can run the Flutter apps on iOS devices from Xcode or Android Studio. Here is what the Flutter apps on iOS devices look like.

That's the Flutter Tutorial: Create Native Android and iOS Apps Quickly. You can get the full source code from our GitHub.
That's just the basics. If you need more deep learning about Flutter and Dart, you can take the following cheap course:
- Flutter & Dart - The Complete Guide [2025 Edition]
- The Complete Flutter Development Bootcamp with Dart
- Complete Flutter Guide 2025: Build Android, iOS and Web apps
- Advanced Flutter: Build Enterprise-Ready Apps.
- Flutter , Nodejs, Express , MongoDB: Build Multi-Store App
- Flutter & Dart Essentials-Build Mobile Apps like a Pro
- Master Flutter with ML: Object Detection, OCR & Beyond
- Full-Stack Mobile Development: Flutter, Figma, and Firebase
- Dart & Flutter - Zero to Mastery [2025] + Clean Architecture
- Master Flame Game Engine with Flutter: Build 2D Mobile Games
Thanks!