
Building mobile apps that work offline is essential for users with limited or unstable connectivity. With React Native 8.0, you can create cross-platform Android and iOS apps that store and access data locally using SQLite, giving your app fast, reliable offline capabilities.
In this hands-on tutorial, you'll learn how to:
-
Initialize a React Native 8.0 project using the latest CLI
-
Integrate native SQLite storage for persistent offline data
-
Set up React Navigation for in-app screen flows
-
Implement CRUD operations: create, read, update, and delete entries offline
-
Test and run your app on both Android and iOS simulators/devices
Following modern React Native conventions, including npx, auto-linking, and Hooks-free architecture, you’ll get a clean, maintainable offline app ready for production deployment.
Create React Native App
Create a React Native application using React Native Community CLI.
npx @react-native-community/cli init RNSQLiteOffline
cd RNSQLiteOffline
That command will create a React Native app and then install all required modules. The app or project folder will contain these folders and files.

To run on an iOS device or simulator, run this command.
npx react-native run-iosRight after iOS build success and React Native starts, you will see this view in the iOS Simulator.

To run on an Android device or simulator, make sure ADB detects the device.
adb devices
List of devices attached
J8AXGF0194047T6    device
Next, type this command to run on the Android device or simulator.
npx react-native run-android
You will see this app on your Android device.

Add the Navigation Header and the required Screen
Above above-generated React Native App just shows a blank app with plain text. Now, we will show you how to add the Navigation Header (react-navigation and react-native-gesture-handler) and Home Screen for your app. So, it will look like the Native App. In the terminal or command line, type this command to install the React Navigation module, and don't forget to stop the running Metro Bundler before installing the modules.
npm i @react-navigation/native
npm i @react-navigation/native-stack
npm i react-native-gesture-handler
Next, create a folder for components and component files in the root of the app folder.
mkdir components
touch components/ProductScreen.tsx
touch components/ProductDetailsScreen.tsx
touch components/ProductAddScreen.tsx
touch components/ProductEditScreen.tsx
Open and edit `components/ProductScreen.tsx`, then add this React code.
import React from 'react';
import { View, Text, Button } from 'react-native';
import { NativeStackScreenProps } from '@react-navigation/native-stack';
import { RootStackParamList } from '../types/navigation'; // adjust path as needed

type Props = NativeStackScreenProps<RootStackParamList, 'Product'>;

const ProductScreen: React.FC<Props> = ({ navigation }) => {
  return (
    <View style={{ flex: 1, alignItems: 'center', justifyContent: 'center' }}>
      <Text>Product List</Text>
      <Button
        title="Go to Details"
        onPress={() => navigation.navigate('ProductDetails')}
      />
      <Button
        title="Go to Add Product"
        onPress={() => navigation.navigate('AddProduct')}
      />
      <Button
        title="Go to Edit Product"
        onPress={() => navigation.navigate('EditProduct')}
      />
    </View>
  );
};

export default ProductScreen;
Create a types folder and navigation file.
// navigation.ts
export type RootStackParamList = {
  Product: undefined;
  ProductDetails: undefined;
  AddProduct: undefined;
  EditProduct: undefined;
};
Open and edit `components/ProductDetailsScreen.tsx`, then add this React code.
import React from 'react';
import { View, Text, Button } from 'react-native';
import { NativeStackScreenProps } from '@react-navigation/native-stack';
import { RootStackParamList } from '../types/navigation'; // adjust path as needed

type Props = NativeStackScreenProps<RootStackParamList, 'ProductDetails'>;

const ProductDetailsScreen: React.FC<Props> = ({ navigation }) => {
  return (
    <View style={{ flex: 1, alignItems: 'center', justifyContent: 'center' }}>
      <Text>Product Details</Text>
      <Button
        title="Go to Details... again"
        onPress={() => navigation.push('ProductDetails')}
      />
      <Button
        title="Go to Home"
        onPress={() => navigation.navigate('Product')}
      />
      <Button
        title="Go back"
        onPress={() => navigation.goBack()}
      />
    </View>
  );
};

export default ProductDetailsScreen;
Open and edit `components/ProductAddScreen.tsx`, then add this React code.
import React from 'react';
import { View, Text, Button } from 'react-native';
import { NativeStackScreenProps } from '@react-navigation/native-stack';
import { RootStackParamList } from '../types/navigation'; // Adjust this path as needed

type Props = NativeStackScreenProps<RootStackParamList, 'AddProduct'>;

const ProductAddScreen: React.FC<Props> = ({ navigation }) => {
  return (
    <View style={{ flex: 1, alignItems: 'center', justifyContent: 'center' }}>
      <Text>Add Product</Text>
      <Button
        title="Go to Add Product... again"
        onPress={() => navigation.push('AddProduct')}
      />
      <Button
        title="Go to Home"
        onPress={() => navigation.navigate('Product')}
      />
      <Button
        title="Go back"
        onPress={() => navigation.goBack()}
      />
    </View>
  );
};

export default ProductAddScreen;
Open and edit `components/ProductEditScreen.js`, then add this React code.
import React from 'react';
import { View, Text, Button } from 'react-native';
import { NativeStackScreenProps } from '@react-navigation/native-stack';
import { RootStackParamList } from '../types/navigation'; // Adjust path if needed

type Props = NativeStackScreenProps<RootStackParamList, 'EditProduct'>;

const ProductEditScreen: React.FC<Props> = ({ navigation }) => {
  return (
    <View style={{ flex: 1, alignItems: 'center', justifyContent: 'center' }}>
      <Text>Edit Product</Text>
      <Button
        title="Go to Edit Product... again"
        onPress={() => navigation.push('EditProduct')}
      />
      <Button
        title="Go to Home"
        onPress={() => navigation.navigate('Product')}
      />
      <Button
        title="Go back"
        onPress={() => navigation.goBack()}
      />
    </View>
  );
};

export default ProductEditScreen;
Next, open and edit `App.tsx`, then replace all code with this.
import React from 'react';
import { NavigationContainer } from '@react-navigation/native';
import { createNativeStackNavigator } from '@react-navigation/native-stack';
import ProductScreen from './components/ProductScreen';
import ProductDetailsScreen from './components/ProductDetailsScreen';
import ProductAddScreen from './components/ProductAddScreen';
import ProductEditScreen from './components/ProductEditScreen';
import { RootStackParamList } from './types/navigation'; // adjust path if needed
const Stack = createNativeStackNavigator<RootStackParamList>();
const App = () => {
return (
<NavigationContainer>
<Stack.Navigator
initialRouteName="Product"
screenOptions={{
headerStyle: { backgroundColor: '#777777' },
headerTintColor: '#fff',
headerTitleStyle: { fontWeight: 'bold' },
}}
>
<Stack.Screen name="Product" component={ProductScreen} />
<Stack.Screen name="ProductDetails" component={ProductDetailsScreen} />
<Stack.Screen name="AddProduct" component={ProductAddScreen} />
<Stack.Screen name="EditProduct" component={ProductEditScreen} />
</Stack.Navigator>
</NavigationContainer>
);
};
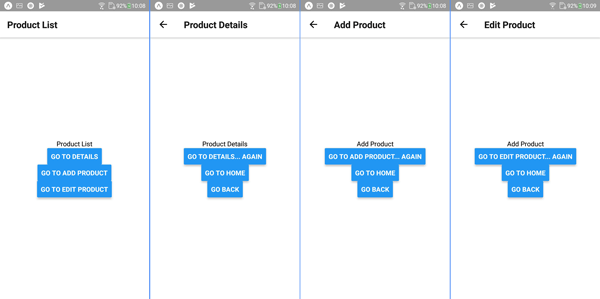
export default App;After re-running the React Native app on the iOS/Android Device/Simulator, you will see these updated views.
Install and Configure React Native SQLite Storage
Before creating an offline CRUD application using local data, we have to install the `react-native-sqlite-storage` and the required UI/UX module.
npm i @types/react-native-sqlite-storage
npm i react-native-paper
We will use a separate Class for accessing SQLite and do some CRUD (create, read, update, delete) operations. For that, create a new TypeScript file in the root of the project folder.
touch Database.tsOpen and edit `Database.ts`, then add these lines of TypeScript code.
import SQLite, { SQLiteDatabase, ResultSet, Transaction } from 'react-native-sqlite-storage';

SQLite.DEBUG(true);
SQLite.enablePromise(true);

const database_name = 'Reactoffline.db';

export interface Product {
    prodId: string;
    prodName: string;
    prodDesc: string;
    prodImage: string;
    prodPrice: string;
}

export default class Database {
    initDB(): Promise<SQLiteDatabase> {
        return new Promise((resolve, reject) => {
            (SQLite as any).echoTest()
                .then(() => {
                    SQLite.openDatabase({
                        name: database_name,
                        location: 'default',
                    })
                        .then((db) => {
                            db.executeSql('SELECT 1 FROM Product LIMIT 1')
                                .then(() => {
                                    resolve(db);
                                })
                                .catch(() => {
                                    db.transaction((tx) => {
                                        tx.executeSql(
                                            'CREATE TABLE IF NOT EXISTS Product (prodId TEXT PRIMARY KEY NOT NULL, prodName TEXT, prodDesc TEXT, prodImage TEXT, prodPrice TEXT)'
                                        );
                                    })
                                        .then(() => resolve(db))
                                        .catch((err) => reject(err));
                                });
                        })
                        .catch((err: any) => reject(err));
                })
                .catch((err: any) => reject(err));
        });
    }

    closeDatabase(db: SQLiteDatabase | null): void {
        if (db) {
            db.close()
                .then(() => console.log('Database CLOSED'))
                .catch((error) => console.log('Close DB error:', error));
        } else {
            console.log('Database was not OPENED');
        }
    }

    listProduct(): Promise<Product[]> {
        return new Promise((resolve, reject) => {
            const products: Product[] = [];
            this.initDB()
                .then((db) => {
                    db.transaction((tx) => {
                        tx.executeSql('SELECT * FROM Product', []).then(([_, results]) => {
                            const len = results.rows.length;
                            for (let i = 0; i < len; i++) {
                                const row = results.rows.item(i);
                                products.push({
                                    prodId: row.prodId,
                                    prodName: row.prodName,
                                    prodDesc: row.prodDesc,
                                    prodImage: row.prodImage,
                                    prodPrice: row.prodPrice,
                                });
                            }
                            resolve(products);
                        });
                    })
                        .then(() => this.closeDatabase(db))
                        .catch((err) => reject(err));
                })
                .catch((err) => reject(err));
        });
    }

    productById(id: string): Promise<Product> {
        return new Promise((resolve, reject) => {
            this.initDB()
                .then((db) => {
                    db.transaction((tx) => {
                        tx.executeSql('SELECT * FROM Product WHERE prodId = ?', [id]).then(([_, results]) => {
                            if (results.rows.length > 0) {
                                resolve(results.rows.item(0));
                            } else {
                                reject('Product not found');
                            }
                        });
                    })
                        .then(() => this.closeDatabase(db))
                        .catch((err) => reject(err));
                })
                .catch((err) => reject(err));
        });
    }

    addProduct(prod: Product): Promise<ResultSet> {
        return new Promise((resolve, reject) => {
            this.initDB()
                .then((db) => {
                    db.transaction((tx) => {
                        tx.executeSql(
                            'INSERT INTO Product (prodId, prodName, prodDesc, prodImage, prodPrice) VALUES (?, ?, ?, ?, ?)',
                            [prod.prodId, prod.prodName, prod.prodDesc, prod.prodImage, prod.prodPrice]
                        ).then(([_, result]) => resolve(result));
                    })
                        .then(() => this.closeDatabase(db))
                        .catch((err) => reject(err));
                })
                .catch((err) => reject(err));
        });
    }

    updateProduct(id: string, prod: Product): Promise<ResultSet> {
        return new Promise((resolve, reject) => {
            this.initDB()
                .then((db) => {
                    db.transaction((tx) => {
                        tx.executeSql(
                            'UPDATE Product SET prodName = ?, prodDesc = ?, prodImage = ?, prodPrice = ? WHERE prodId = ?',
                            [prod.prodName, prod.prodDesc, prod.prodImage, prod.prodPrice, id]
                        ).then(([_, result]) => resolve(result));
                    })
                        .then(() => this.closeDatabase(db))
                        .catch((err) => reject(err));
                })
                .catch((err) => reject(err));
        });
    }

    deleteProduct(id: string): Promise<ResultSet> {
        return new Promise((resolve, reject) => {
            this.initDB()
                .then((db) => {
                    db.transaction((tx) => {
                        tx.executeSql('DELETE FROM Product WHERE prodId = ?', [id]).then(([_, result]) => {
                            resolve(result);
                        });
                    })
                        .then(() => this.closeDatabase(db))
                        .catch((err) => reject(err));
                })
                .catch((err) => reject(err));
        });
    }
}
Show List of Products
To show or display the list of products, open and edit `components/ProductScreen.tsx`, then replace all.
import React, { useEffect, useState, useCallback } from 'react';
import {
  View,
  FlatList,
  StyleSheet,
  ActivityIndicator,
  Text,
  Image,
  TouchableOpacity,
} from 'react-native';
import { IconButton, useTheme } from 'react-native-paper';
import { NativeStackScreenProps } from '@react-navigation/native-stack';
import { RootStackParamList } from '../types/navigation';
import Database, { Product } from '../Database';

const db = new Database();

type Props = NativeStackScreenProps<RootStackParamList, 'Product'>;

const ProductScreen: React.FC<Props> = ({ navigation }) => {
  const [isLoading, setIsLoading] = useState(true);
  const [products, setProducts] = useState<Product[]>([]);
  const [notFound] = useState(
    'Products not found.\nPlease click (+) button to add it.',
  );
  const { colors } = useTheme();

  const getProducts = useCallback(() => {
    db.listProduct()
      .then(data => {
        setProducts(data);
        setIsLoading(false);
      })
      .catch(err => {
        console.error(err);
        setIsLoading(false);
      });
  }, []);

  useEffect(() => {
    const unsubscribe = navigation.addListener('focus', () => {
      setIsLoading(true);
      getProducts();
    });
    return unsubscribe;
  }, [navigation, getProducts]);

  useEffect(() => {
    navigation.setOptions({
      title: 'Product List',
      headerRight: () => (
        <IconButton
          icon="plus-circle"
          iconColor={colors.primary}
          size={28}
          onPress={() => navigation.navigate('AddProduct')}
        />
      ),
    });
  }, [navigation, colors]);

  const renderItem = ({ item }: { item: Product }) => (
    <TouchableOpacity
      style={styles.itemContainer}
      onPress={() =>
        navigation.navigate('ProductDetails', {
          prodId: item.prodId,
        })
      }
    >
      {item.prodImage ? (
        <Image source={{ uri: item.prodImage }} style={styles.avatar} />
      ) : (
        <View style={[styles.avatar, styles.avatarPlaceholder]}>
          <Text style={styles.avatarText}>{item.prodName[0]}</Text>
        </View>
      )}
      <Text style={styles.itemText}>{item.prodName}</Text>
    </TouchableOpacity>
  );

  if (isLoading) {
    return (
      <View style={styles.activity}>
        <ActivityIndicator size="large" color={colors.primary} />
      </View>
    );
  }

  if (products.length === 0) {
    return (
      <View style={styles.centered}>
        <Text style={styles.message}>{notFound}</Text>
      </View>
    );
  }

  return (
    <FlatList
      data={products}
      keyExtractor={item => item.prodId}
      renderItem={renderItem}
    />
  );
};

const styles = StyleSheet.create({
  activity: {
    flex: 1,
    justifyContent: 'center',
    alignItems: 'center',
  },
  centered: {
    flex: 1,
    justifyContent: 'center',
    alignItems: 'center',
    padding: 16,
  },
  message: {
    fontSize: 18,
    color: 'red',
    textAlign: 'center',
  },
  itemContainer: {
    flexDirection: 'row',
    alignItems: 'center',
    padding: 16,
    borderBottomColor: '#ddd',
    borderBottomWidth: 1,
  },
  itemText: {
    marginLeft: 12,
    fontSize: 16,
  },
  avatar: {
    width: 40,
    height: 40,
    borderRadius: 20,
  },
  avatarPlaceholder: {
    backgroundColor: '#ccc',
    justifyContent: 'center',
    alignItems: 'center',
  },
  avatarText: {
    fontWeight: 'bold',
    color: '#fff',
  },
});

export default ProductScreen;
Show Product Details and Delete Product
From the list of product views, you will see that the list item has an action button to show the product details. Next, open and edit `components/ProductDetailsScreen.tsx`, then replace all.
import React, { useEffect, useState, useCallback } from 'react';
import {
  View,
  StyleSheet,
  ScrollView,
  Image,
  ActivityIndicator,
  Text,
  Alert,
} from 'react-native';
import { Button, Card, useTheme } from 'react-native-paper';
import { NativeStackScreenProps } from '@react-navigation/native-stack';
import { RootStackParamList } from '../types/navigation';
import Database, { Product } from '../Database';

const db = new Database();

type Props = NativeStackScreenProps<RootStackParamList, 'ProductDetails'>;

const ProductDetailsScreen: React.FC<Props> = ({ navigation, route }) => {
  const { prodId } = route.params;
  const [product, setProduct] = useState<Product | null>(null);
  const [isLoading, setIsLoading] = useState(true);
  const { colors } = useTheme();

  const fetchProduct = useCallback(() => {
    db.productById(prodId)
      .then(data => {
        setProduct(data);
        setIsLoading(false);
      })
      .catch(err => {
        console.error(err);
        setIsLoading(false);
      });
  }, [prodId]);

  useEffect(() => {
    const unsubscribe = navigation.addListener('focus', fetchProduct);
    return unsubscribe;
  }, [navigation, fetchProduct]);

  const deleteProduct = () => {
    Alert.alert(
      'Delete Product',
      'Are you sure you want to delete this product?',
      [
        { text: 'Cancel', style: 'cancel' },
        {
          text: 'Delete',
          style: 'destructive',
          onPress: () => {
            setIsLoading(true);
            db.deleteProduct(prodId)
              .then(() => navigation.goBack())
              .catch(err => {
                console.error(err);
                setIsLoading(false);
              });
          },
        },
      ],
    );
  };

  if (isLoading) {
    return (
      <View style={styles.activity}>
        <ActivityIndicator size="large" color={colors.primary} />
      </View>
    );
  }

  if (!product) {
    return (
      <View style={styles.activity}>
        <Text style={{ color: colors.error }}>Product not found.</Text>
      </View>
    );
  }

  return (
    <ScrollView contentContainerStyle={styles.container}>
      <Card>
        <Card.Content>
          <View style={styles.subContainer}>
            <Image
              source={{ uri: product.prodImage }}
              style={styles.image}
              resizeMode="contain"
            />
            <Text style={styles.text}>Product ID: {product.prodId}</Text>
            <Text style={styles.text}>Product Name: {product.prodName}</Text>
            <Text style={styles.text}>Product Desc: {product.prodDesc}</Text>
            <Text style={styles.text}>Product Price: {product.prodPrice}</Text>
          </View>
          <View style={styles.buttonGroup}>
            <Button
              mode="contained"
              icon="pencil"
              style={styles.button}
              onPress={() =>
                navigation.navigate('EditProduct', { prodId: product.prodId })
              }
            >
              Edit
            </Button>
            <Button
              mode="contained"
              icon="delete"
              buttonColor={colors.error}
              textColor="#fff"
              style={styles.button}
              onPress={deleteProduct}
            >
              Delete
            </Button>
          </View>
        </Card.Content>
      </Card>
    </ScrollView>
  );
};

const styles = StyleSheet.create({
  container: {
    padding: 16,
  },
  subContainer: {
    alignItems: 'center',
    marginBottom: 16,
  },
  image: {
    width: 150,
    height: 150,
    marginBottom: 12,
  },
  text: {
    fontSize: 16,
    marginBottom: 4,
  },
  buttonGroup: {
    marginTop: 16,
    flexDirection: 'row',
    justifyContent: 'space-between',
  },
  button: {
    flex: 1,
    marginHorizontal: 4,
  },
  activity: {
    flex: 1,
    justifyContent: 'center',
    alignItems: 'center',
    padding: 24,
  },
});

export default ProductDetailsScreen;
Add Product
To add or save a new Product, open and edit the `components/ProductAddScreen.tsx`, then replace all.
import React, { useState } from 'react';
import {
  ScrollView,
  StyleSheet,
  View,
  KeyboardTypeOptions,
} from 'react-native';
import {
  TextInput,
  Button,
  ActivityIndicator,
  useTheme,
} from 'react-native-paper';
import { NativeStackScreenProps } from '@react-navigation/native-stack';
import { RootStackParamList } from '../types/navigation';
import Database from '../Database';

const db = new Database();

type Props = NativeStackScreenProps<RootStackParamList, 'AddProduct'>;

const ProductAddScreen: React.FC<Props> = ({ navigation }) => {
  const [prodId, setProdId] = useState('');
  const [prodName, setProdName] = useState('');
  const [prodDesc, setProdDesc] = useState('');
  const [prodImage, setProdImage] = useState('');
  const [prodPrice, setProdPrice] = useState('0');
  const [isLoading, setIsLoading] = useState(false);
  const { colors } = useTheme();

  const saveProduct = () => {
    setIsLoading(true);
    const data = {
      prodId,
      prodName,
      prodDesc,
      prodImage,
      prodPrice,
    };
    db.addProduct(data)
      .then(() => {
        setIsLoading(false);
        navigation.goBack();
      })
      .catch(err => {
        console.error(err);
        setIsLoading(false);
      });
  };

  if (isLoading) {
    return (
      <View style={styles.activity}>
        <ActivityIndicator size="large" color={colors.primary} />
      </View>
    );
  }

  return (
    <ScrollView style={styles.container}>
      <View style={styles.subContainer}>
        <TextInput
          label="Product ID"
          value={prodId}
          onChangeText={setProdId}
          mode="outlined"
        />
      </View>
      <View style={styles.subContainer}>
        <TextInput
          label="Product Name"
          value={prodName}
          onChangeText={setProdName}
          mode="outlined"
        />
      </View>
      <View style={styles.subContainer}>
        <TextInput
          label="Product Description"
          value={prodDesc}
          onChangeText={setProdDesc}
          mode="outlined"
          multiline
          numberOfLines={4}
        />
      </View>
      <View style={styles.subContainer}>
        <TextInput
          label="Product Image URL"
          value={prodImage}
          onChangeText={setProdImage}
          mode="outlined"
        />
      </View>
      <View style={styles.subContainer}>
        <TextInput
          label="Product Price"
          value={prodPrice}
          onChangeText={setProdPrice}
          keyboardType="numeric"
          mode="outlined"
        />
      </View>
      <View style={styles.button}>
        <Button mode="contained" icon="content-save" onPress={saveProduct}>
          Save
        </Button>
      </View>
    </ScrollView>
  );
};

const styles = StyleSheet.create({
  container: {
    flex: 1,
    padding: 20,
  },
  subContainer: {
    marginBottom: 16,
  },
  button: {
    marginTop: 24,
    alignSelf: 'center',
    width: '100%',
  },
  activity: {
    flex: 1,
    justifyContent: 'center',
    alignItems: 'center',
  },
});

export default ProductAddScreen;
Edit Product
To edit a product, open and edit `components/ProductEditScreen.tsx`, then replace all.
import React, { useEffect, useState } from 'react';
import { ScrollView, StyleSheet, View } from 'react-native';
import {
  TextInput,
  Button,
  ActivityIndicator,
  useTheme,
} from 'react-native-paper';
import { NativeStackScreenProps } from '@react-navigation/native-stack';
import { RootStackParamList } from '../types/navigation';
import Database from '../Database';

const db = new Database();

type Props = NativeStackScreenProps<RootStackParamList, 'EditProduct'>;

const ProductEditScreen: React.FC<Props> = ({ navigation, route }) => {
  const { prodId } = route.params;
  const [prodName, setProdName] = useState('');
  const [prodDesc, setProdDesc] = useState('');
  const [prodImage, setProdImage] = useState('');
  const [prodPrice, setProdPrice] = useState('0');
  const [isLoading, setIsLoading] = useState(true);
  const { colors } = useTheme();

  useEffect(() => {
    db.productById(prodId)
      .then(product => {
        setProdName(product.prodName);
        setProdDesc(product.prodDesc);
        setProdImage(product.prodImage);
        setProdPrice(product.prodPrice);
        setIsLoading(false);
      })
      .catch(err => {
        console.error(err);
        setIsLoading(false);
      });
  }, [prodId]);

  const updateProduct = () => {
    setIsLoading(true);
    const data = {
      prodId,
      prodName,
      prodDesc,
      prodImage,
      prodPrice,
    };
    db.updateProduct(prodId, data)
      .then(() => {
        setIsLoading(false);
        navigation.goBack();
      })
      .catch(err => {
        console.error(err);
        setIsLoading(false);
      });
  };

  if (isLoading) {
    return (
      <View style={styles.activity}>
        <ActivityIndicator size="large" color={colors.primary} />
      </View>
    );
  }

  return (
    <ScrollView style={styles.container}>
      <View style={styles.subContainer}>
        <TextInput label="Product ID" value={prodId} mode="outlined" disabled />
      </View>
      <View style={styles.subContainer}>
        <TextInput
          label="Product Name"
          value={prodName}
          onChangeText={setProdName}
          mode="outlined"
        />
      </View>
      <View style={styles.subContainer}>
        <TextInput
          label="Product Description"
          value={prodDesc}
          onChangeText={setProdDesc}
          mode="outlined"
          multiline
          numberOfLines={4}
        />
      </View>
      <View style={styles.subContainer}>
        <TextInput
          label="Product Image URL"
          value={prodImage}
          onChangeText={setProdImage}
          mode="outlined"
        />
      </View>
      <View style={styles.subContainer}>
        <TextInput
          label="Product Price"
          value={prodPrice}
          onChangeText={setProdPrice}
          keyboardType="numeric"
          mode="outlined"
        />
      </View>
      <View style={styles.button}>
        <Button mode="contained" icon="content-save" onPress={updateProduct}>
          Save
        </Button>
      </View>
    </ScrollView>
  );
};

const styles = StyleSheet.create({
  container: {
    flex: 1,
    padding: 20,
  },
  subContainer: {
    marginBottom: 16,
  },
  button: {
    marginTop: 24,
    alignSelf: 'center',
    width: '100%',
  },
  activity: {
    flex: 1,
    justifyContent: 'center',
    alignItems: 'center',
  },
});

export default ProductEditScreen;
Add react-native-paper to App.tsx:
import React from 'react';
import { NavigationContainer } from '@react-navigation/native';
import { createNativeStackNavigator } from '@react-navigation/native-stack';
import ProductScreen from './components/ProductScreen';
import ProductDetailsScreen from './components/ProductDetailsScreen';
import ProductAddScreen from './components/ProductAddScreen';
import ProductEditScreen from './components/ProductEditScreen';
import { RootStackParamList } from './types/navigation'; // adjust path if needed
import { PaperProvider } from 'react-native-paper';

const Stack = createNativeStackNavigator<RootStackParamList>();

const App = () => {
  return (
    <PaperProvider>
      <NavigationContainer>
        <Stack.Navigator
          initialRouteName="Product"
          screenOptions={{
            headerStyle: { backgroundColor: '#777777' },
            headerTintColor: '#fff',
            headerTitleStyle: { fontWeight: 'bold' },
          }}
        >
          <Stack.Screen name="Product" component={ProductScreen} />
          <Stack.Screen
            name="ProductDetails"
            component={ProductDetailsScreen}
          />
          <Stack.Screen name="AddProduct" component={ProductAddScreen} />
          <Stack.Screen name="EditProduct" component={ProductEditScreen} />
        </Stack.Navigator>
      </NavigationContainer>
    </PaperProvider>
  );
};

export default App;
Run and Test React Native and SQLite Offline Mobile App
As we showed you in the first step, run the React Native and SQLite app using this command.
npx react-native run-android
npx react-native run-ios
Now, you will see the whole application on the Android/iOS Device.


Conclusion
In this updated tutorial for React Native 0.80.0 and React 19.1.0, we’ve walked through creating an offline-enabled mobile app using SQLite for local storage:
-
Project setup with the modern RN CLI (
npx react-native init) -
React Navigation configuration for smooth screen transitions
-
Native SQLite integration for efficient local database handling
-
Complete CRUD implementation, allowing data to be added, viewed, edited, and deleted offline
-
Cross-platform testing on both Android and iOS environments
This solid foundation empowers you to build robust, offline-capable mobile applications in React Native 8.0. You can further enhance the app with features like:
-
Data syncing to remote servers when online
-
Optimistic UI updates and error handling
-
Advanced navigation strategies or deep linking
-
Encryption of local data using secure storage
You can get the full source code from our GitHub.
That's just the basics. If you need more deep learning about React Native, you can take the following cheap course:
- React Native - The Practical Guide [2025]
- The Complete React Native + Hooks Course
- The Best React Native Course 2025 (From Beginner To Expert)
- React Native: Mobile App Development (CLI) [2025]
- React - The Complete Guide 2025 (incl. Next.js, Redux)
- React Native Development Simplified [2025]
- React Native by Projects: From Basics to Pro [2025]
- Full Stack Ecommerce Mobile App: React Native & Node.js 2025
- Learning Management System Mobile App using React Native
- React Native: Advanced Concepts
Thanks!