
The simple step by step tutorial on places searches using Ionic 3, Angular 5, Google Places and Google Maps API. In this tutorial, we use Google Places and Maps Javascript API. There are a lot of features in Google Places API, including search places, places autocomplete and places nearby. The scenario for this tutorial just shows maps that show places nearby my location.
Jumps to the steps:
- Setup Google Places and Maps Javascript API
- Create a new Ionic 3 and Angular 5 App
- Configure Google Maps and Places Javascript APIs
- Change Marker Icon and Display Places Details
- Troubleshooting
The Places API is a service that returns information about places using HTTP requests. Places are defined within this API as establishments, geographic locations, or prominent points of interest. Each of the services is accessed as an HTTP request and returns either a JSON or XML response. All requests to a Places service must use the https:// protocol and include an API key.
The following tools, frameworks, and modules are required for this tutorial:
- Node.js
- Ionic 3
- Angular 5
- Google Places Javascript API
- Google Maps Javascript API
- Terminal or Node Command Line
- Text Editor or IDE
Before the move to the main steps, make sure Node.js is installed and runnable correctly. Open the Terminal or Node command line then type this command.
node -vAnd this is the Node version that we use.
v8.9.4
Setup Google Places and Maps Javascript API
Open your browser then go to `https://console.developers.google.com` address. Login using your Google account and you will be redirected to API dashboard.

If you don't have a project yet, click the drop-down menu on the right side of the Google APIs logo.

Click the plus button to create a new project.

Fill the project name and click `Create` button. As you see, our Google APIs has reached maximum project, so we will use our existing project for this tutorial. After creating a new project, it will back to the project dashboard. Click the `Enable APIs and Services` button then click `View All` in the Maps category.

Find and click `Google Places API Web Service`.

Click the `ENABLE` button to enable the Google Places API Web Service. Back to the project dashboard then do the same way to enable Google Maps Javascript API. Now, click the `Credentials` menu on the left menu then click `Create Credentials` drop-down button.

Choose `API Key` then it will create an API Key. Write down and save to your notepad or text editor for use later.
Create a new Ionic 3 and Angular 5 App
To create a new Ionic 3 and Angular 5 app, in the terminal go to your Ionic projects folder then type this command.
ionic start ionic-places blankThat command will create a new Ionic 3 and Angular 5 app with the name `ionic-places` and blank template (just Homepage). It also installing required NPM packages automatically. If there's a question like this.
Would you like to integrate your new app with Cordova to target native iOS and Android? (y/N)Just skip it by press `Enter` or `N` because we will primarily use the browser for testing. Next, go to the newly created app folder.
cd ./ionic-placesAs usual, for sanitation purpose run the Ionic 3 and Angular 5 app in the browser.
ionic serve -lIf you see the Ionic 3 blank page in the browser like below, then you can move to the next steps.

Configure Google Maps and Places Javascript APIs
To integrated Google Maps and Places Javascript APIs for The Ionic 3 app, open and edit `src/index.html` then add this script reference before the closing of the body tag.
<script src="https://maps.googleapis.com/maps/api/js?key=YOUR_API_KEY&libraries=places"></script>Replace `YOUR_API_KEY` with the Google API Key that you write to the Notepad in the previous step. Next, open and edit `src/pages/home/home.html` then replace all HTML tags with this.
<ion-header>
  <ion-navbar>
    <ion-title>
      Google Places
    </ion-title>
  </ion-navbar>
</ion-header>

<ion-content>
  <div #map id="map"></div>
</ion-content>
Open and edit `src/pages/home/home.scss` then replace all SCSS syntax with this.
page-home {
  #map {
    height: 100%;
  }
}
Next, open and edit `src/pages/home/home.ts` then add/replace these imports of Angular Component, ViewChild, ElementRef, Ionic-Angular NavController, and Platform.
import { Component, ViewChild, ElementRef } from '@angular/core';
import { NavController, Platform } from 'ionic-angular';
Declare Google maps required variables before the class name and `@Component`.
declare var google;
let map: any;
let infowindow: any;
let options = {
  enableHighAccuracy: true,
  timeout: 5000,
  maximumAge: 0
};
Add this variable before the constructor for identify map div in the HTML view.
@ViewChild('map') mapElement: ElementRef;Add function for initializing Browser Geolocation, Google maps and places search by nearby.
initMap() {
  navigator.geolocation.getCurrentPosition((location) => {
    console.log(location);
    map = new google.maps.Map(this.mapElement.nativeElement, {
      center: {lat: location.coords.latitude, lng: location.coords.longitude},
      zoom: 15
    });

    infowindow = new google.maps.InfoWindow();
    var service = new google.maps.places.PlacesService(map);
    service.nearbySearch({
      location: {lat: location.coords.latitude, lng: location.coords.longitude},
      radius: 1000,
      type: ['store']
    }, (results,status) => {
      if (status === google.maps.places.PlacesServiceStatus.OK) {
        for (var i = 0; i < results.length; i++) {
          this.createMarker(results[i]);
        }
      }
    });
  }, (error) => {
    console.log(error);
  }, options);
  var myplace = {lat: -33.8665, lng: 151.1956};
}
Create a function for displaying founded places markers that called from `initMap` function.
createMarker(place) {
  var placeLoc = place.geometry.location;
  var marker = new google.maps.Marker({
    map: map,
    position: placeLoc
  });

  google.maps.event.addListener(marker, 'click', function() {
    infowindow.setContent(place.name);
    infowindow.open(map, this);
  });
}
That's it the basic Google maps and places initial that loaded places by nearby location with radius 1000 meters. Here we use browser geolocation to get the current geolocation latitude and longitude. We will move to use Ionic 3 Cordova Geolocation Native plugin when we test this app in the real Android/iOS devices.
Now, you can test it on the browser. Just type this command again.
ionic serve -lYou will get the places with the type of `store` that nearby your current location.

Change Marker Icon and Display Places Details
To change the marker icon, open and edit `src/pages/home/home.ts` then modify `createMarker` function add this variable inside that function block.
var image = {
  url: place.icon,
  size: new google.maps.Size(71, 71),
  origin: new google.maps.Point(0, 0),
  anchor: new google.maps.Point(17, 34),
  scaledSize: new google.maps.Size(25, 25)
};
Add icon inside marker variable.
var marker = new google.maps.Marker({
map: map,
position: placeLoc,
icon: image
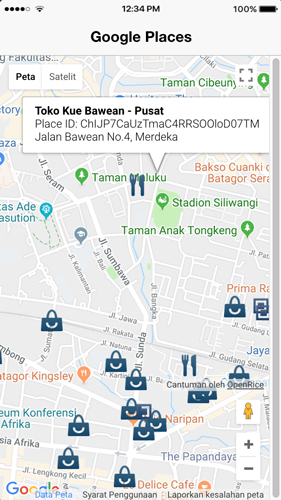
});To display details of the places that clicked from the marker. Simply change `infowindow.setContent` inside markers event listener.
google.maps.event.addListener(marker, 'click', function() {
  // infowindow.setContent(place.name);
  // infowindow.open(map, this);
  infowindow.setContent('<div><strong>' + place.name + '</strong><br>' +
    'Place ID: ' + place.place_id + '<br>' +
    place.vicinity + '</div>');
  infowindow.open(map, this);
});
Now, you will see different marker icon and place details when you click the marker.
Troubleshooting
Sometimes you will be facing this error when using Google Maps Javascript APIs.
ERROR ReferenceError: google is not defined
This can cause by Google maps initialize before it's completely loaded from Google Javascript APIs. The solution to this problem:
- Make sure you are using correct API_KEY
- Make sure you have enabled Google Maps Javascript API
- Add built-in Ionic 3 platform ready before the call or initialize the maps
import { NavController, Platform } from 'ionic-angular';
...
constructor(public navCtrl: NavController, public platform: Platform) {
  platform.ready().then(() => {
    this.initMap();
  });
}
To make geolocation working on the device, you can use Ionic 3 Cordova Native Geolocation Plugin and here our tutorial.
That it's, for the complete reference of Google Maps and Places APIs you can refer directly to Google official documentation here. This tutorial comes with full working source code from our GitHub.
We know that building beautifully designed Ionic apps from scratch can be frustrating and very time-consuming. Check Ionic 6 - Full Starter App and save development and design time. Android, iOS, and PWA, 100+ Screens and Components, the most complete and advanced Ionic Template.
That's just the basics. If you need more deep learning about Ionic, Angular, and TypeScript, you can take the following cheap course:
- Ionic - Build iOS, Android & Web Apps with Ionic & Angular
- Master Ionic 8+: Beginner to Expert Food Delivery App Course
- Ionic 8+ Masterclass:Build Real-Time Chat Apps with Firebase
- Ionic 8+ & Supabase Full-Stack Mastery: Build Real-Time Apps
- Learn Ionic React By Building a WhatsApp Clone
- Progressive Web Apps (PWA) - The Complete Guide
- IONIC - Build Android & Web Apps with Ionic
- Ionic Framework with VueJS: Build a CRUD App Using SQLite
- Angular, Ionic & Node: Build A Real Web & Mobile Chat App
- Ionic Apps with Firebase
Thanks!