
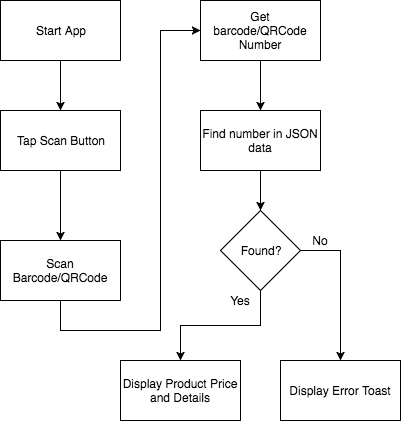
This tutorial shows you how to create an example of Ionic 3, Angular 4 and Cordova Barcode and QR code Scanner using Ionic 3 Native Barcode Scanner. Actually, there is an Ionic 3 QR Scanner plugin, but we decide to use this Barcode plugin that can scan both Barcode and QR code. This barcode and QR code scanner example is price checker app. So, the app will use local JSON data to get a price by barcode or QR code number. Here's the app flow.
Jumps to the steps:
- Create a new Ionic 3 and Angular 4 App
- Add and Configure Ionic 3 Native Barcode and Toast Plugin
- Implement Ionic 3 Barcode or QR code scanner
- Test the Ionic 3 Barcode/QRCode Scanner App on the Real Device
The following tools, modules, and dependencies should prepare before starting the tutorial:
- Node.js (Stable or recommended version)
- Latest Ionic 3, Angular 4 and Cordova
- Ionic Native Barcode Scanner Plugin
- Ionic Native Toast Plugin
- Terminal or Command Line
- Text Editor or IDE
- Android Studio and XCode (Mac OS only)
- Android or iOS device
We assume that you have installed Node.js and able to run `npm` in Node.js command line (Windows) or Terminal (OS X/Linux). To make sure everything is up to date, type this command in the terminal or Node command line.
npm install -g ionic cordovaSometimes on OS X terminal need `sudo` for that command.
Create a new Ionic 3 and Angular 4 App
As usual, we start tutorial from scratch or from zero. In the terminal or Node command line type this command to create a new Ionic 3 and Angular 4 app. Make sure you are in your projects folder.
ionic start ionic3-barcode blankGo to the newly created app folder.
cd ionic3-barcodeRun the app for the browser to make sure everything working properly by type this command.
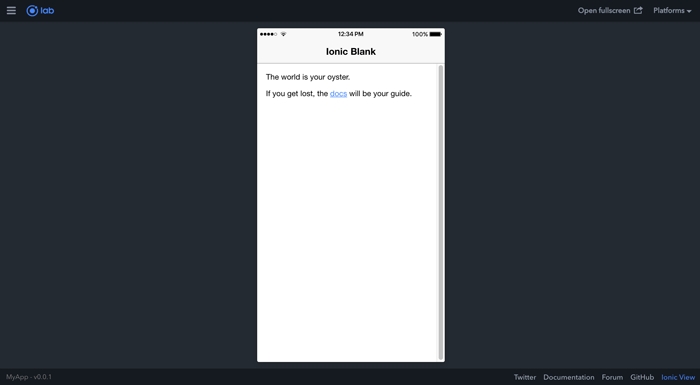
ionic serve --labIf you see this page in your browser then you are ready to move.
Add and Configure Ionic 3 Native Barcode and Toast Plugin
To add Ionic 3 Native Barcode (phonegap-plugin-barcodescanner) and Toast (cordova-plugin-x-toast) plugin, just type this commands.
ionic cordova plugin add phonegap-plugin-barcodescanner
npm install --save @ionic-native/barcode-scanner
ionic cordova plugin add cordova-plugin-x-toast
npm install --save @ionic-native/toast
Now, open and edit `src/app/app.module.ts` then add these imports of BarcodeScanner (@ionic-native/barcode-scanner) and Toast (@ionic-native/toast).
import { BarcodeScanner } from '@ionic-native/barcode-scanner';
import { Toast } from '@ionic-native/toast';
Add `BarcodeScanner` and `Toast` to `@NgModule` providers, so it will look like this.
providers: [
  StatusBar,
  SplashScreen,
  {provide: ErrorHandler, useClass: IonicErrorHandler},
  BarcodeScanner,
  Toast
]
Implement Ionic 3 Barcode or QR code scanner
Before implementing Ionic 3 Barcode or QR code scanner on view and controller, first we have to make a JSON file for product data. Create a new folder inside `src/assets` by type this command.
mkdir src/assets/dataInside that new folder create a new JSON file.
touch src/assets/data/products.jsonNow, fill the JSON file with single data like this.
[
  {
    "plu":"01234567895",
    "name":"Gaming DDR5 RAM 16GB",
    "price":76,
    "desc":"Gaming DDR5 RAM 16GB PC-128000 For x64 PC"
  },
  {
    "plu":"01234567898",
    "name":"Intel Core i7 3.3GHz",
    "price":200,
    "desc":"Intel Core i7 3.3GHz L2 16MB 4.6ns"
  }
]
Next, create a service or provider for accessing the JSON data by typing this command.
ionic g provider DataServiceOpen and edit `src/providers/data-service/data-service.ts` then add this function after the constructor.
getListDetails(){
  return this.http.get('assets/data/products.json')
    .map((response:Response)=>response.json());
}
Don't forget to register `HttpModule` in `src/app/app.module.ts` by adding this import.
import { HttpModule } from '@angular/http';And declare this `HttpModule` in `@NgModule` imports.
imports: [
  BrowserModule,
  IonicModule.forRoot(MyApp),
  HttpModule
],
Now, open and edit `src/pages/home/home.ts` then add these imports of BarcodeScanner (@ionic-native/barcode-scanner), Toast (@ionic-native/toast), and DataServiceProvider.
import { BarcodeScanner } from '@ionic-native/barcode-scanner';
import { Toast } from '@ionic-native/toast';
import { DataServiceProvider } from '../../providers/data-service/data-service';
And inject all of that imports to the constructor.
constructor(public navCtrl: NavController,
  private barcodeScanner: BarcodeScanner,
  private toast: Toast,
  public dataService: DataServiceProvider) {}
Declare these variables before the constructor.
products: any[] = [];
selectedProduct: any;
productFound:boolean = false;
Add this function to get JSON data inside the constructor body.
this.dataService.getProducts()
  .subscribe((response)=> {
      this.products = response
      console.log(this.products);
  });
Create a new function for scan barcode or QRCode.
scan() {
  this.selectedProduct = {};
  this.barcodeScanner.scan().then((barcodeData) => {
    this.selectedProduct = this.products.find(product => product.plu === barcodeData.text);
    if(this.selectedProduct !== undefined) {
      this.productFound = true;
    } else {
      this.productFound = false;
      this.toast.show(`Product not found`, '5000', 'center').subscribe(
        toast => {
          console.log(toast);
        }
      );
    }
  }, (err) => {
    this.toast.show(err, '5000', 'center').subscribe(
      toast => {
        console.log(toast);
      }
    );
  });
}
Now, open and edit `src/pages/home/home.html` then add these lines to `<ion-content>`.
<h1>
  <button ion-button color="dark" full round (click)="scan()">Start Scan</button>
</h1>

<ion-card *ngIf="productFound">
  <ion-card-header>
    <h2>Price: $ {{selectedProduct.price}}</h2>
  </ion-card-header>
  <ion-card-content>
    <ul>
      <li>{{selectedProduct.plu}}</li>
      <li>{{selectedProduct.name}}</li>
      <li>{{selectedProduct.desc}}</li>
    </ul>
  </ion-card-content>
</ion-card>
Test the Ionic 3 Barcode/QRCode Scanner App on the Real Device
Before test on the real devices make sure you have connected your Android/iOS device to your computer. For safety, add remove Ionic Cordova Android/iOS platform.
ionic cordova platform rm android
ionic cordova platform add android
ionic cordova platform rm ios
ionic cordova platform add ios
Now, run on your Android/iOS device.
ionic cordova run androidor
ionic cordova run iosYou will land on this page.

Go to online barcode generator or QR code generator to create your barcode or QR code then scan it. If found you see the product price and details below the scan button.

Otherwise, you will see Toast with `Not found` message.
That it's, please leave your comment, suggestion or critics below. You can find the working source code on our GitHub.
We know that building beautifully designed Ionic apps from scratch can be frustrating and very time-consuming. Check Ionic 4 - Full Starter App and save development and design time. Android, iOS, and PWA, 100+ Screens and Components, the most complete and advance Ionic Template.
That just the basic. If you need more deep learning about Ionic, Angular, and Typescript, you can take the following cheap course:
- IONIC 4 Design Hybrid Mobile Applications IOS & Android
- Wordpress Rest API and Ionic 4 (Angular) App With Auth
- Mobile App from Development to Deployment - IONIC 4
- Ionic 4 Crash Course with Heartstone API & Angular
- Ionic 4 Mega Course: Build 10 Real World Apps
Thanks!