
This is an example of a multi-level accordion menu with dynamic data using latest Ionic 3 and Angular 4. Previously we have created the simple hardcoded accordion list using Ionic 2 and Angular 2 in this tutorial.
Table of Contents:
- Create New Ionic 3 and Angular 4 Side Menu App
- Create Nested Array of Objects
- Create and Call Service/Provider for Accessing Data
- Create Multilevel Accordion Menu
Another name of Accordion is the collapsible list. The accordion is a graphical control element comprising a vertically stacked list of items, such as labels or thumbnails. Each item can be "expanded" or "collapsed" to reveal the content associated with that item. There can be zero expanded items, exactly one, or more than one item expanded at a time, depending on the configuration.
Create New Ionic 3 and Angular 4 Side Menu App
We will start this tutorial by creating new Ionic 3 and Angular 4 app. This time we will use generated side menu app. Open and edit the terminal or Node.js command line then type this command.
ionic start ionic3-accordion-menu sidemenu --v2Or if you are using the latest Ionic CLI, type this command.
ionic start ionic3-accordion-menu sidemenu --type ionic-angularThat command will create new Ionic 3 app with the name 'ionic3-accordion-menu' using default template 'sidemenu'. Go to the newly created app folder.
cd ionic3-accordion-menuRun the Ionic 3 app on the browser.
ionic serve -lYou should see this side menu.
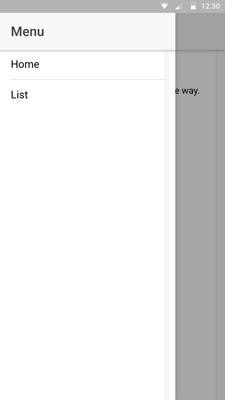
Right now, we will skip lazy loading pages configuration because we will focus only on the multilevel accordion menu. You can find more about lazy loading and Ionic 3 getting started here.
Create Nested Array of Objects
We have to create nested Array of objects which it's contains multilevel arrays. Create a new folder and JSON file in the asset folder.
mkdir src/assets/data
touch src/assets/data/menus.json
Open and edit 'menus.json' then add this lines of data.
[
  {
    "category":"PC",
    "subs": [
      {
        "subcategory":"Processor",
        "manufactures": [
          {
            "manufacture":"Intel"
          },
          {
            "manufacture":"AMD"
          }
        ]
      },
      {
        "subcategory":"Motherboard",
        "manufactures": [
          {
            "manufacture":"Asus"
          },
          {
            "manufacture":"AMD"
          },
          {
            "manufacture":"GigaByte"
          },
          {
            "manufacture":"Intel"
          }
        ]
      },
      {
        "subcategory":"Memory",
        "manufactures": [
          {
            "manufacture":"Visipro"
          },
          {
            "manufacture":"Crucial"
          },
          {
            "manufacture":"VenomRX"
          }
        ]
      }
    ]
  },
  {
    "category":"Laptop",
    "subs": [
      {
        "subcategory":"Notebook",
        "manufactures": [
          {
            "manufacture":"Lenovo"
          },
          {
            "manufacture":"Dell"
          }
        ]
      },
      {
        "subcategory":"Netbook",
        "manufactures": [
          {
            "manufacture":"Lenovo"
          },
          {
            "manufacture":"Dell"
          },
          {
            "manufacture":"Acer"
          },
          {
            "manufacture":"HP"
          }
        ]
      }
    ]
  },
  {
    "category":"Printer",
    "subs": [
      {
        "subcategory":"Laserjet",
        "manufactures": [
          {
            "manufacture":"HP"
          },
          {
            "manufacture":"Brother"
          },
          {
            "manufacture":"Canon"
          },
          {
            "manufacture":"Samsung"
          }
        ]
      },
      {
        "subcategory":"Deskjet",
        "manufactures": [
          {
            "manufacture":"HP"
          },
          {
            "manufacture":"Canon"
          },
          {
            "manufacture":"Epson"
          }
        ]
      }
    ]
  }
]
Create and Call Service/Provider for Accessing Data
To access JSON data we have to create new service or provider to keep app modular. Type this command to create it.
ionic g provider DataServiceOpen and edit 'src/providers/data-service.ts' add 'Response' to 'Http' import.
import { Http, Response } from "@angular/http";Create this function for call JSON data.
getMenus(){
  return this.http.get('assets/data/menus.json')
   .map((response:Response)=>response.json());
}
Register this service in 'app.module.ts' by open and edit 'src/app/app.module.ts' then add this import.
import { HttpModule } from '@angular/http';
import { DataService } from '../providers/data-service';
Add 'HttpModule' in '@NgModule' imports.
...
imports: [
  BrowserModule,
  IonicModule.forRoot(MyApp),
],
...
Add 'DataService' in '@NgModule' providers.
...
providers: [
  StatusBar,
  SplashScreen,
  {provide: ErrorHandler, useClass: IonicErrorHandler},
  DataService
]
...
Because menu holds by component, we have to edit it to call data for the menu from service/provider. Open and edit 'src/app/app.component.ts' then add this import.
import { DataService } from '../providers/data-service';Replace this line.
pages: Array<{title: string, component: any}>;With this.
pages: any;Now, inject 'DataService' in constructor parameter and add this function for calling JSON data inside of the constructor.
constructor(public platform: Platform, public statusBar: StatusBar, public splashScreen: SplashScreen, public dataService: DataService) {
  this.initializeApp();

  this.dataService.getMenus()
    .subscribe((response)=> {
        this.pages = response;
        console.log(this.pages);
    });

}
Create Multilevel Accordion Menu
Now, is the point. Creating multilevel Accordion Menu with Ionic 3 and Angular 4. Open and edit 'src/app/app.html' the add this lines of codes inside '<ion-content>'.
<ion-content>
  <ion-list>
    <ion-item *ngFor="let p of pages" text-wrap>
      {{p.category}}
      <ion-list>
        <ion-item *ngFor="let s of p.subs" text-wrap>
          {{s.subcategory}}
          <ion-list>
            <ion-item *ngFor="let m of s.manufactures" text-wrap>
              {{m.manufacture}}
            </ion-item>
          </ion-list>
        </ion-item>
      </ion-list>
    </ion-item>
  </ion-list>
</ion-content>
After we re-run the Ionic 3 app, the menu should look like this.
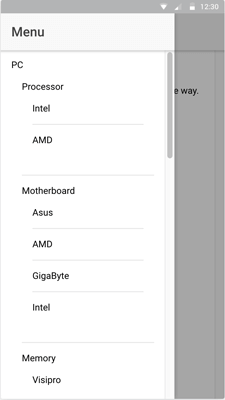
As you can see, there is 3 level of the menu. For that, we have to make accordion to hide child menus. Open and edit 'src/app/app.component.ts' then declare this variable.
showLevel1 = null;
showLevel2 = null;
Create new functions for toggle show/hide level 2 and level 3 of the menu.
toggleLevel1(idx) {
  if (this.isLevel1Shown(idx)) {
    this.showLevel1 = null;
  } else {
    this.showLevel1 = idx;
  }
};

toggleLevel2(idx) {
  if (this.isLevel2Shown(idx)) {
    this.showLevel1 = null;
    this.showLevel2 = null;
  } else {
    this.showLevel1 = idx;
    this.showLevel2 = idx;
  }
};
Also, create the function for check if level 2 and 3 is shown or hidden.
isLevel1Shown(idx) {
  return this.showLevel1 === idx;
};

isLevel2Shown(idx) {
  return this.showLevel2 === idx;
};
Now, open and edit 'src/app/app.html' then replace all list with this list.
<ion-content>
<ion-list>
<ion-item *ngFor="let p of pages; let i=index" text-wrap (click)="toggleLevel1('idx'+i)" [ngClass]="{active: isLevel1Shown('idx'+i)}">
<h4>
{{p.category}}
<ion-icon color="success" item-right [name]="isLevel1Shown('idx'+i) ? 'arrow-dropdown' : 'arrow-dropright'"></ion-icon>
</h4>
<ion-list *ngIf="isLevel1Shown('idx'+i)">
<ion-item *ngFor="let s of p.subs; let i2=index" text-wrap (click)="toggleLevel2('idx'+i+'idx'+i2)" [ngClass]="{active: isLevel2Shown('idx'+i+'idx'+i2)}">
<h4>
{{s.subcategory}}
<ion-icon color="success" item-right [name]="isLevel2Shown('idx'+i+'idx'+i2) ? 'arrow-dropdown' : 'arrow-dropright'"></ion-icon>
</h4>
<ion-list *ngIf="isLevel2Shown('idx'+i+'idx'+i2)">
<ion-item *ngFor="let m of s.manufactures" text-wrap>
{{m.manufacture}}
</ion-item>
</ion-list>
</ion-item>
</ion-list>
</ion-item>
</ion-list>
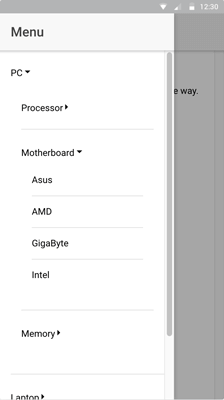
</ion-content>Then re-run the Ionic 3 app and see the results in the browser.
That it's for now, we are leaving this tutorial without action for click on each menu item. We know this isn't a best and simple way for creating multiple accordions. For that, we need suggestions and best algorithm to make this tutorial better and useful for everyone.
You can find the source code on our GitHub.
We know that building beautifully designed Ionic apps from scratch can be frustrating and very time-consuming. Check Ionic 4 - Full Starter App and save development and design time. Android, iOS, and PWA, 100+ Screens and Components, the most complete and advance Ionic Template.
That just the basic. If you need more deep learning about Ionic, Angular, and Typescript, you can take the following cheap course:
- IONIC 4 Design Hybrid Mobile Applications IOS & Android
- Wordpress Rest API and Ionic 4 (Angular) App With Auth
- Mobile App from Development to Deployment - IONIC 4
- Ionic 4 Crash Course with Heartstone API & Angular
- Ionic 4 Mega Course: Build 10 Real World Apps
Thanks.